A complete guide for testing in React using Jest along with code coverage report

Full Stack Developer | Freelancer | JavaScript | React | Nodejs.
Loves sharing knowledge through technical articles.
Dev.to: https://dev.to/myogeshchavan97
https://linktr.ee/myogeshchavan97
Writing test cases is an important part of React development. Each component should have a test case written correctly so by just running a single command we can make sure that our entire application works correctly no matter how big the application is.
So if some API call is failing because the server is down or there is some issue processing request we can easily catch it before the application is deployed to production by just running a single command.
Therefore writing unit tests in React is very important and every React developer should know how to write the test cases.
In this article, we will explore all of that.
So let’s get started
To start with, clone the todo list repository code from HERE which is created to demonstrate localStorage in this article
Once cloned, run the application by executing the following commands:
- npm install
- npm start
Now we will start writing test cases using Jest Framework.
When using create-react-app, jest is already included so there is no need of installing it separately as in our case.
We will write a simple test case to understand jest and then we will start writing test cases for the todo app.
Create a new folder named tests inside src folder and add a simple test file with the name app.test.js with following code:
// app.test.js
const add = (a, b) => a + b;
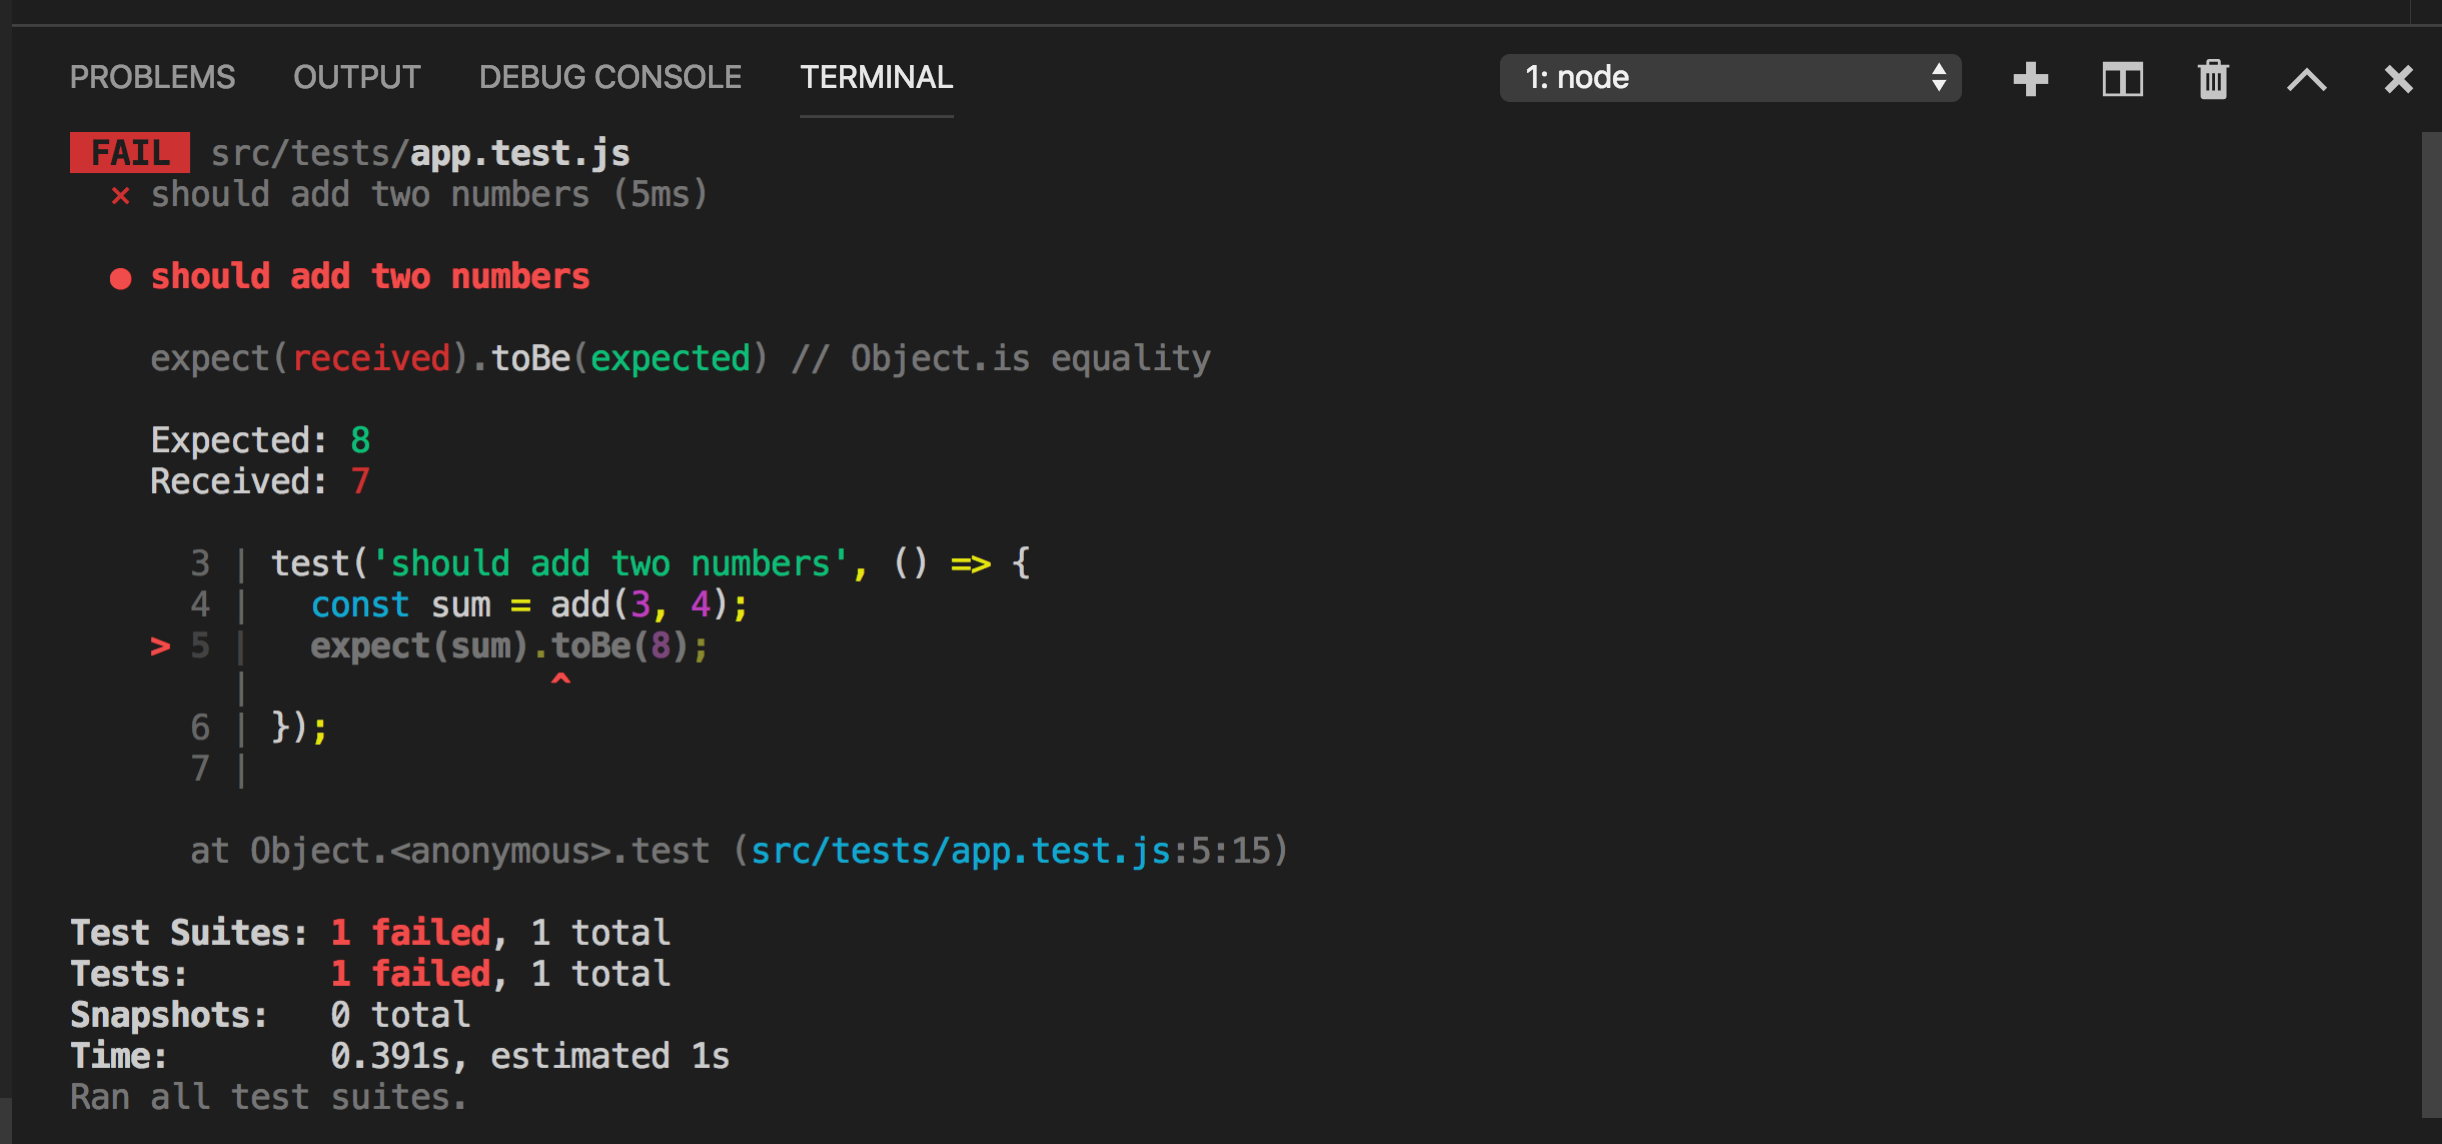
test('should add two numbers', () => {
const sum = add(3, 4);
expect(sum).toBe(7);
});
Note: Every test file should end with .test.js extension. This is how jest is able to find all the test files to be executed.
Let’s understand the above code.
Here we are testing add function which takes two numbers and returns the sum of those numbers. Jest provides some global functions one of them is testfunction inside which we write our test case.
You can find a complete list of global functions HERE
The test function takes two arguments.
- the string which describes what we are testing
- the function where we write our test case_
Inside the test function, we are calling the add method by passing two numbers and then checking if the sum of 3 and 4 equals 7.
To run this file, open the command line or terminal and execute the following command
npm run test
Once executed, you will see that our test case is passed

Now change the expect statement from
expect(sum).toBe(7);
to
expect(sum).toBe(8);
and you will immediately see that the test case has failed because 3 + 4 is definitely not 8 and you will see the filename along with the line number where it fails. That’s how easy to test and debug with jest.
toBe is one of the many methods provided by Jest for testing. You can find the complete list HERE
Change the toBe value from 8 to 7 to make it work again.
Now, let’s start testing our todo list app. To do that we need to install the enzyme library and make some configuration changes.
To easily test components and handle the event handlers, manage state, etc, Enzyme library is used together with Jest.
Install enzyme and it’s dependencies using
npm install --save-dev enzyme@3.11.0 enzyme-adapter-react-16@1.15.2 jest-enzyme@7.1.2
If you are using react less than version 16, you need to install its compatible version of the adapter as shown HERE
To use Enzyme with Jest, create a new file setupTests.js inside the src folder and add the following content
import { configure } from 'enzyme';
import Adapter from 'enzyme-adapter-react-16';
import 'jest-enzyme';

configure({ adapter: new Adapter() });
To connect it with Jest create a file with the name jest.config.json in the root of the project where package.json file is present and add the following content
{
 "setupFiles": ["<rootDir>/src/setupTests.js"]
}
Now we are done with the configuration, let’s start testing the Header component from src/components directory.
Snapshot Testing
Snapshot testing is a way to test react components where we create a snapshot of the component by passing the props if any.
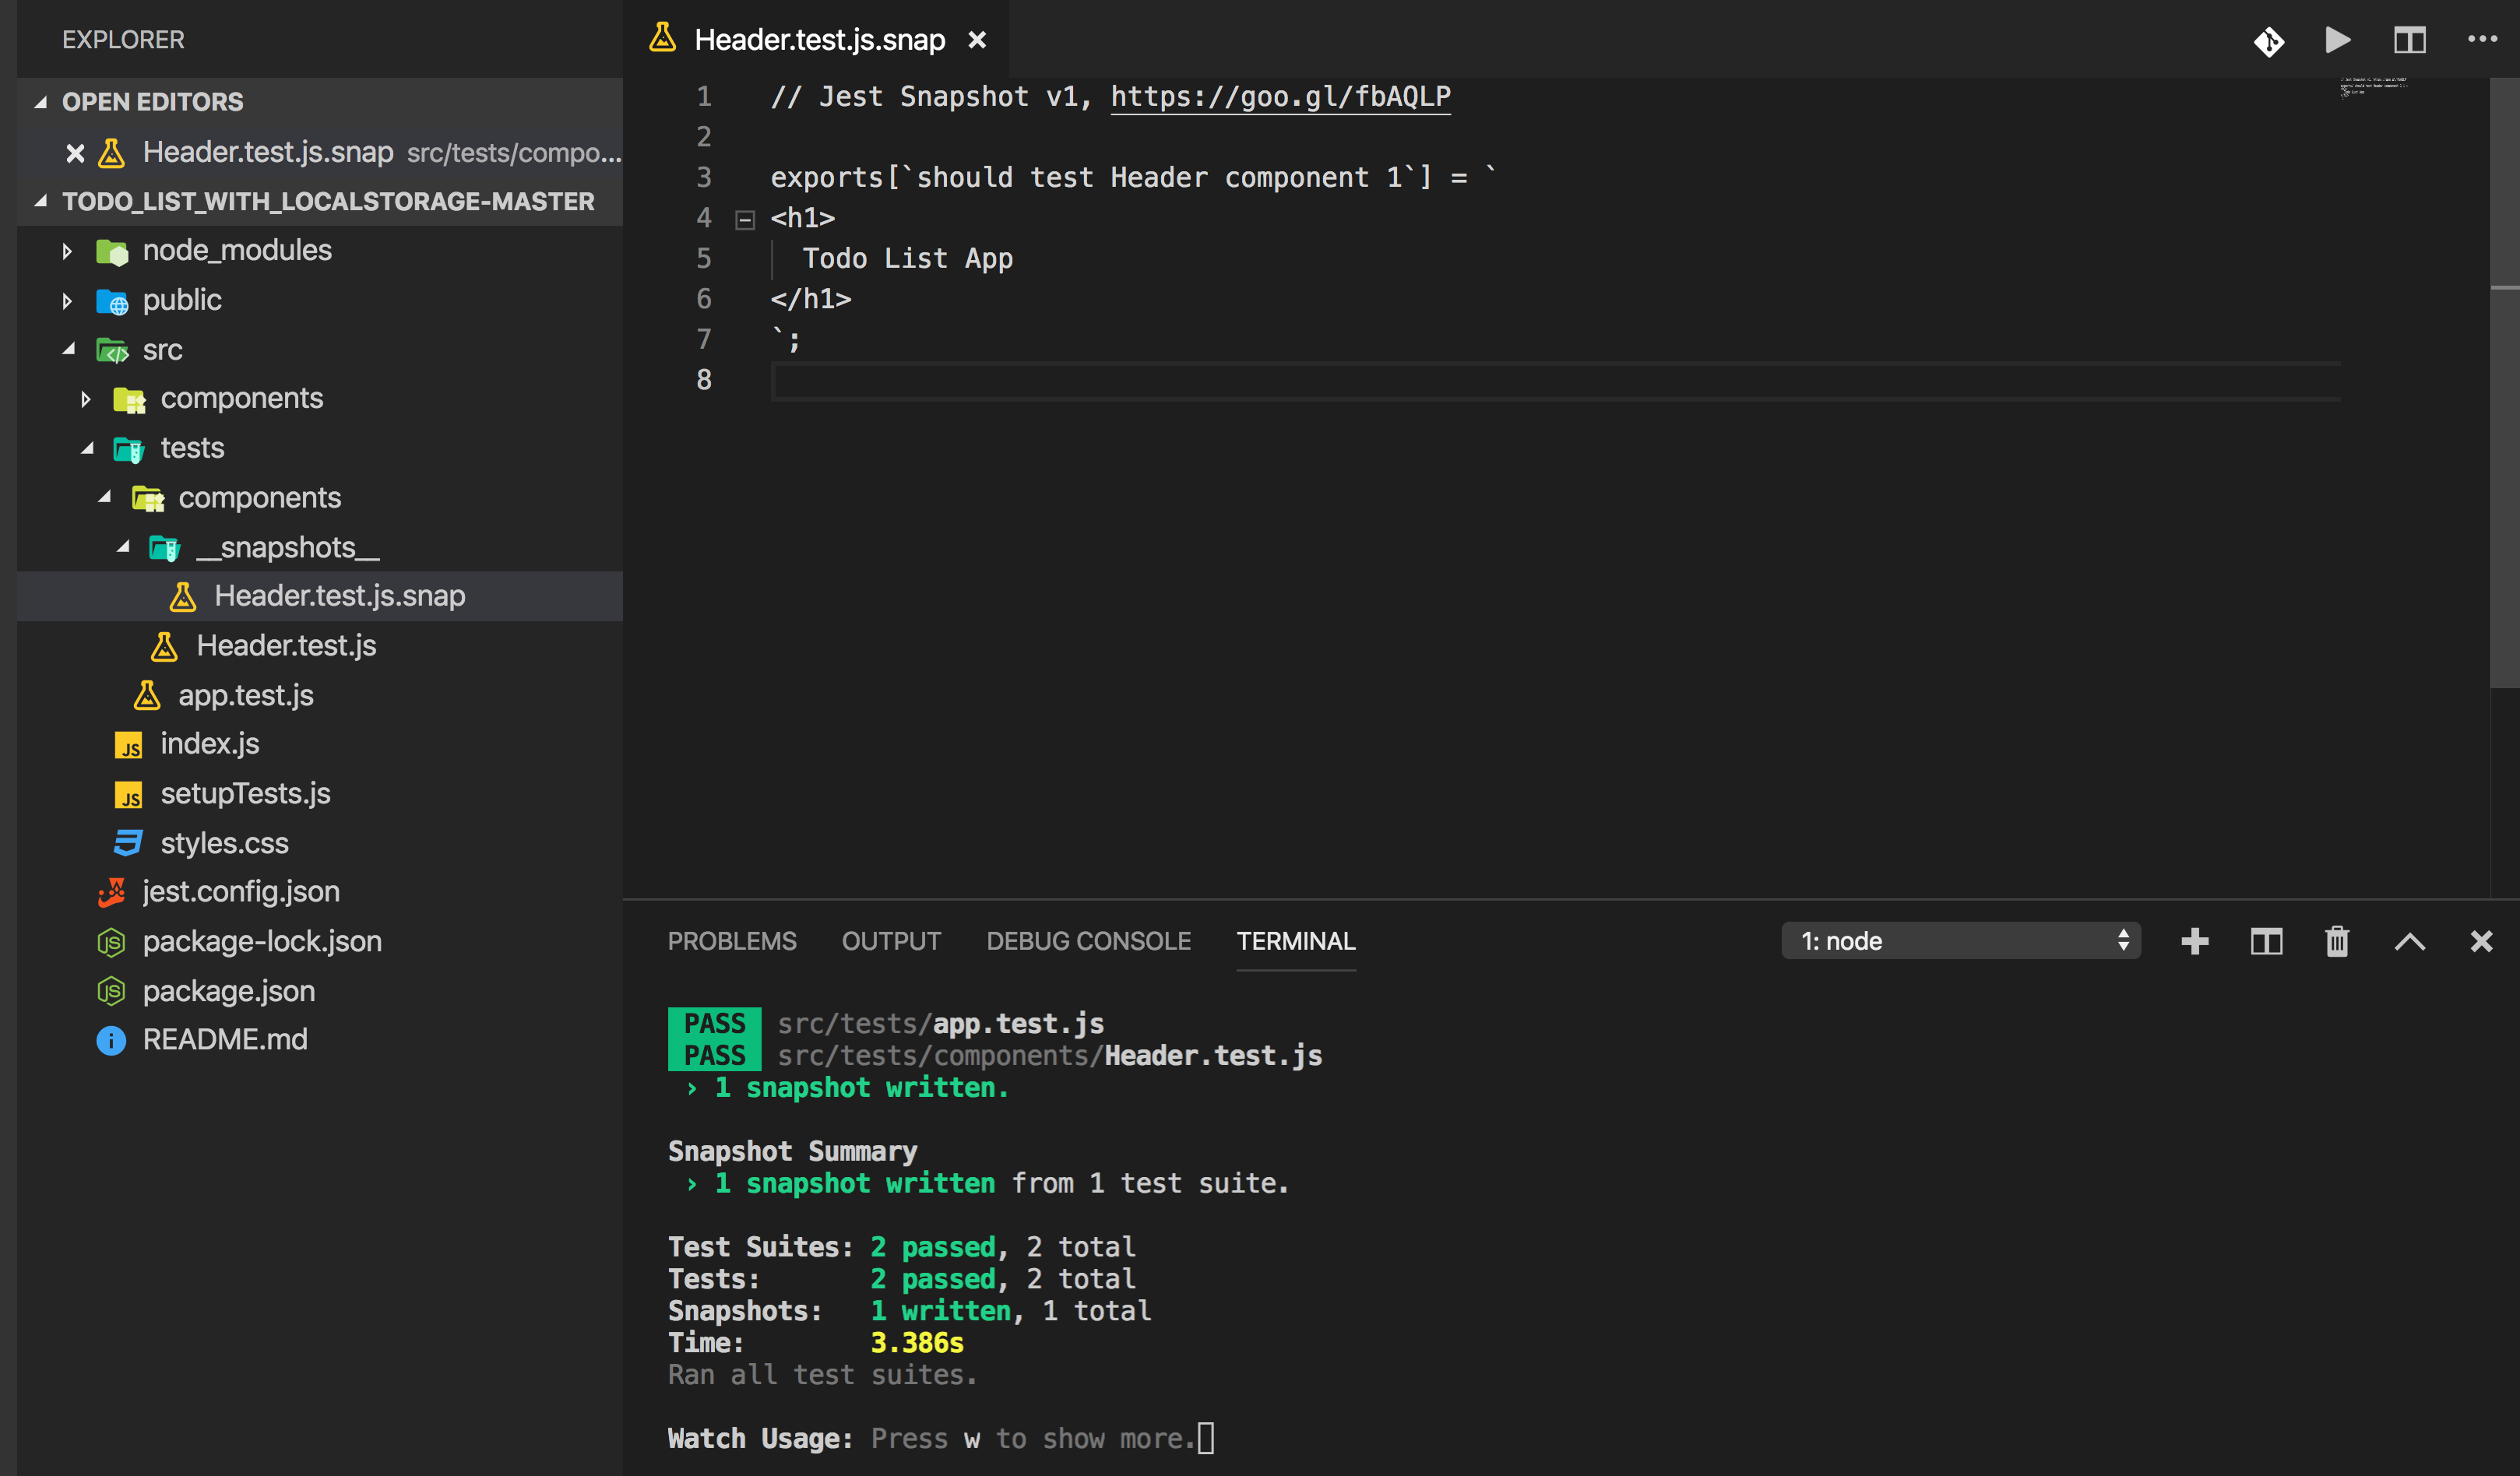
It’s usual practice to create the same folder structure for test files as components inside the src folder so create components folder inside src/tests folder and create a new file Header.test.js inside it and add the following code
import React from 'react';
import { shallow } from 'enzyme';
import Header from '../../components/Header';

test('should test Header component', () => {
 const wrapper = shallow(<Header />);
 expect(wrapper).toMatchSnapshot();
});
Here, we are using shallow rendering to create a snapshot of the Header component.
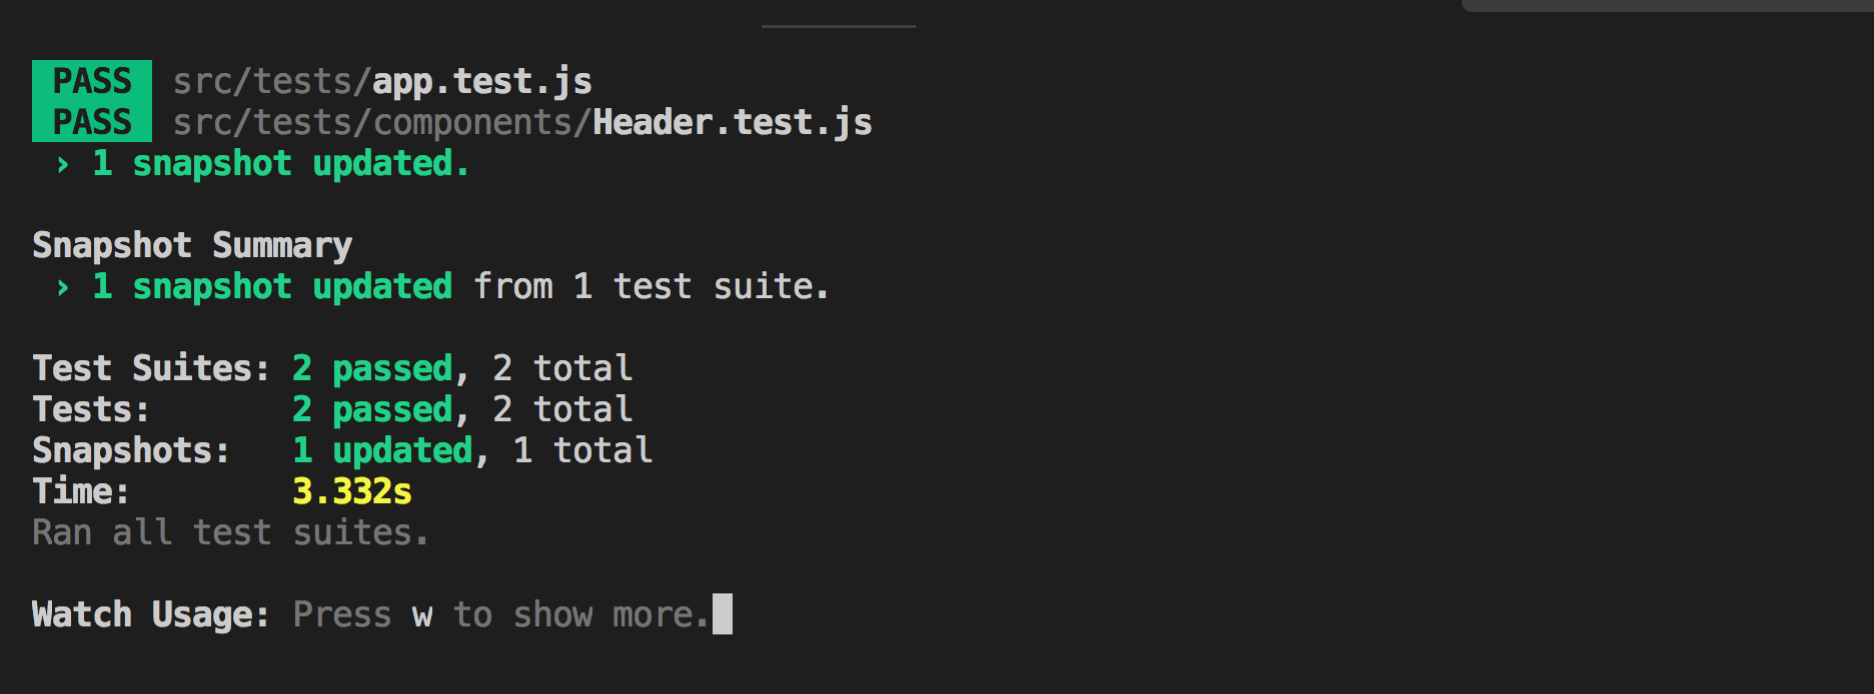
Now, if you run the tests again using
npm run test
you will see that all tests passed and a new folder with the name __snapshots__is created inside components which has the Header component snapshot saved to the file
Now open the src/components/Header.js file and change something in the file like adding an exclamation mark in h1
const Header = () => {
 return <h1>Todo List App!</h1>;
};

export default Header;
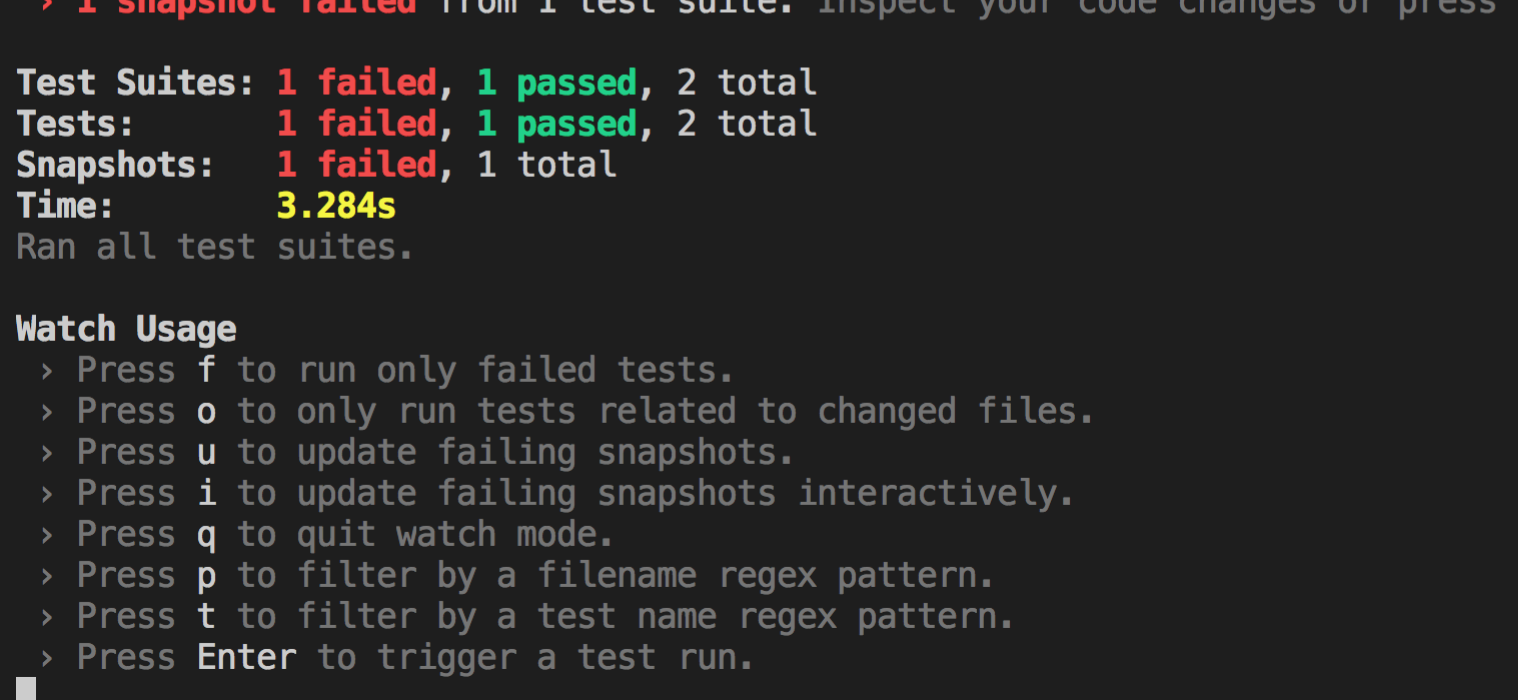
Now, if you save the file, you will see an error as shown below

The error clearly tells us that, the new snapshot with the exclamation mark does not match the original snapshot saved in Header.test.js.snap.
Here we have two choices
- Keep the change we did in
Header.js(added exclamation mark) - Discard the change in
Header.js
So if you press w key in the terminal you will see more options
If we want the change in Header.js, press u key and the snapshot will be updated with our changes in Header.js file and you will see the updated snapshot message
If you don’t want the exclamation mark in the Header.js, remove it from the file, and then save the file which will re-run the tests and will keep the old snapshot without the exclamation mark.
So using snapshot testing we can easily test our React components and track if something changes in any of the files may be by mistake or by purpose.
Now, let’s write test cases for src/components/TodoLists.js component.
Create a new file TodoLists.test.js inside src/tests/components folder
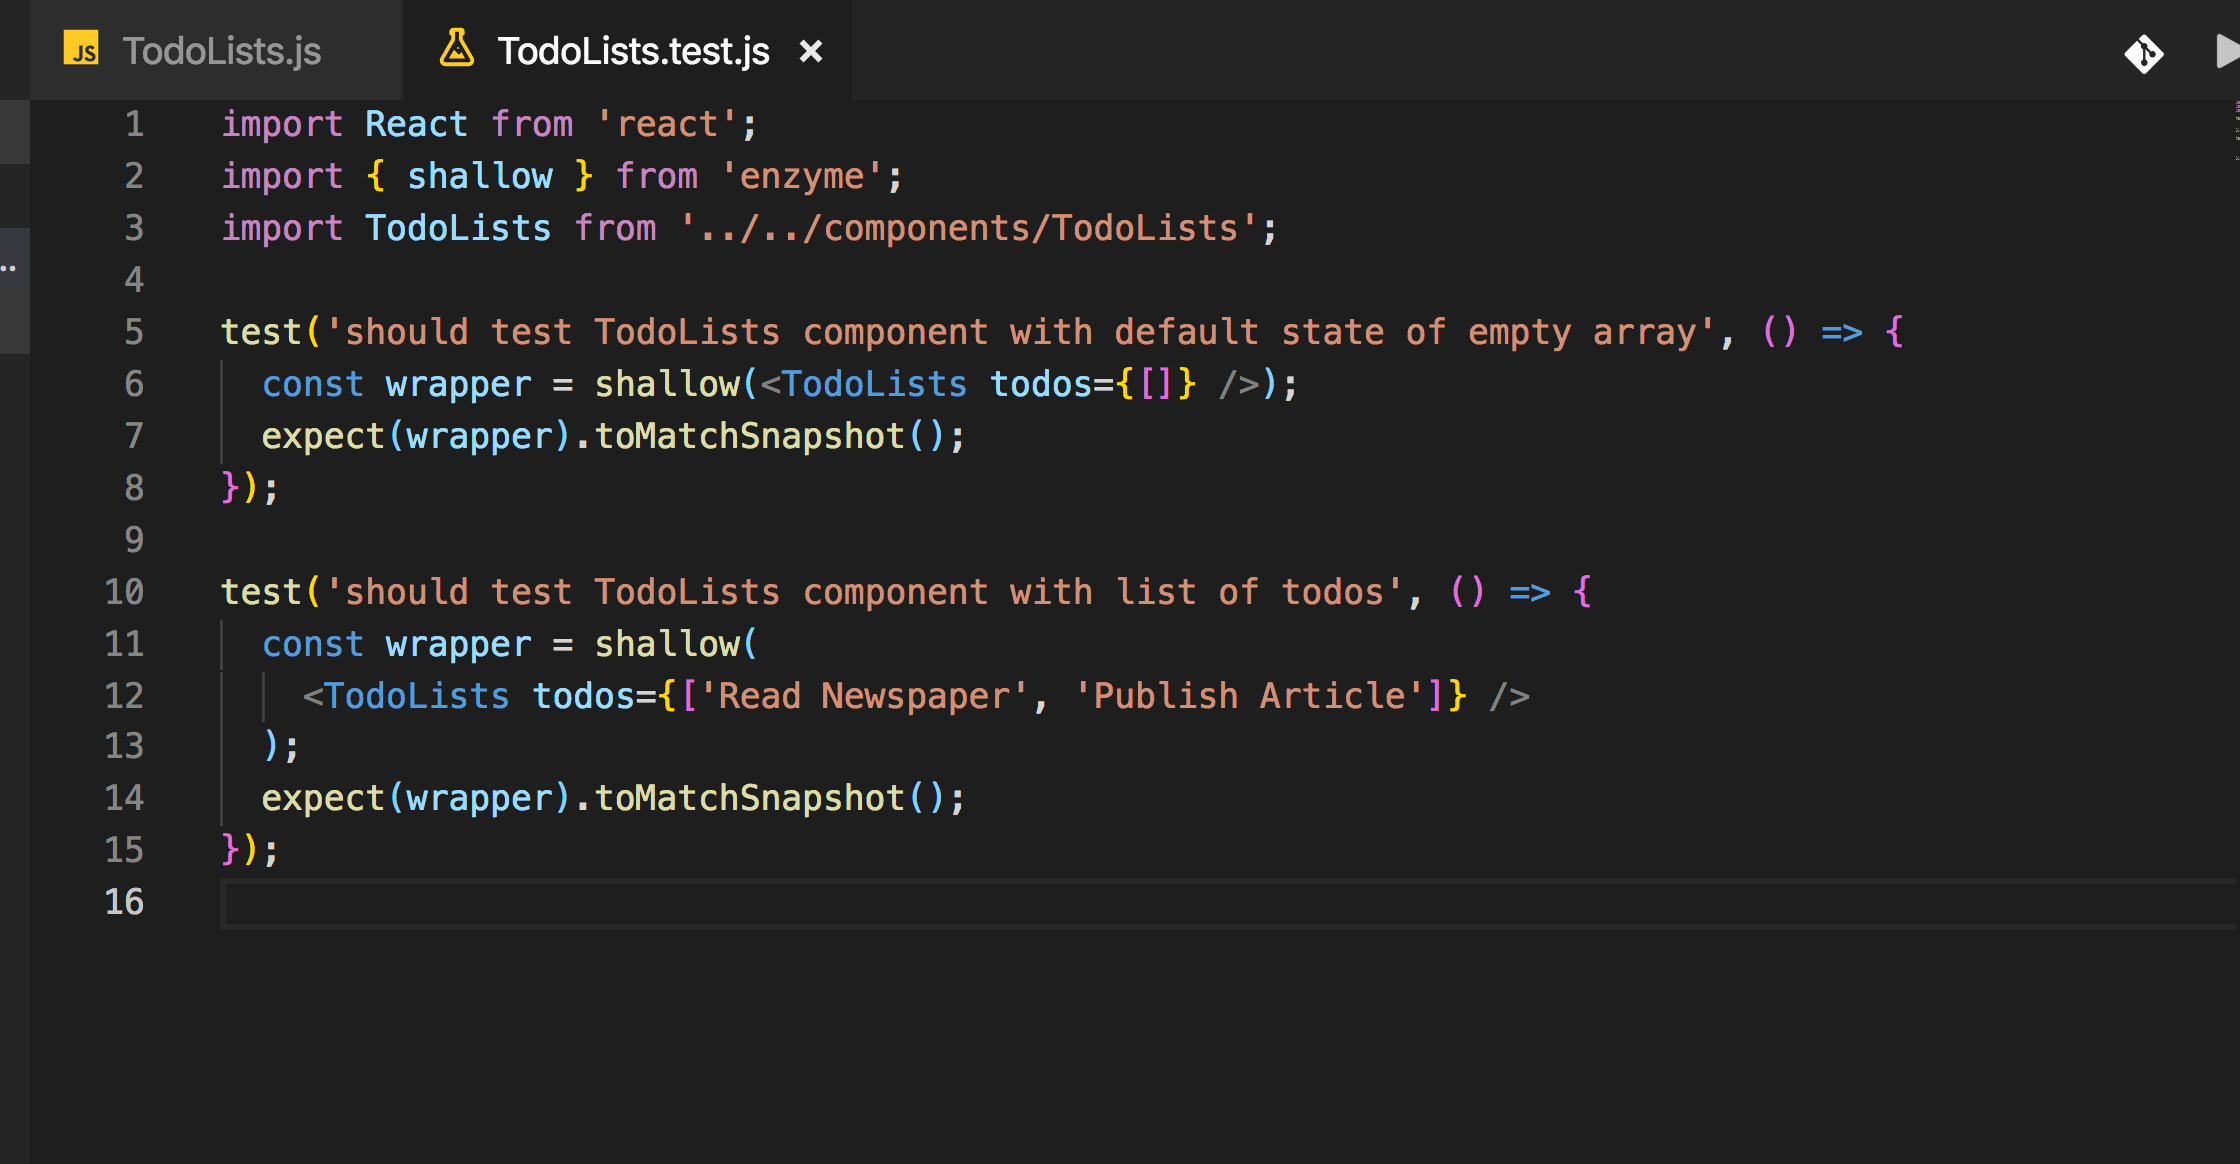
The TodoLists.js component accepts prop which is an array of todos, So let’s write a test case which takes an array as props
import React from 'react';
import { shallow } from 'enzyme';
import TodoLists from '../../components/TodoLists';

test('should test TodoLists component with default state of empty array', () => {
 const wrapper = shallow(<TodoLists todos={[]} />);
 expect(wrapper).toMatchSnapshot();
});
If your npm run test command is still running, you can see a new snapshot is created into __snapshots__ folder
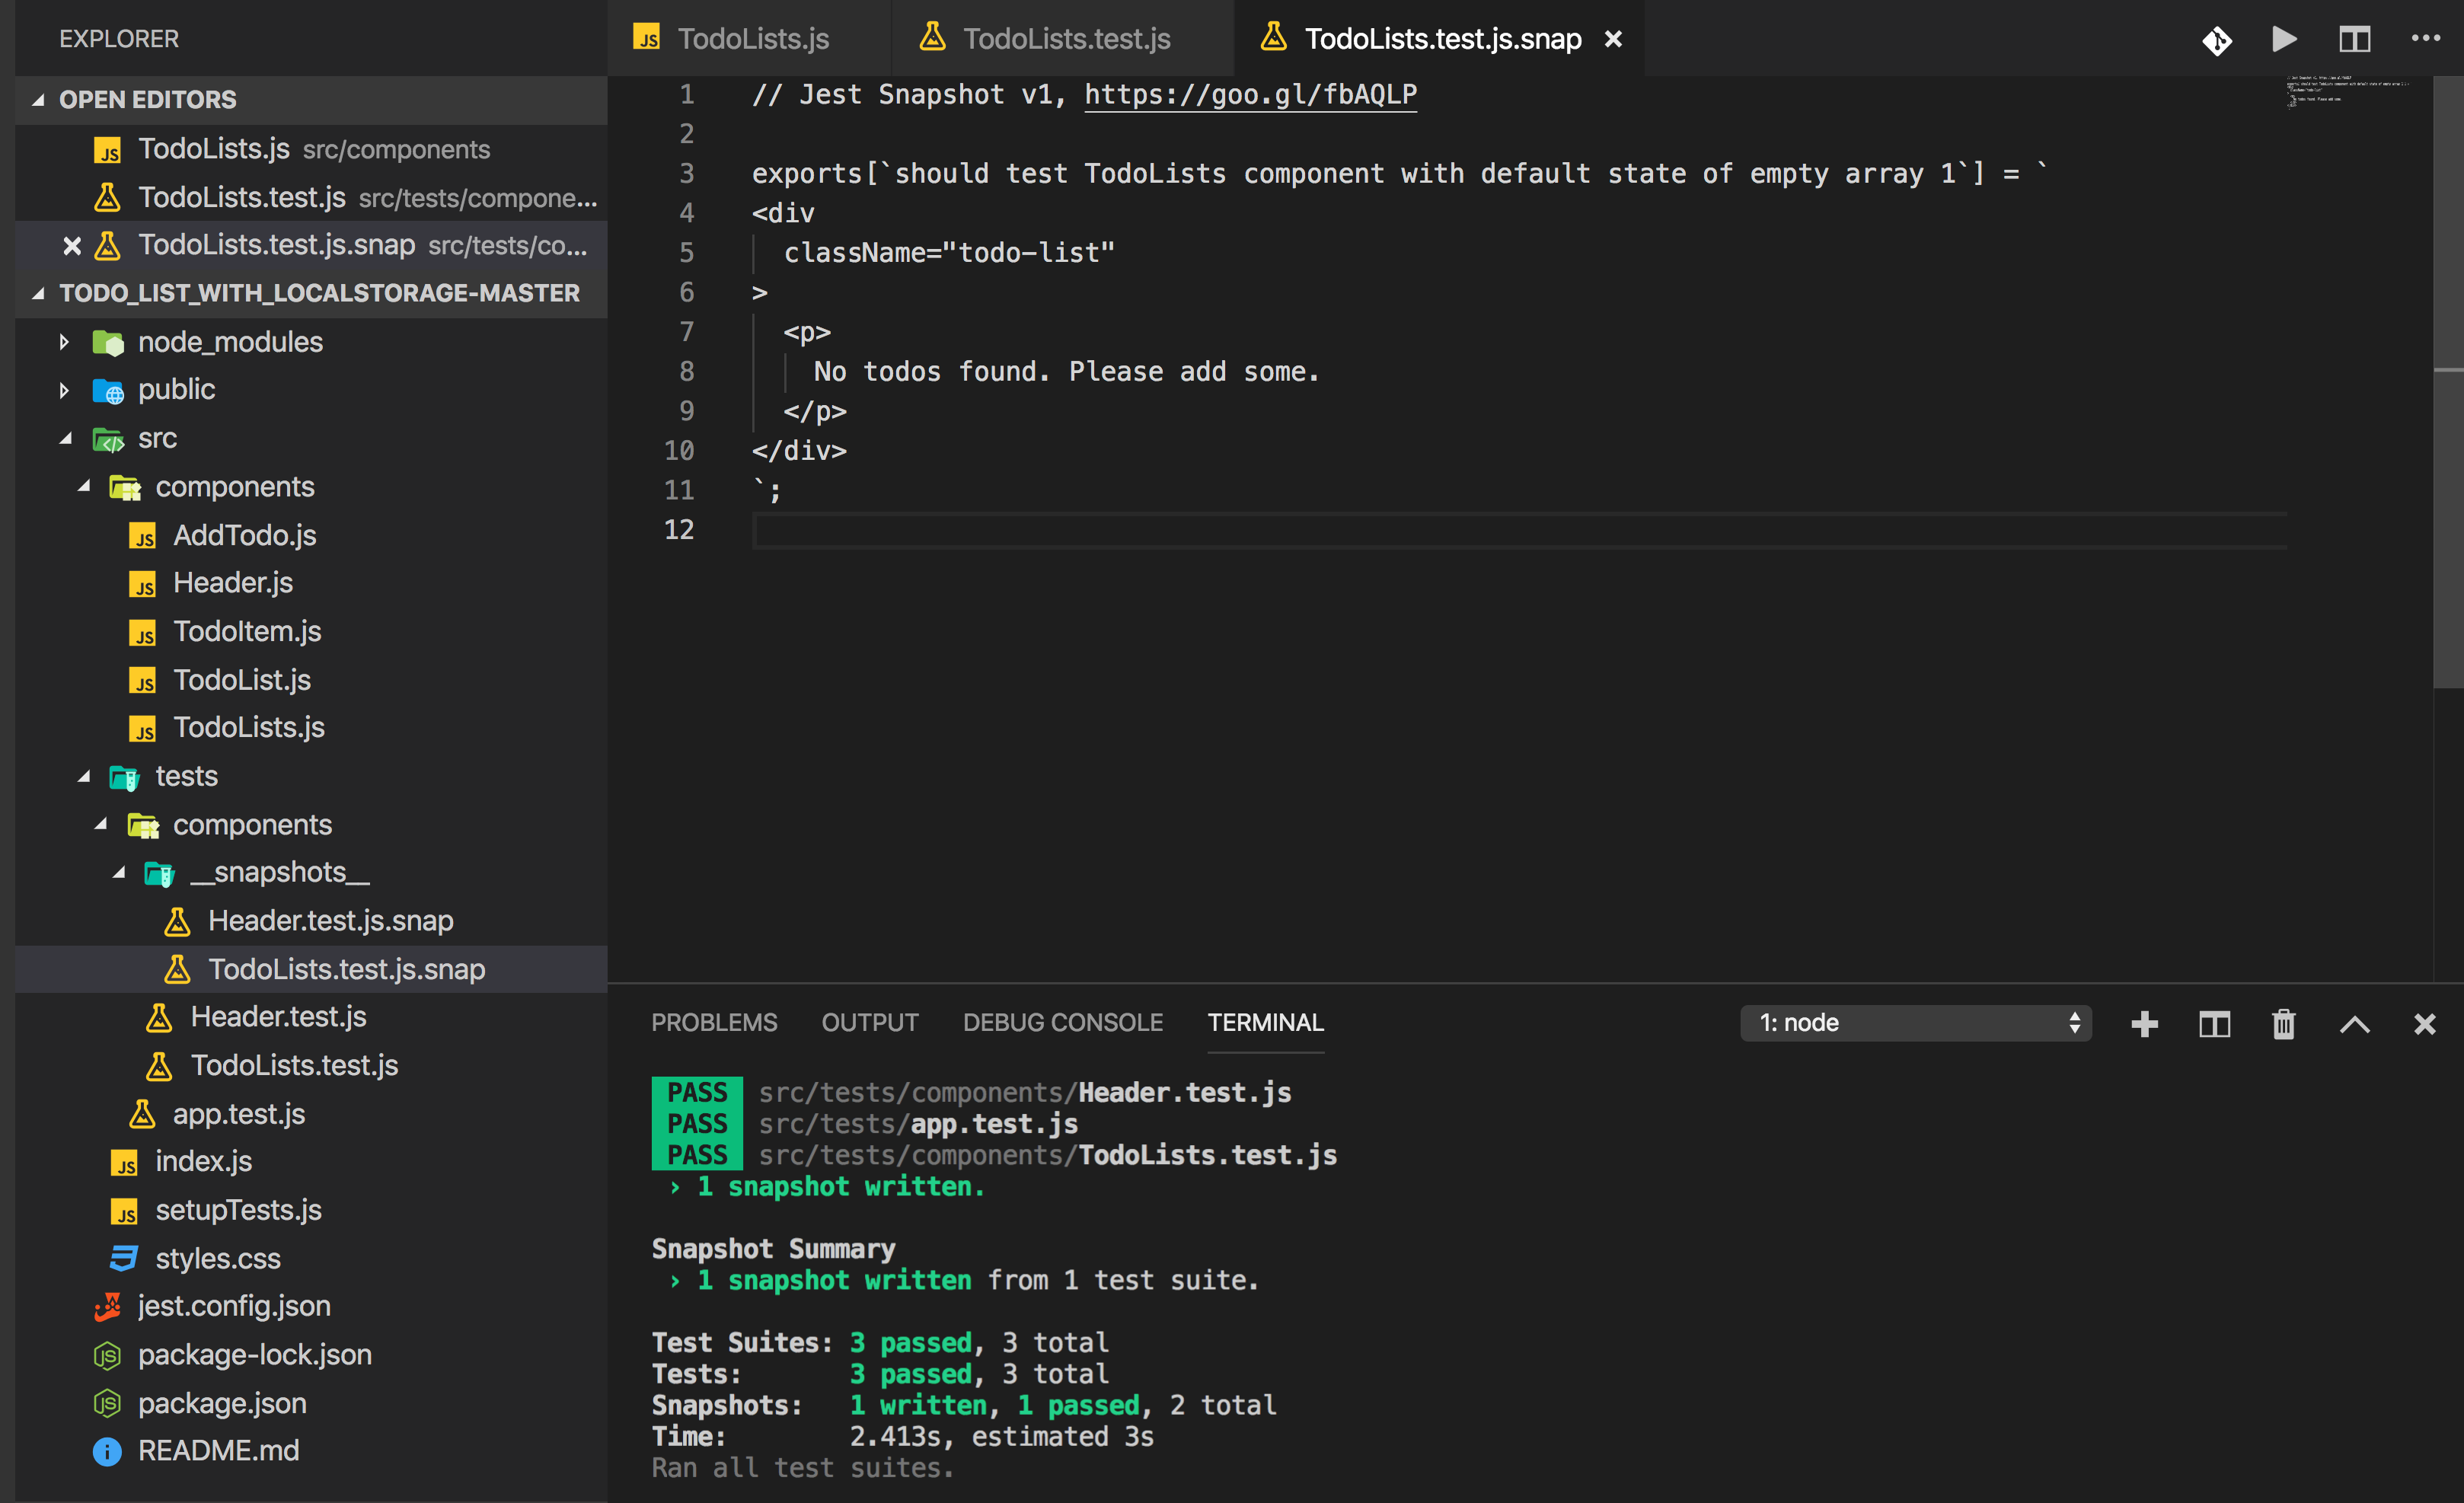
So you can see that the empty array check from TodoLists.js is correctly getting executed.
Now, we will write another test case by adding some todos
test('should test TodoLists component with list of todos', () => {
 const wrapper = shallow(
  <TodoLists todos={['Read Newspaper', 'Publish Article']} />
 );
 expect(wrapper).toMatchSnapshot();
});
As you can see the snapshot is updated with the new test case data
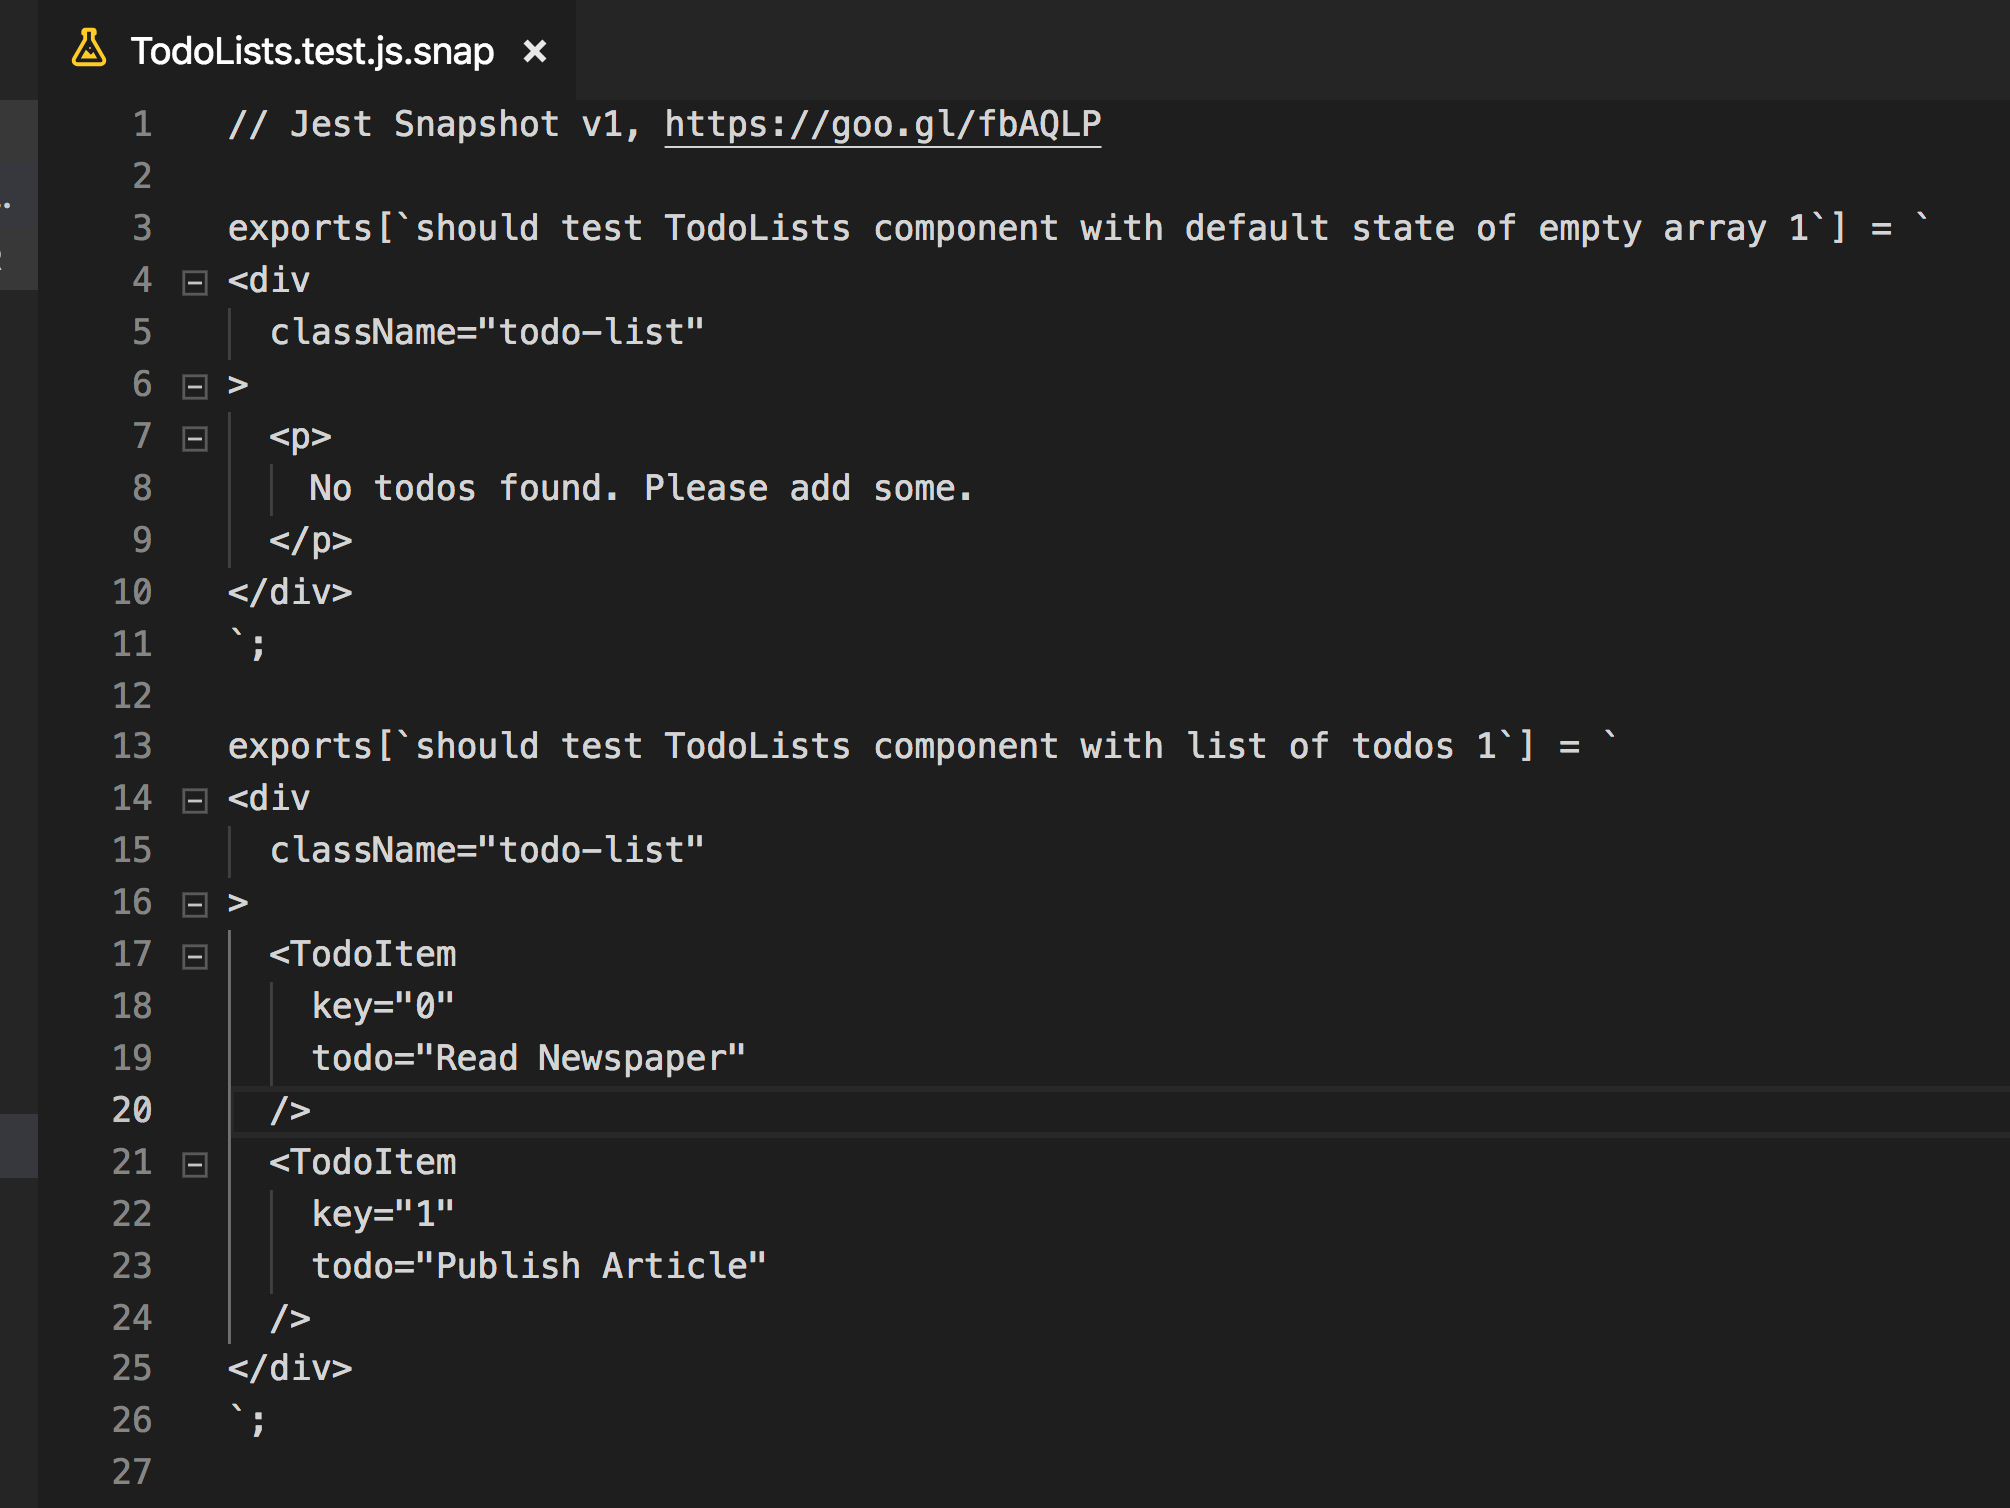
Now we have handled both the conditions from TodoLists.js
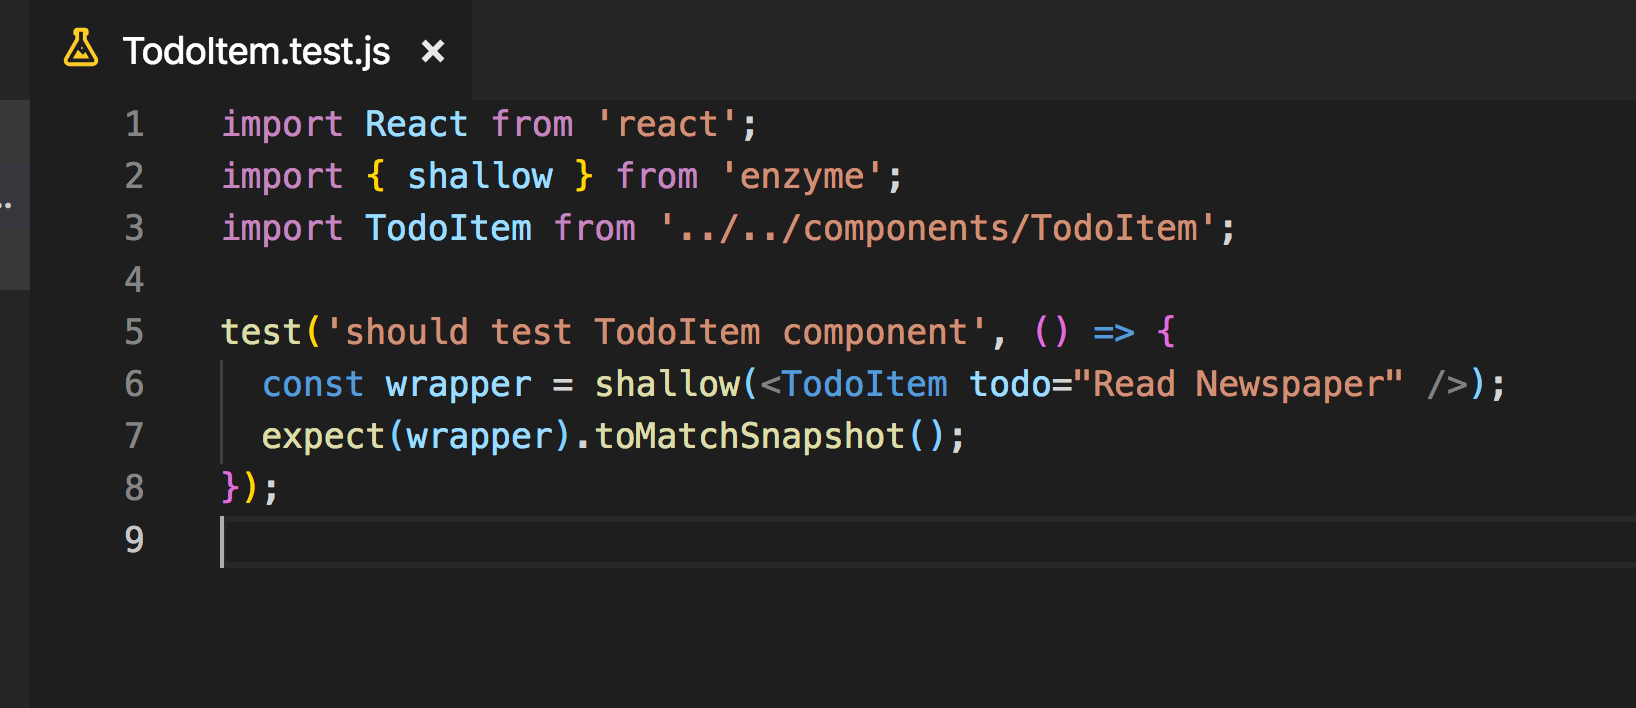
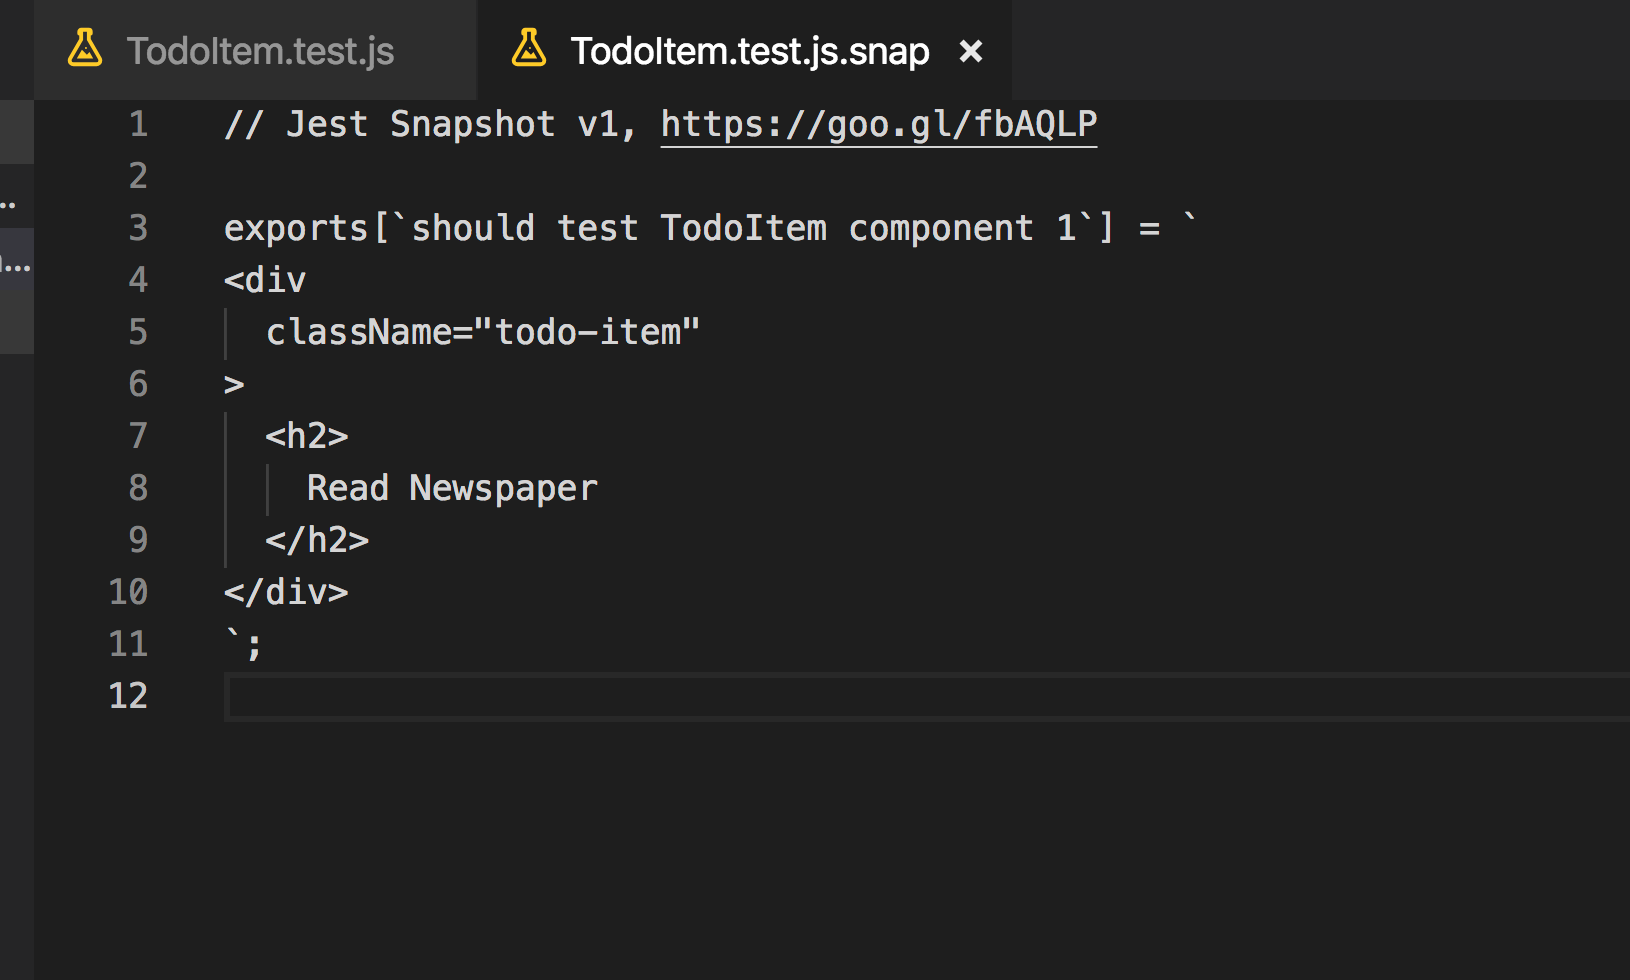
Let’s move on to the next component which is TodoItem.js component
It accepts a single todo as a prop
Create a new file TodoItem.test.js inside src/tests/components folder and add the following code inside it.
Let’s start with testing AddTodo.js component now
Create a new file AddTodo.test.js inside src/tests/components folder
AddTodo component accepts a handleAddTodo method as a prop
Let’s test AddTodo component by not passing any props

when you run npm run test you will see a new snapshot file created for this

Now let’s add another test case to handle the onSubmit method call
When we submit the form, handleAddTodo method is called so we will be creating a spy in jest to test that function call.
Creating a spy is a way of creating a function and checking if the written method gets called or not.
To create a spy for function in Jest, we use jest.fn method provided by Jest and we will pass it as the handleAddTodo prop
Then we will find the Form element and we will trigger the onSubmit handler.
It’s always good to save the snapshot before, so it will be easy to identify what is the final element we need to use in .find method.
we will use the simulate method of the enzyme by mentioning which event to trigger.
Once the submit event is triggered, we will verify if it’s actually triggered or not by calling toHaveBeenCalled method of Jest

You can find all other methods provided by enzyme HERE
If you run the tests, you can see that a new snapshot is saved and our test runs successfully.

Feel free to open the AddTodo.test.js.snap file and understand what gets stored when we create a new snapshot for this component which is a very important part of writing test cases.
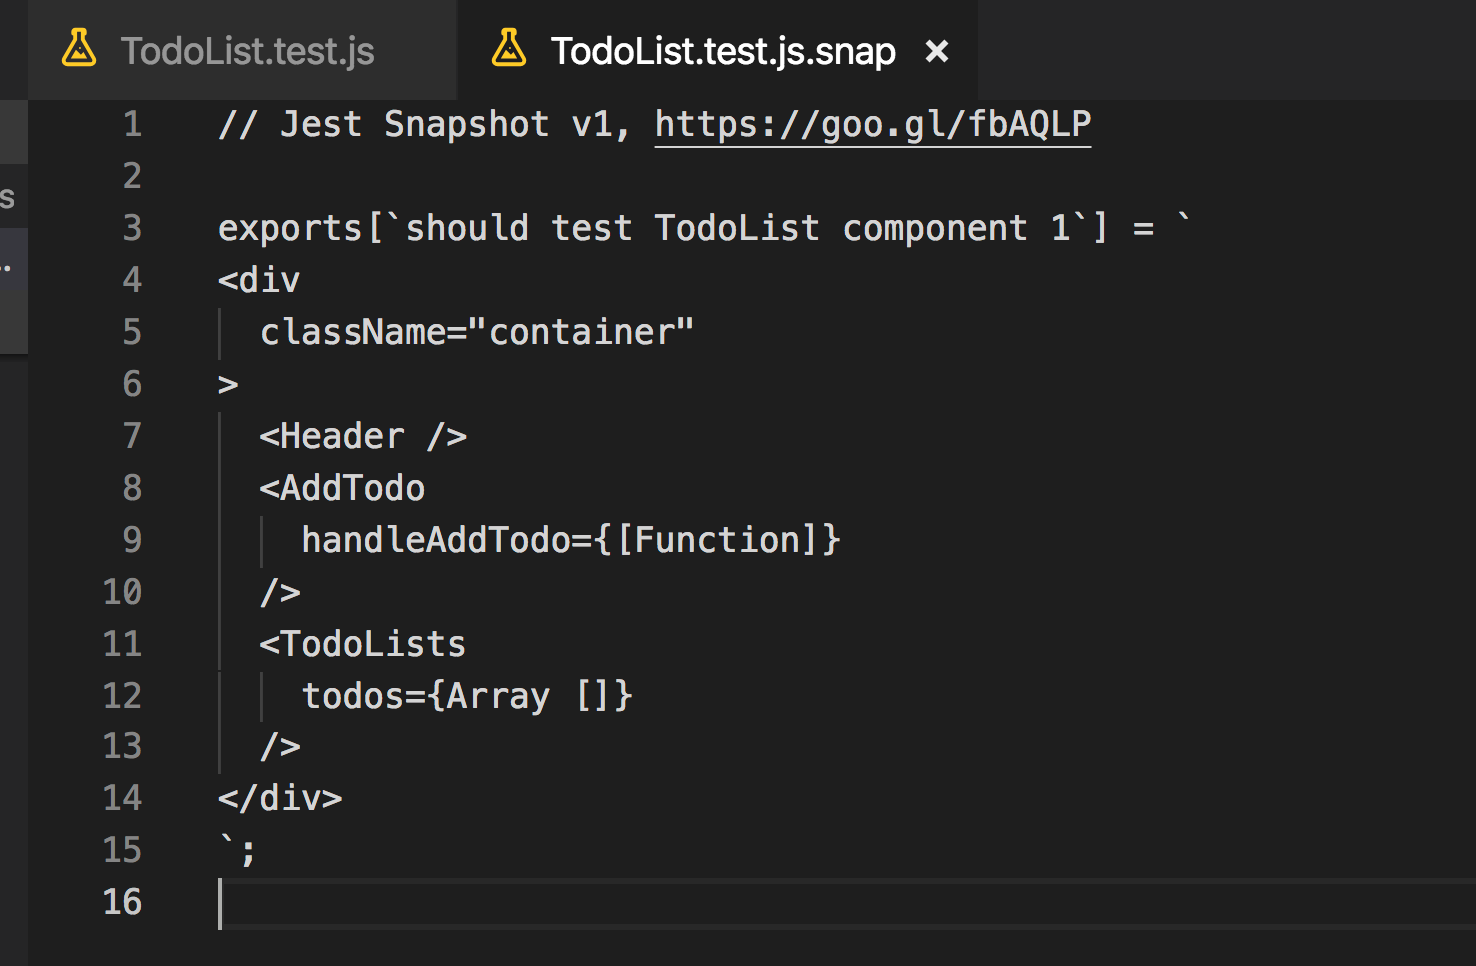
Now we will add tests for the final component which is TodoList.js
Create a new file TodoList.test.js inside src/tests/components folder

Its snapshot will look like this
Now, we are done with all component test cases. Let’s explore how to see the total code coverage for the entire application.
For this, we will need to make some configuration changes.
Open jest.config.json and add the following content:
{
 "setupFiles": ["<rootDir>/src/setupTests.js"],
 "testRegex": "/*.test.js$",
 "collectCoverage": true,
 "coverageReporters": ["lcov"],
 "coverageDirectory": "test-coverage",
 "coverageThreshold": {
  "global": {
  "branches": 0,
  "functions": 0,
  "lines": 0,
  "statements": 0
  }
 },
 "moduleDirectories": ["node_modules", "src"]
}
Here we are telling jest to generate coverage reports for all files ending with .test.js as shown in testRegex property.
Now to generate coverage report, execute the following command from the terminal
npm run test -- --coverage --watchAll=false
Once executed, we will see the total coverage for each test file
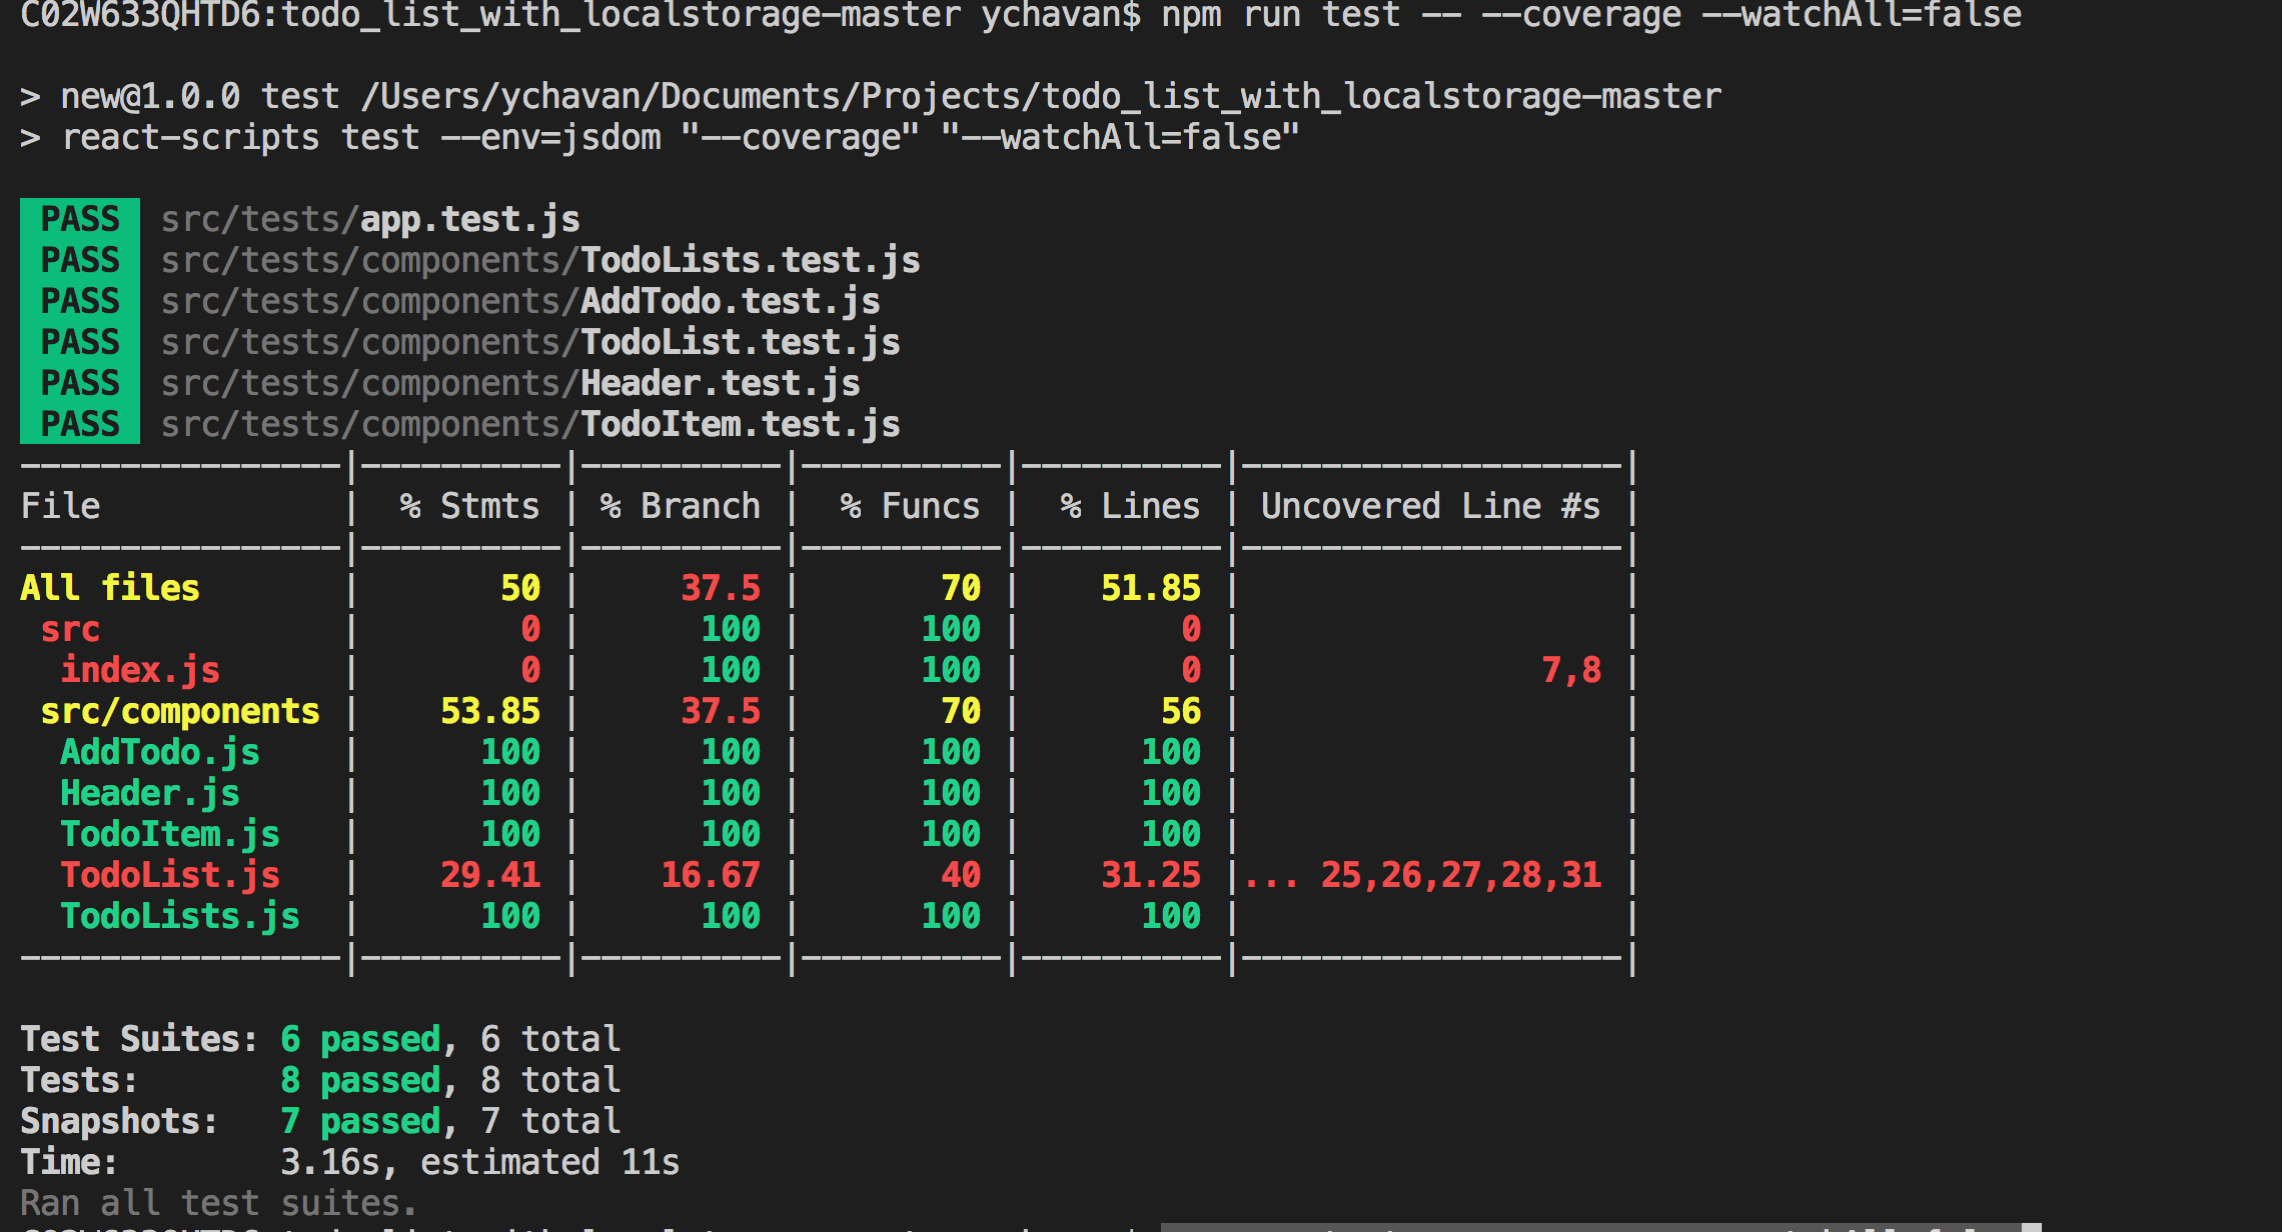
This will also create a new coverage folder in the project
If you open the index.html file in the browser located at coverage/lcov-report folder you will be able to view the report

As you can see, we have covered all the scenarios for each of the components except TodoList.js for which it’s showing only 29.41% statements covered.
Let’s open the TodoList.js and we can see what extra test cases we need to handle
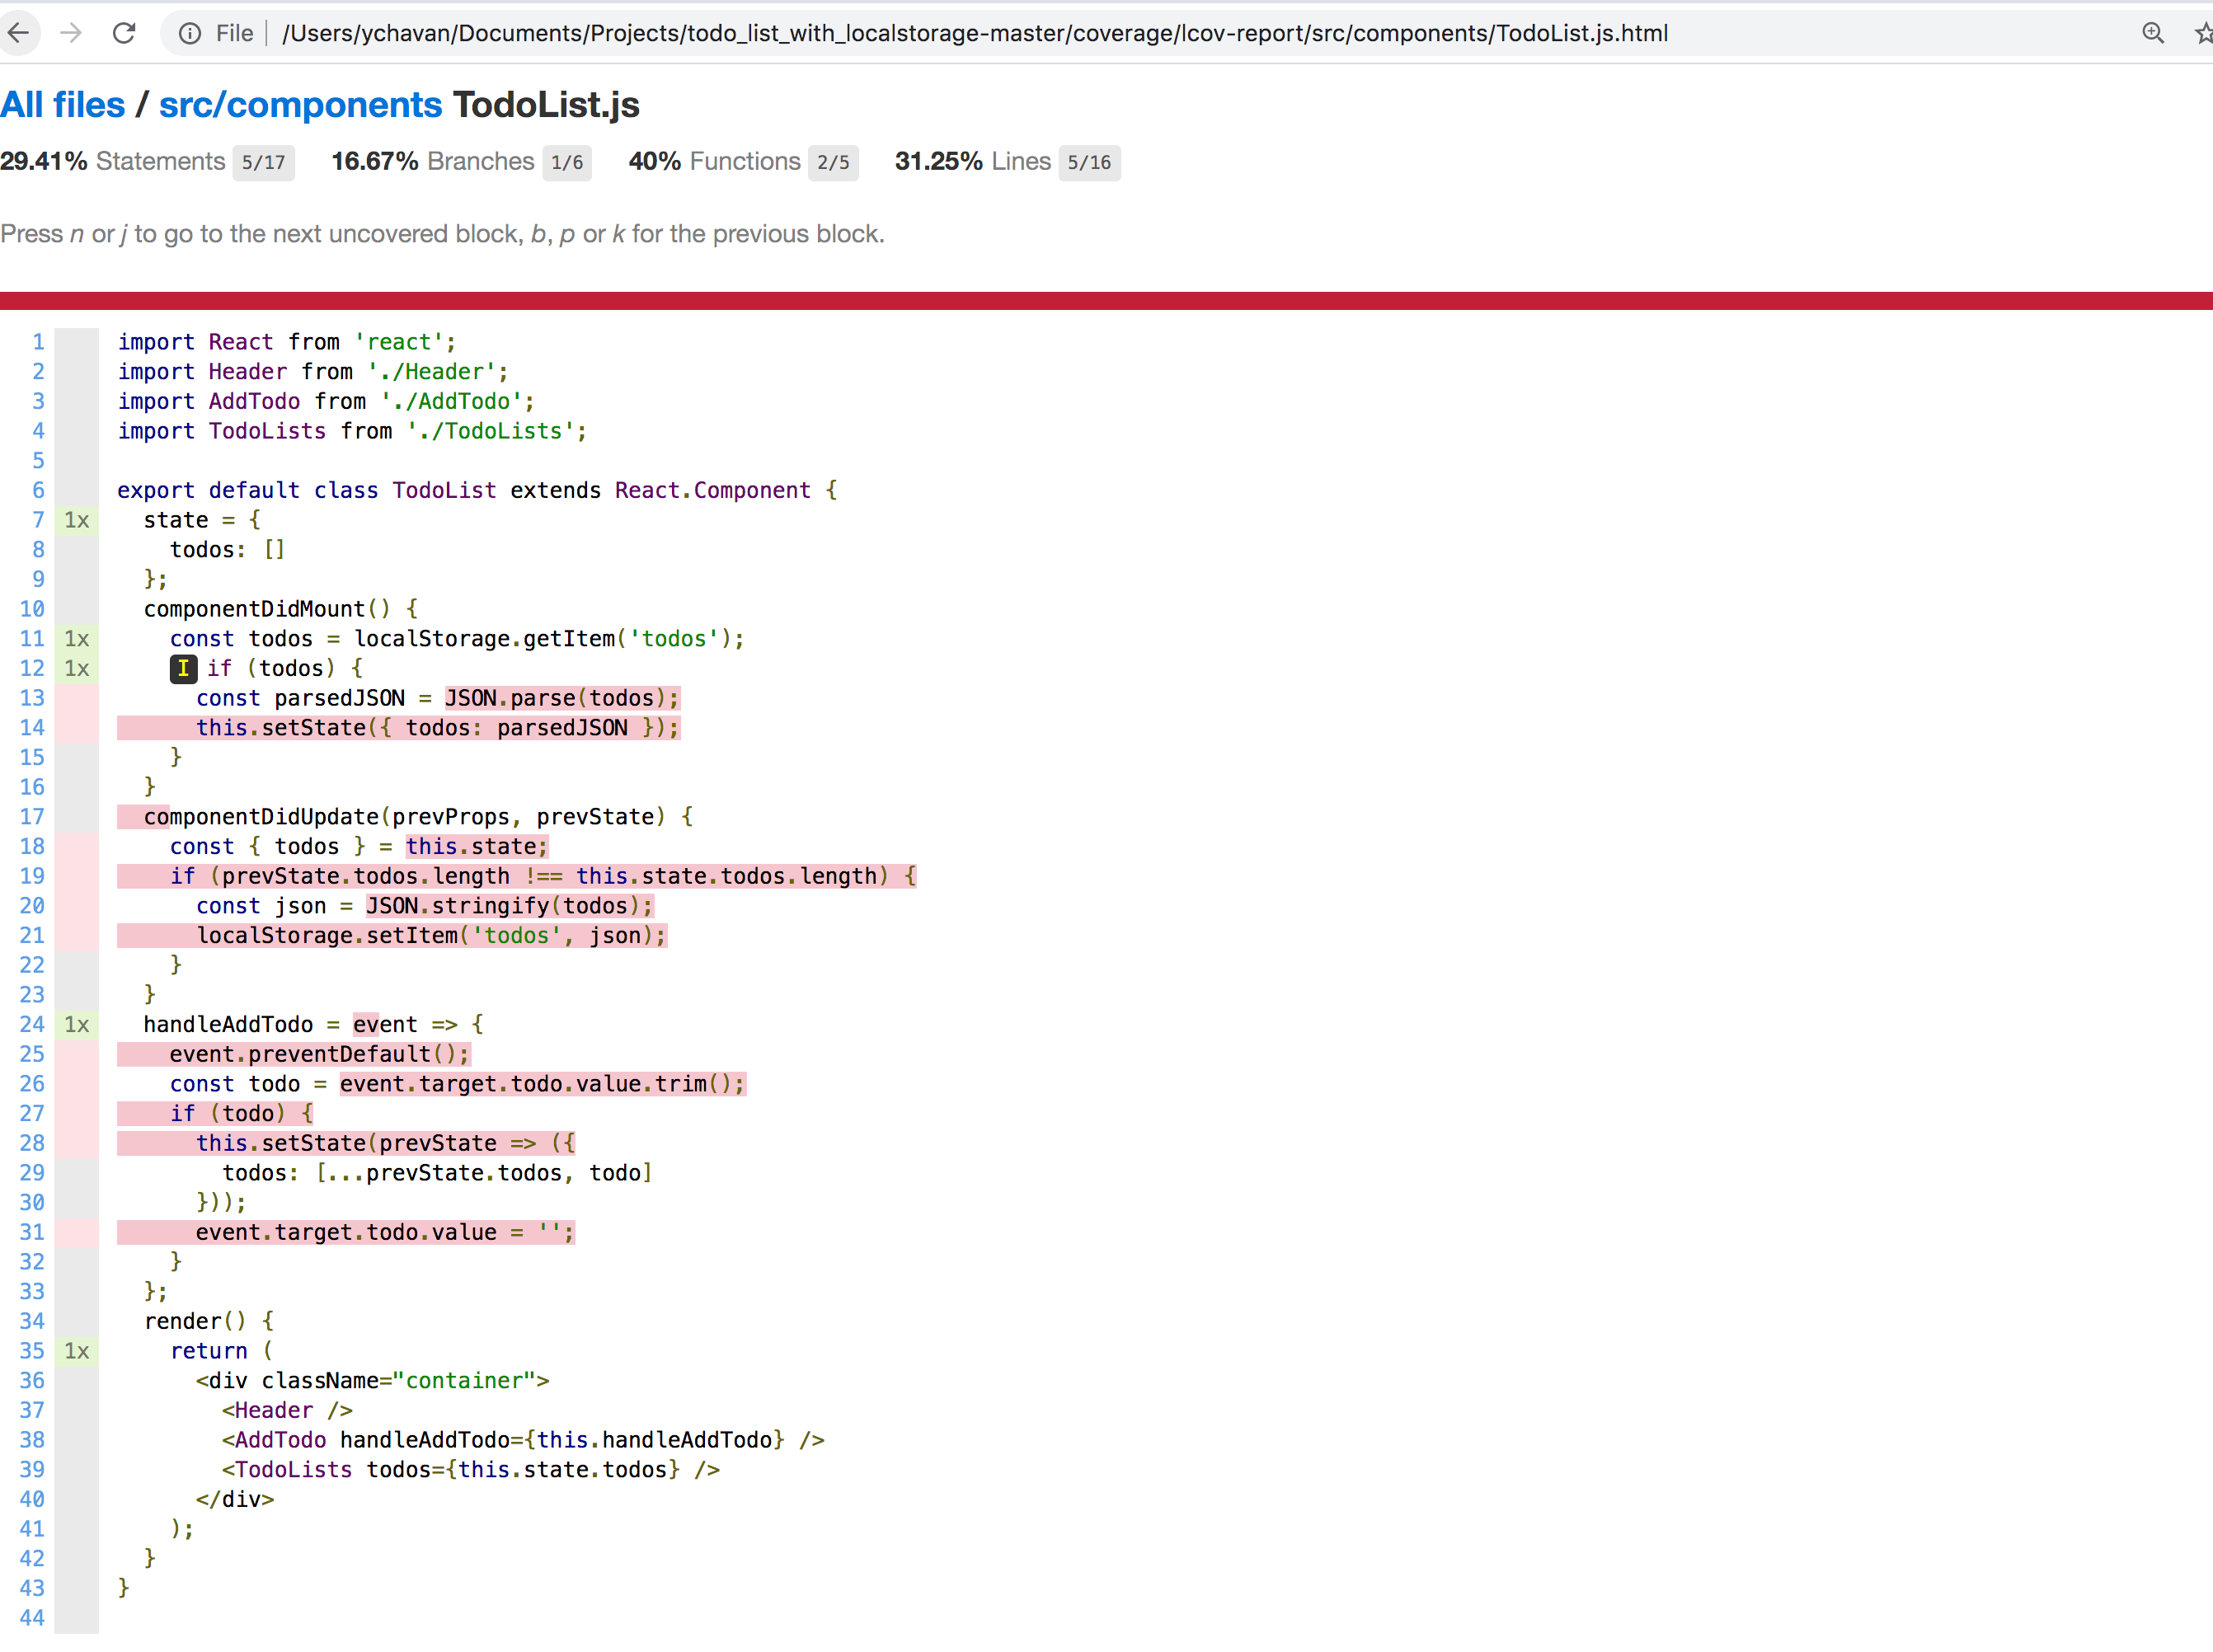
As you can see, the lifecycle methods and handleAddTodo method is not handled in our test cases so let’s add the test cases for them
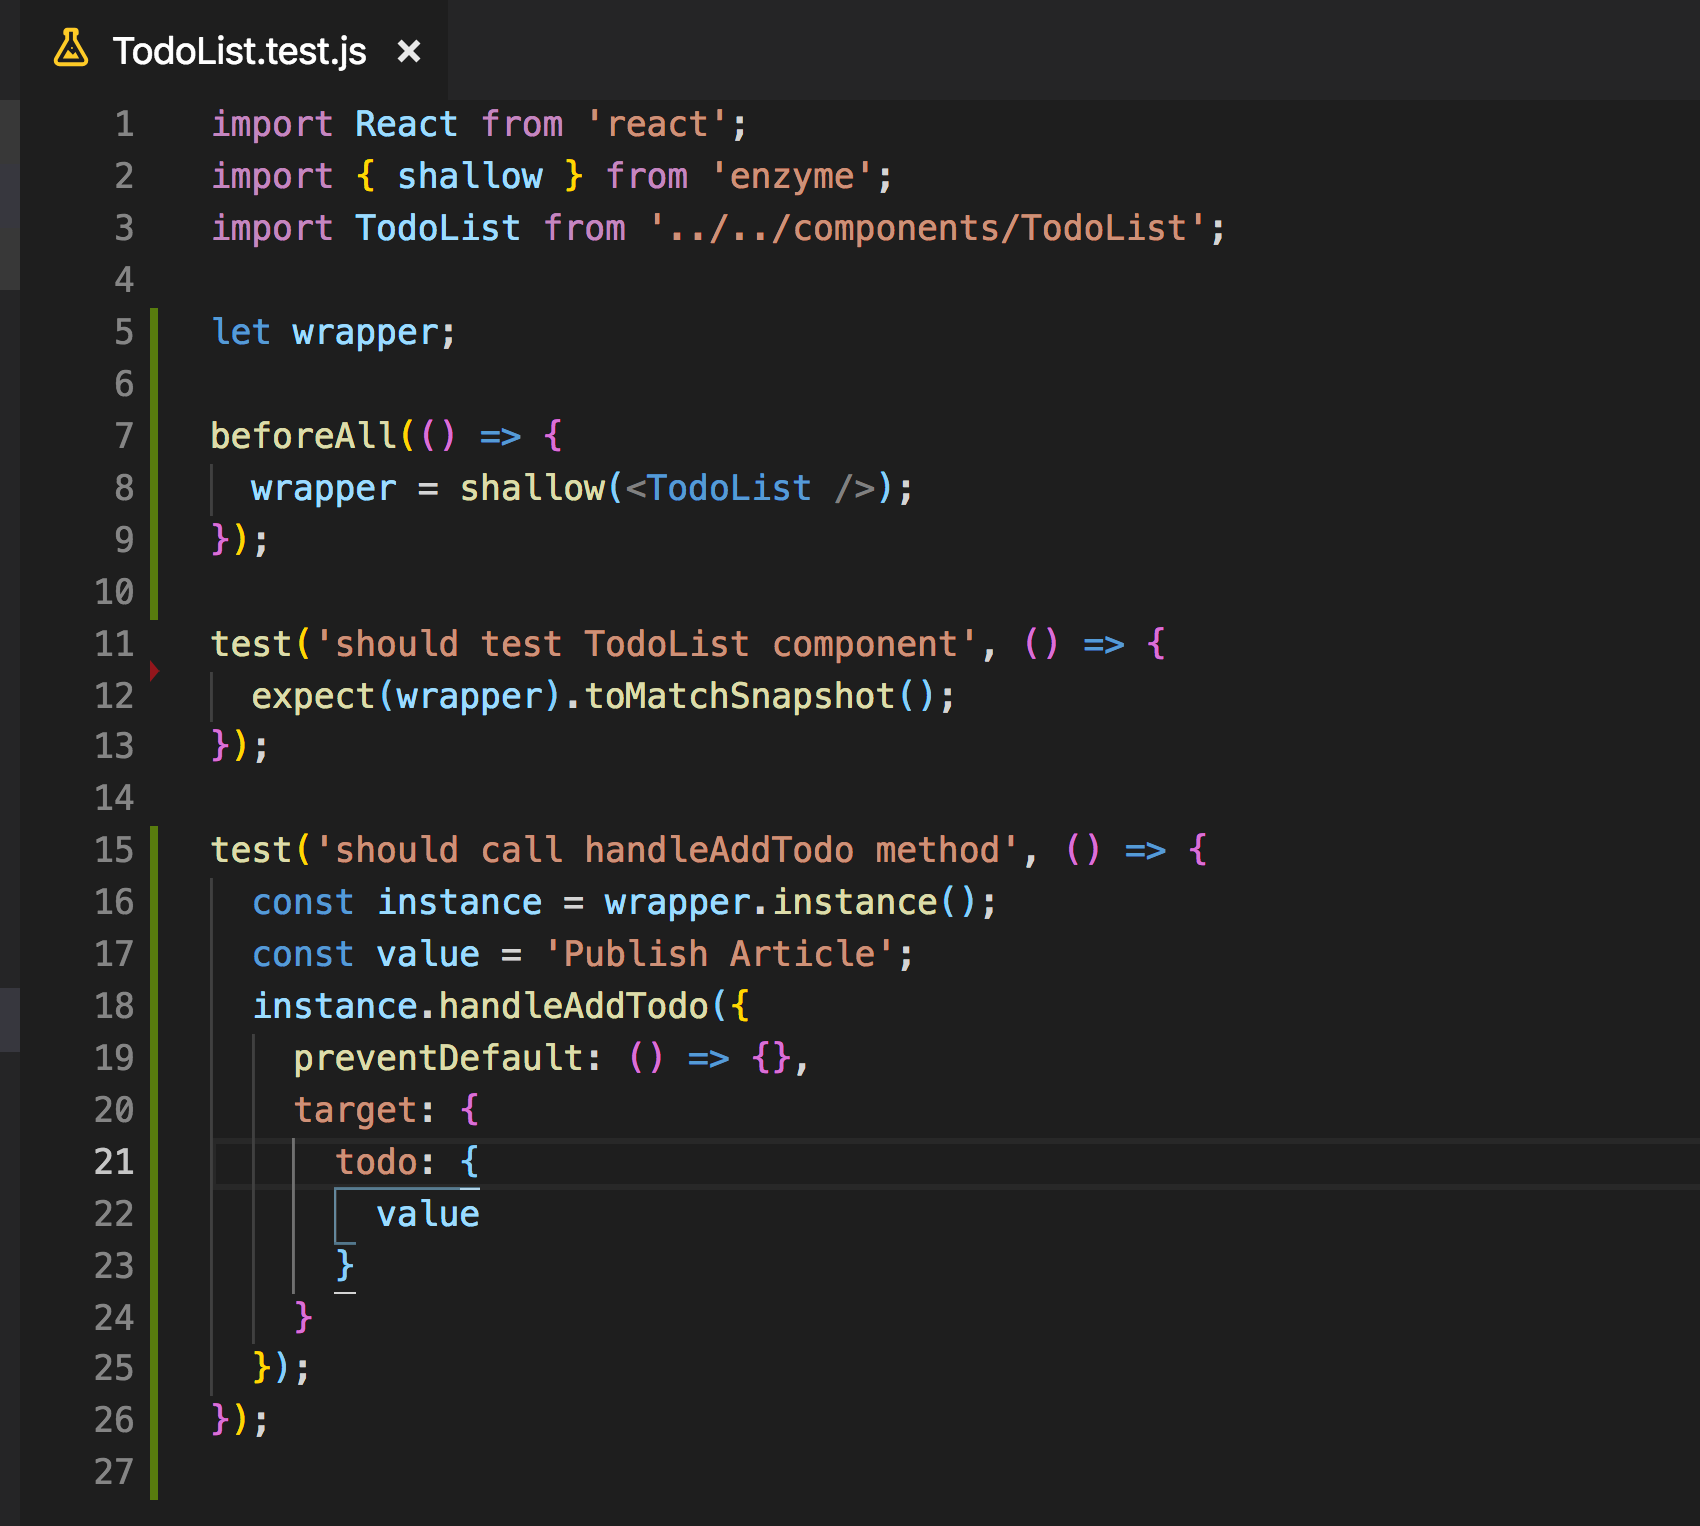
Open TodoList.test.js from src/tests/components folder and add the following test case in it.
test('should call handleAddTodo method', () => {
 const wrapper = shallow(<TodoList />);
 const instance = wrapper.instance();
 const value = 'Publish Article';
 instance.handleAddTodo({
  preventDefault: () => {},
  target: {
   todo: {
     value
    }
   }
 });
});
Here we are manually calling the handleAddTodo using instance.handleAddTodo method. The handleAddTodo is expecting an event object as a parameter which has preventDefault method and value property so we are providing it as a parameter

Now run the coverage command again
npm run test -- --coverage --watchAll=false
and you will see the coverage percent has increased for TodoList.js

If you open the TodoList.js file, you will see that handleAddTodo method is covered but the componentDidMount is still not covered by test cases because of which the percentage is 88.24% and not 100%

I will leave it to you to add the test case for it as an exercise for you.
Hint: you can use the _mount_ method of the enzyme to handle that test case
A couple of improvements:
If you open the TodoList.test.js file, you can see that we have duplicate code of const wrapper = shallow();
It’s repeated in the first and second test case.
If we add more test cases it will be repeated again. So jest provides some life cycle methods using which we can remove the duplicate code.
Life cycle methods:
- afterAll: It will be executed after all the test cases from the test file are finished executing
- beforeAll: It will be executed before executing any of the test cases in a file
- afterEach: It will be executed after each of the test cases in a file
- beforeEach: It will be executed before each of the test cases in a file_
Complete List: https://jestjs.io/docs/en/api
we will use the beforeAll life cycle method to fix the duplicate code
That looks much better now.
You can find complete source code for this application here.
That’s it for today. Hope you learned something new today.
I hope you've been enjoying my articles and tutorials I've been writing. If you found them useful, consider buying me a coffee! I would really appreciate it.

Don’t forget to subscribe to get my weekly newsletter with amazing tips, tricks, and articles directly in your inbox here.