# A quick introduction to SASS/SCSS
In today’s fast-moving world, knowing [Sass](https://sass-lang.com/) is an important part of web development. Today, almost all large projects use some sort of preprocessor like [Sass](https://sass-lang.com/), [Less](http://lesscss.org/), [Stylus](https://stylus-lang.com/), etc.
Sass is the most popular and easy to use. If you learn Sass, it’s very easy to learn other preprocessors.
# What Is Sass?
It stands for _Syntantically Awesome Stylesheets._ It’s a CSS preprocessor.
It allows us to create variables, nested rules, mixins, functions, and do mathematical calculations, allowing us to write next-generation CSS today. It allows us to easily manage large CSS files and split across different files.
Every CSS file is a Sass file. so you can take your .css file contents and put it in a Sass file and it will work just fine.
There are two types of syntaxes while writing CSS in Sass.
1. SASS: Files with the `.sass` extension allows us to write CSS without semicolons and without curly brackets with added indentation for CSS properties.
2\. SCSS: Files with the `.scss` extension are the CSS we normally write, where each CSS declaration ends with a semicolon and each selector is written in curly brackets.
The choice is up to you as to which syntax to use. We will be using the SCSS syntax.
The great thing about Sass is that we write code in a `.scss` file and it will be converted to a CSS file using a tool we will explore later in this article. So, in the end, the browser will render only CSS files.
Let’s understand what Sass provides.
## Variables
Sass allows us to declare variables. This is one of the areas where Sass shines because we can create variables for different colors or font sizes and use that variable in any file.
So, if we want to change the color of any part of the page later, we don’t need to make changes in all places where the color is used. We just change the color in the variable and the change will be reflected in all the places where that color is used.
To declare a variable in Sass, we start the variable name with a dollar sign.
```
$background-color: #ff0000;
$sm-font-size: 16px;
$lg-font-size: 20px;
```
## Comments
Sass provides two ways of writing comments.
1. Single-line comment: double slashes `//`.
2. Multi-line comment: `/* */`.
Note: Single-line comments will not be added to the final compiled CSS file. Only multi-line comments will be added to the final CSS. So, if you need to see the comments in a CSS file, you need to write it using the `/* */` syntax
## Nesting
If you have CSS like below:
%[https://gist.github.com/BetterProgramming/77653dabe06a223fdabdd633bebb40ba]
We can write it using nesting like this:
%[https://gist.github.com/BetterProgramming/1abb63cf3212c0594525acbe1471c7b7]
So, as shown in the above CSS, nesting allows us to group together related code, which is easy to modify and maintain and also saves us from typing extra characters.
## Parent selector
The parent selector is a special selector that’s used in nested selectors to refer to the outer selector.
If we have the following CSS:
%[https://gist.github.com/BetterProgramming/2874e2f44838017e585b7930533618cc]
Then, using the parent selector, we can re-write it like this:
%[https://gist.github.com/BetterProgramming/e90126f3ef4fc1b2b6573c0f8b2886f3]
So, the `&` will refer to the parent which is `a`(anchor tag), in this case.
## Extend
If we have some already defined CSS that we need to apply for another div or element, we can use the `@extend` selector to include the previously defined CSS without re-writing the same CSS again.
%[https://gist.github.com/BetterProgramming/3d0aac81a1d77b728235dfe34b4ada3a]
%[https://codepen.io/myogeshchavan97/pen/dyogrXW]
## Placeholder
A `placeholder` is a special type of syntax that only prints when it is extended and can help keep your compiled CSS neat and clean.
In the above codepen demo about extend, if you click on the down arrow in the CSS section and select the `“View Compiled CSS”` option, you will be able to see the final compiled CSS.
The compiled CSS will look like this:
%[https://gist.github.com/BetterProgramming/2074c3b1c4256f0e764bf14dc16e807c]
As you can see in the compiled CSS, there is a `.menu-button` selector, but we have not used that selector in any HTML code, we have just used it in a SCSS file so we can extend its properties.
There is actually no need for the `.menu-button` class to be added in the final CSS as it’s redundant. So, using the `placeholder` syntax, which is denoted by the percent sign `%`, we can remove that redundant code from the final CSS.
%[https://codepen.io/myogeshchavan97/pen/ExjdMmy]
As you can see in this demo, we have declared the `menu-button` selector using `%menu-button`. So, the final CSS will not have that redundant CSS selector which you can confirm by viewing the compiled CSS.
The compiled CSS will now look like this:
%[https://gist.github.com/BetterProgramming/91309029aef5cfec109c1c479f6c776f]
## Mixin
The `@mixin` selector is similar to `@extend` except that the `@mixin` selector can accept parameters.
Some things in CSS are a bit tedious to write, especially with CSS3 and the many vendor prefixes that exist.
A mixin lets you make groups of CSS declarations that you want to reuse throughout your site. You can even pass in values to make your mixin more flexible. A good use of a mixin is for vendor prefixes.
We declare a mixin using `@mixin` and use it using `@include`.
%[https://gist.github.com/BetterProgramming/f3f1b3426ba1d6df44cbc7680b65f717]
%[https://codepen.io/myogeshchavan97/pen/mdJzoqL]
As you can see in this demo, we have two divs. For the first div, we have not passed any value to the `bradius` mixin while using include so it’s set to the default 5px border-radius.
However, the second div has our 10px border-radius which we passed explicitly.
**A key point** to note about differences between extend and mixin is that we can declare a mixin without accepting any parameter but the final CSS code generated by using the mixin will make the file size larger compared to extend.
Let’s see this through an example.
We will write the above demo of the placeholder from [this Code Pen](https://codepen.io/myogeshchavan97/pen/ExjdMmy?editors=1100) to use a mixin.
%[https://gist.github.com/BetterProgramming/e9600f7ecb7d0c68a61374a8f7e149ca]
%[https://codepen.io/myogeshchavan97/pen/JjdmqJg]
If you see the compiled CSS by clicking on the “View Compiled CSS” menu from the dropdown, you will see the difference. The final CSS code when _extend_ is used is less compared to _mixin_.
So, the same CSS is repeated for every class if we use mixin, which will make the CSS file larger.
Therefore, you need to use mixin only if it’s taking different parameter values and you are going to include that mixin in many places.
If the mixin is used only at one place in the SCSS file and it’s not using any parameters, then it’s better to use extend which will decrease the final CSS file size.
## Partials
Partials play an important role in Sass. Partials allow us to create separate `.scss` files and import in another file, making it easy to maintain the related CSS code.
To declare a file as a partial file, we need to start the filename with the `underscore` symbol and add it in another file using the `@import` syntax without mentioning the underscore and file extension.
For example, we can create `_buttons.scss`, `_base.scss`, `_variables.scss`, and include all of them in the main SCSS file.
To import `_buttons.scss` from the buttons folder, we use `@import 'buttons/buttons';`.
To import `_base.scss`, we use `@import 'base';`.
It’s a general practice to create a single SCSS file to import all other partial files.
```
@import 'variables';
@import 'base';
@import 'buttons';
```
The order of import matters here. If `_buttons.scss` is using some variables declared in `_variables.scss`, then it needs to be imported before `_buttons.scss`, as shown in `main.scss` above.
The difference between Sass’ `@import` and a normal `css import` statement is that Sass’ `@import` will not make extra HTTP requests for each imported SCSS file. Instead, it will add the contents of partial files into a single file.
## Operators and functions
Sass provides support for mathematical operators like `+`, `-`, `*`, `/`, and `%`, which we can use in our SCSS code. It also provides a `calc` function that we can use to calculate any value.
```
button {
width: calc(200px / 2)
}
```
This will make the button width 100px.
There is also a widely-used `lighten` function provided by Sass which allows us to make any color light by a certain percentage. For example, when we mouse hover over any button or link.
Sass also has a `darken` function to make the color dark instead of light.
%[https://codepen.io/myogeshchavan97/pen/bGdmJgd]
Functions make Sass more powerful. If we want to build a menu, we can easily build using the Sass variables and functions.
%[https://codepen.io/myogeshchavan97/pen/RwPeOZm]
So, if in the future we need to add any other menu, we just need to increment the `$tabs-count` value and each menu’s width will be adjusted automatically.
## Setting Up Sass for Local Development
Create a new folder with the name `sass_intro` and execute the following commands in sequence:
```
1. npm init -y
2. npm install node-sass@4.13.1 live-server@1.2.1
```
The first command will create a `package.json` file where `node-sass` and `live-server` dependencies will be added.
Once installed, create an `index.html` and CSS folder with `main.scss` inside it. Your folder structure will look like this now:
Add new scripts in the `scripts` section of the `package.json`.
```
"scripts": {
"compile": "node-sass css/main.scss css/main.css --watch",
"start": "live-server"
}
```
The command will use the `css/main.scss` file and will convert it to `main.css` and will save it to the `css` folder.
Now, your `package.json` file will look like this:
Open the `index.html` file and add the following content:
%[https://gist.github.com/myogeshchavan97/e4e4024a8fd3c6d3013f660c315e23eb]
Here we have included the `css/main.css` file in the `head` tag. This file will be created once we run the `compile` script created from the `package.json`.
Inside the CSS folder, create `_base.scss`, `_variables.scss`, `_buttons.scss`, and `_content.scss` files.
Open `_base.scss` and add the following CSS:
%[https://gist.github.com/BetterProgramming/efd452b766aae8b9e9e9ca9497b1b3b1]
Open `_buttons.scss` and add the following CSS:
%[https://gist.github.com/BetterProgramming/af989b7e9da07f95fa42048925a07eb1]
Open `_content.scss` and add the following CSS:
%[https://gist.github.com/BetterProgramming/6df7c1e60df3d268b8e27a583a3a8880]
Open `_variables.scss` and add the following content:
```
$main-background-color: #f0c77a;
$content-background-color: #777;
```
Open `main.scss` and add the following content:
```
@import 'variables';
@import 'base';
@import 'buttons';
@import 'content';
```
Now run the `compile` and `start` commands from the terminal or command prompt.
```
npm run compile
npm run start
```
The `compile` command will create a new `main.css` file inside the `css` folder and will keep watching for your changes in the `.scss` file to convert it to a CSS file.
The `start` command will load your `index.html` to the browser and will automatically refresh the page if anything is changed in the HTML or CSS files.
**You can check out the GitHub source code for the same in [this repository](https://github.com/myogeshchavan97/sass_intro).**
That’s it for today. I hope you learned something new.
I hope you've been enjoying my articles and tutorials I've been writing. If you found them useful, consider buying me a coffee! I would really appreciate it.
[](https://www.buymeacoffee.com/myogeshchavan97)
**Don’t forget to subscribe to get my weekly newsletter with amazing tips, tricks, and articles directly in your inbox [here](https://yogeshchavan.dev/).**
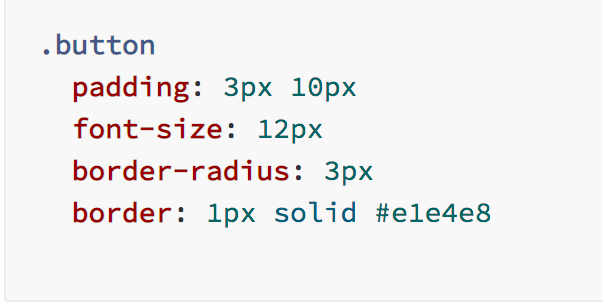 2\. SCSS: Files with the `.scss` extension are the CSS we normally write, where each CSS declaration ends with a semicolon and each selector is written in curly brackets.
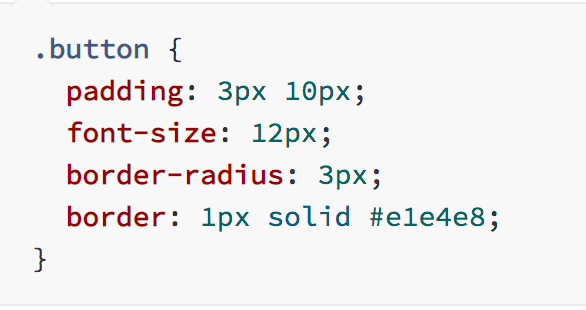 The choice is up to you as to which syntax to use. We will be using the SCSS syntax.
The great thing about Sass is that we write code in a `.scss` file and it will be converted to a CSS file using a tool we will explore later in this article. So, in the end, the browser will render only CSS files.
Let’s understand what Sass provides.
## Variables
Sass allows us to declare variables. This is one of the areas where Sass shines because we can create variables for different colors or font sizes and use that variable in any file.
So, if we want to change the color of any part of the page later, we don’t need to make changes in all places where the color is used. We just change the color in the variable and the change will be reflected in all the places where that color is used.
To declare a variable in Sass, we start the variable name with a dollar sign.
```
$background-color: #ff0000;
$sm-font-size: 16px;
$lg-font-size: 20px;
```
## Comments
Sass provides two ways of writing comments.
1. Single-line comment: double slashes `//`.
2. Multi-line comment: `/* */`.
Note: Single-line comments will not be added to the final compiled CSS file. Only multi-line comments will be added to the final CSS. So, if you need to see the comments in a CSS file, you need to write it using the `/* */` syntax
## Nesting
If you have CSS like below:
%[https://gist.github.com/BetterProgramming/77653dabe06a223fdabdd633bebb40ba]
We can write it using nesting like this:
%[https://gist.github.com/BetterProgramming/1abb63cf3212c0594525acbe1471c7b7]
So, as shown in the above CSS, nesting allows us to group together related code, which is easy to modify and maintain and also saves us from typing extra characters.
## Parent selector
The parent selector is a special selector that’s used in nested selectors to refer to the outer selector.
If we have the following CSS:
%[https://gist.github.com/BetterProgramming/2874e2f44838017e585b7930533618cc]
Then, using the parent selector, we can re-write it like this:
%[https://gist.github.com/BetterProgramming/e90126f3ef4fc1b2b6573c0f8b2886f3]
So, the `&` will refer to the parent which is `a`(anchor tag), in this case.
## Extend
If we have some already defined CSS that we need to apply for another div or element, we can use the `@extend` selector to include the previously defined CSS without re-writing the same CSS again.
%[https://gist.github.com/BetterProgramming/3d0aac81a1d77b728235dfe34b4ada3a]
%[https://codepen.io/myogeshchavan97/pen/dyogrXW]
## Placeholder
A `placeholder` is a special type of syntax that only prints when it is extended and can help keep your compiled CSS neat and clean.
In the above codepen demo about extend, if you click on the down arrow in the CSS section and select the `“View Compiled CSS”` option, you will be able to see the final compiled CSS.
The choice is up to you as to which syntax to use. We will be using the SCSS syntax.
The great thing about Sass is that we write code in a `.scss` file and it will be converted to a CSS file using a tool we will explore later in this article. So, in the end, the browser will render only CSS files.
Let’s understand what Sass provides.
## Variables
Sass allows us to declare variables. This is one of the areas where Sass shines because we can create variables for different colors or font sizes and use that variable in any file.
So, if we want to change the color of any part of the page later, we don’t need to make changes in all places where the color is used. We just change the color in the variable and the change will be reflected in all the places where that color is used.
To declare a variable in Sass, we start the variable name with a dollar sign.
```
$background-color: #ff0000;
$sm-font-size: 16px;
$lg-font-size: 20px;
```
## Comments
Sass provides two ways of writing comments.
1. Single-line comment: double slashes `//`.
2. Multi-line comment: `/* */`.
Note: Single-line comments will not be added to the final compiled CSS file. Only multi-line comments will be added to the final CSS. So, if you need to see the comments in a CSS file, you need to write it using the `/* */` syntax
## Nesting
If you have CSS like below:
%[https://gist.github.com/BetterProgramming/77653dabe06a223fdabdd633bebb40ba]
We can write it using nesting like this:
%[https://gist.github.com/BetterProgramming/1abb63cf3212c0594525acbe1471c7b7]
So, as shown in the above CSS, nesting allows us to group together related code, which is easy to modify and maintain and also saves us from typing extra characters.
## Parent selector
The parent selector is a special selector that’s used in nested selectors to refer to the outer selector.
If we have the following CSS:
%[https://gist.github.com/BetterProgramming/2874e2f44838017e585b7930533618cc]
Then, using the parent selector, we can re-write it like this:
%[https://gist.github.com/BetterProgramming/e90126f3ef4fc1b2b6573c0f8b2886f3]
So, the `&` will refer to the parent which is `a`(anchor tag), in this case.
## Extend
If we have some already defined CSS that we need to apply for another div or element, we can use the `@extend` selector to include the previously defined CSS without re-writing the same CSS again.
%[https://gist.github.com/BetterProgramming/3d0aac81a1d77b728235dfe34b4ada3a]
%[https://codepen.io/myogeshchavan97/pen/dyogrXW]
## Placeholder
A `placeholder` is a special type of syntax that only prints when it is extended and can help keep your compiled CSS neat and clean.
In the above codepen demo about extend, if you click on the down arrow in the CSS section and select the `“View Compiled CSS”` option, you will be able to see the final compiled CSS.
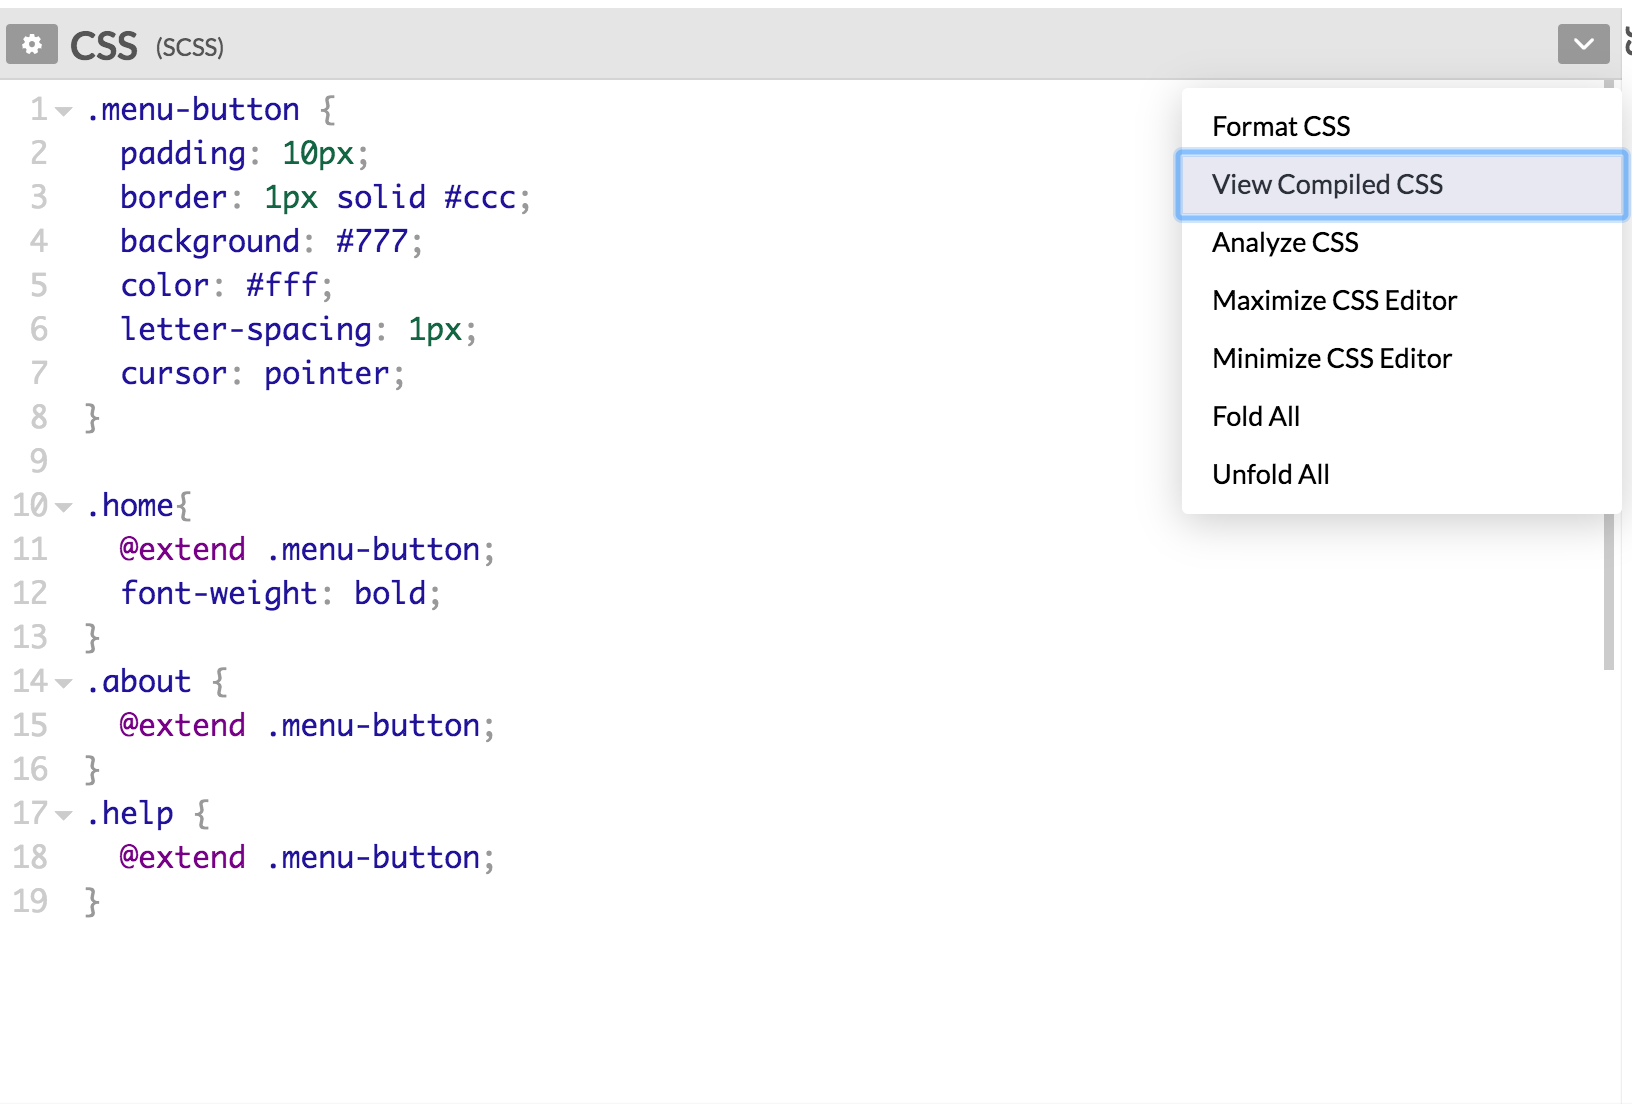 The compiled CSS will look like this:
%[https://gist.github.com/BetterProgramming/2074c3b1c4256f0e764bf14dc16e807c]
As you can see in the compiled CSS, there is a `.menu-button` selector, but we have not used that selector in any HTML code, we have just used it in a SCSS file so we can extend its properties.
There is actually no need for the `.menu-button` class to be added in the final CSS as it’s redundant. So, using the `placeholder` syntax, which is denoted by the percent sign `%`, we can remove that redundant code from the final CSS.
%[https://codepen.io/myogeshchavan97/pen/ExjdMmy]
As you can see in this demo, we have declared the `menu-button` selector using `%menu-button`. So, the final CSS will not have that redundant CSS selector which you can confirm by viewing the compiled CSS.
The compiled CSS will now look like this:
%[https://gist.github.com/BetterProgramming/91309029aef5cfec109c1c479f6c776f]
## Mixin
The `@mixin` selector is similar to `@extend` except that the `@mixin` selector can accept parameters.
Some things in CSS are a bit tedious to write, especially with CSS3 and the many vendor prefixes that exist.
A mixin lets you make groups of CSS declarations that you want to reuse throughout your site. You can even pass in values to make your mixin more flexible. A good use of a mixin is for vendor prefixes.
We declare a mixin using `@mixin` and use it using `@include`.
%[https://gist.github.com/BetterProgramming/f3f1b3426ba1d6df44cbc7680b65f717]
%[https://codepen.io/myogeshchavan97/pen/mdJzoqL]
As you can see in this demo, we have two divs. For the first div, we have not passed any value to the `bradius` mixin while using include so it’s set to the default 5px border-radius.
However, the second div has our 10px border-radius which we passed explicitly.
**A key point** to note about differences between extend and mixin is that we can declare a mixin without accepting any parameter but the final CSS code generated by using the mixin will make the file size larger compared to extend.
Let’s see this through an example.
We will write the above demo of the placeholder from [this Code Pen](https://codepen.io/myogeshchavan97/pen/ExjdMmy?editors=1100) to use a mixin.
%[https://gist.github.com/BetterProgramming/e9600f7ecb7d0c68a61374a8f7e149ca]
%[https://codepen.io/myogeshchavan97/pen/JjdmqJg]
If you see the compiled CSS by clicking on the “View Compiled CSS” menu from the dropdown, you will see the difference. The final CSS code when _extend_ is used is less compared to _mixin_.
The compiled CSS will look like this:
%[https://gist.github.com/BetterProgramming/2074c3b1c4256f0e764bf14dc16e807c]
As you can see in the compiled CSS, there is a `.menu-button` selector, but we have not used that selector in any HTML code, we have just used it in a SCSS file so we can extend its properties.
There is actually no need for the `.menu-button` class to be added in the final CSS as it’s redundant. So, using the `placeholder` syntax, which is denoted by the percent sign `%`, we can remove that redundant code from the final CSS.
%[https://codepen.io/myogeshchavan97/pen/ExjdMmy]
As you can see in this demo, we have declared the `menu-button` selector using `%menu-button`. So, the final CSS will not have that redundant CSS selector which you can confirm by viewing the compiled CSS.
The compiled CSS will now look like this:
%[https://gist.github.com/BetterProgramming/91309029aef5cfec109c1c479f6c776f]
## Mixin
The `@mixin` selector is similar to `@extend` except that the `@mixin` selector can accept parameters.
Some things in CSS are a bit tedious to write, especially with CSS3 and the many vendor prefixes that exist.
A mixin lets you make groups of CSS declarations that you want to reuse throughout your site. You can even pass in values to make your mixin more flexible. A good use of a mixin is for vendor prefixes.
We declare a mixin using `@mixin` and use it using `@include`.
%[https://gist.github.com/BetterProgramming/f3f1b3426ba1d6df44cbc7680b65f717]
%[https://codepen.io/myogeshchavan97/pen/mdJzoqL]
As you can see in this demo, we have two divs. For the first div, we have not passed any value to the `bradius` mixin while using include so it’s set to the default 5px border-radius.
However, the second div has our 10px border-radius which we passed explicitly.
**A key point** to note about differences between extend and mixin is that we can declare a mixin without accepting any parameter but the final CSS code generated by using the mixin will make the file size larger compared to extend.
Let’s see this through an example.
We will write the above demo of the placeholder from [this Code Pen](https://codepen.io/myogeshchavan97/pen/ExjdMmy?editors=1100) to use a mixin.
%[https://gist.github.com/BetterProgramming/e9600f7ecb7d0c68a61374a8f7e149ca]
%[https://codepen.io/myogeshchavan97/pen/JjdmqJg]
If you see the compiled CSS by clicking on the “View Compiled CSS” menu from the dropdown, you will see the difference. The final CSS code when _extend_ is used is less compared to _mixin_.
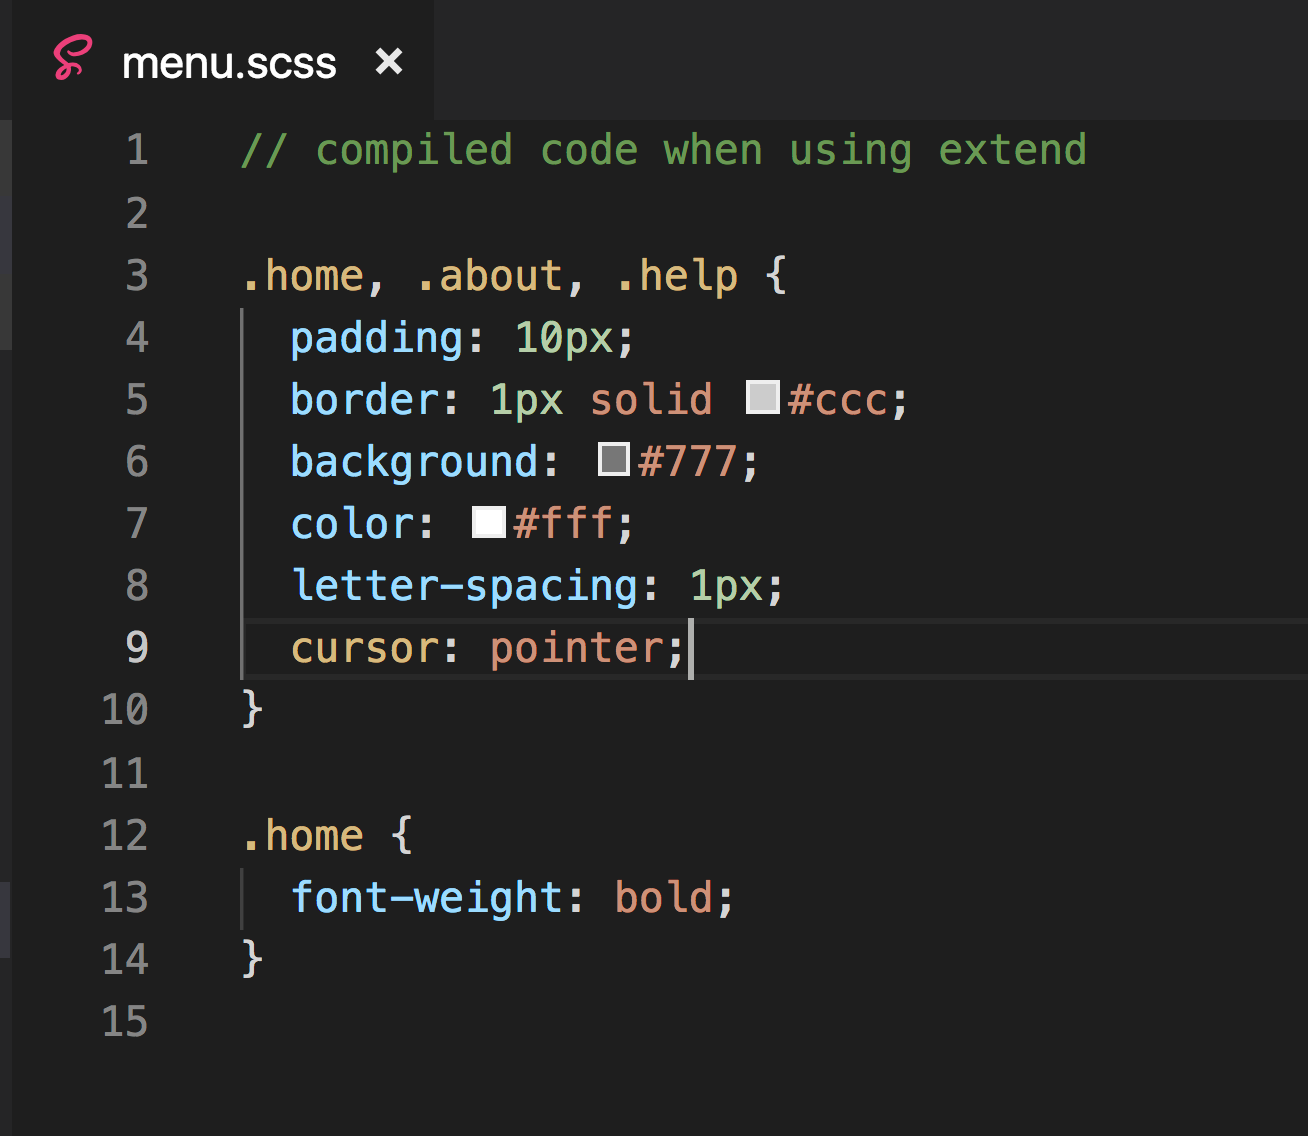
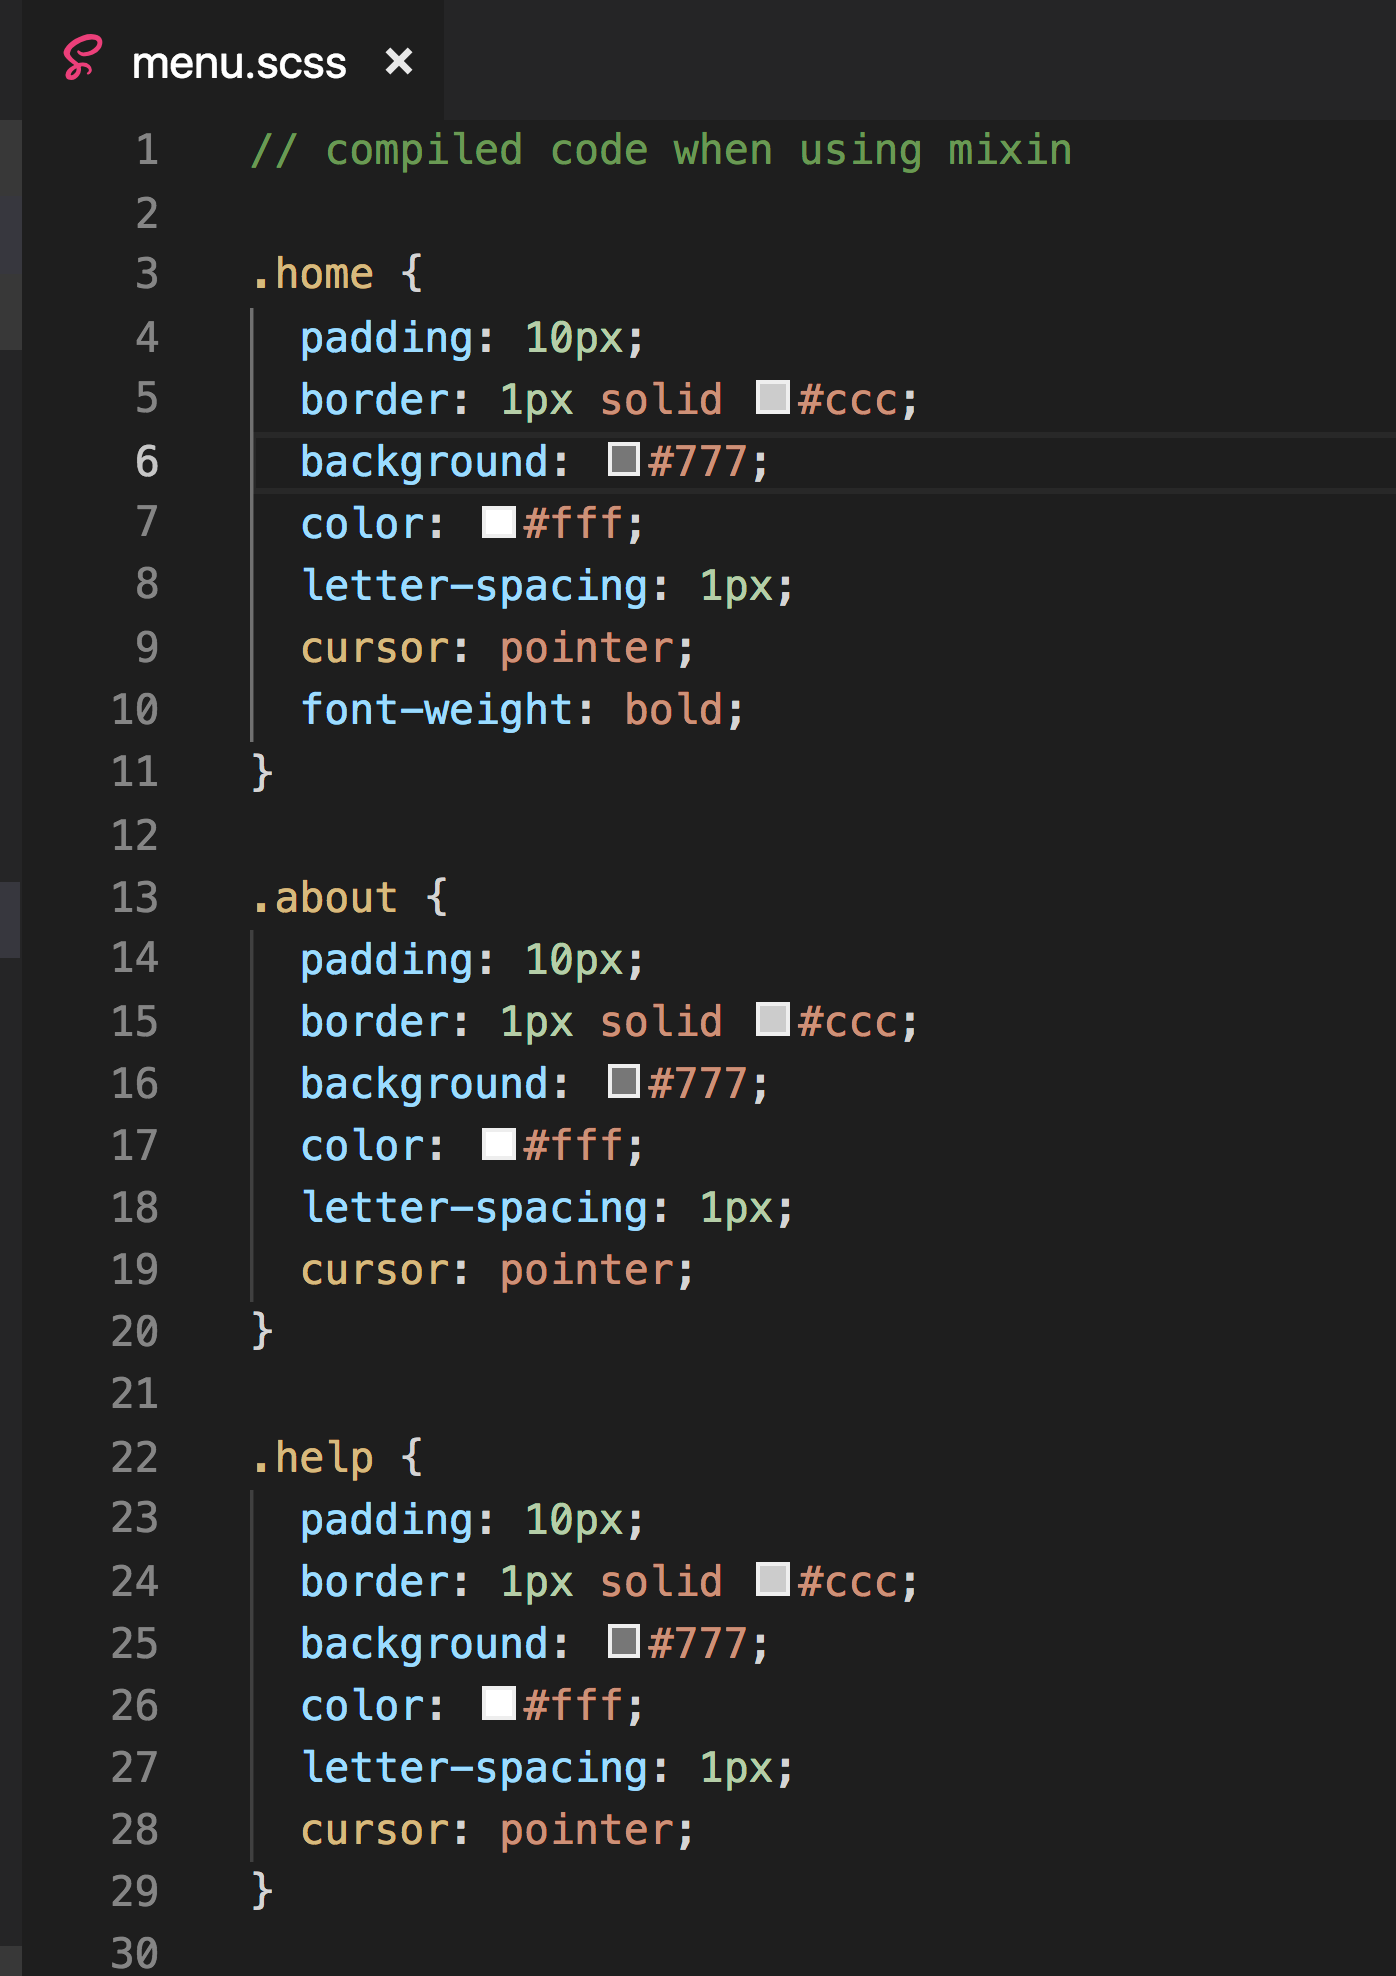 So, the same CSS is repeated for every class if we use mixin, which will make the CSS file larger.
Therefore, you need to use mixin only if it’s taking different parameter values and you are going to include that mixin in many places.
If the mixin is used only at one place in the SCSS file and it’s not using any parameters, then it’s better to use extend which will decrease the final CSS file size.
## Partials
Partials play an important role in Sass. Partials allow us to create separate `.scss` files and import in another file, making it easy to maintain the related CSS code.
To declare a file as a partial file, we need to start the filename with the `underscore` symbol and add it in another file using the `@import` syntax without mentioning the underscore and file extension.
For example, we can create `_buttons.scss`, `_base.scss`, `_variables.scss`, and include all of them in the main SCSS file.
To import `_buttons.scss` from the buttons folder, we use `@import 'buttons/buttons';`.
To import `_base.scss`, we use `@import 'base';`.
It’s a general practice to create a single SCSS file to import all other partial files.
```
@import 'variables';
@import 'base';
@import 'buttons';
```
The order of import matters here. If `_buttons.scss` is using some variables declared in `_variables.scss`, then it needs to be imported before `_buttons.scss`, as shown in `main.scss` above.
The difference between Sass’ `@import` and a normal `css import` statement is that Sass’ `@import` will not make extra HTTP requests for each imported SCSS file. Instead, it will add the contents of partial files into a single file.
## Operators and functions
Sass provides support for mathematical operators like `+`, `-`, `*`, `/`, and `%`, which we can use in our SCSS code. It also provides a `calc` function that we can use to calculate any value.
```
button {
width: calc(200px / 2)
}
```
This will make the button width 100px.
There is also a widely-used `lighten` function provided by Sass which allows us to make any color light by a certain percentage. For example, when we mouse hover over any button or link.
Sass also has a `darken` function to make the color dark instead of light.
%[https://codepen.io/myogeshchavan97/pen/bGdmJgd]
Functions make Sass more powerful. If we want to build a menu, we can easily build using the Sass variables and functions.
%[https://codepen.io/myogeshchavan97/pen/RwPeOZm]
So, if in the future we need to add any other menu, we just need to increment the `$tabs-count` value and each menu’s width will be adjusted automatically.
## Setting Up Sass for Local Development
Create a new folder with the name `sass_intro` and execute the following commands in sequence:
```
1. npm init -y
2. npm install node-sass@4.13.1 live-server@1.2.1
```
The first command will create a `package.json` file where `node-sass` and `live-server` dependencies will be added.
Once installed, create an `index.html` and CSS folder with `main.scss` inside it. Your folder structure will look like this now:
So, the same CSS is repeated for every class if we use mixin, which will make the CSS file larger.
Therefore, you need to use mixin only if it’s taking different parameter values and you are going to include that mixin in many places.
If the mixin is used only at one place in the SCSS file and it’s not using any parameters, then it’s better to use extend which will decrease the final CSS file size.
## Partials
Partials play an important role in Sass. Partials allow us to create separate `.scss` files and import in another file, making it easy to maintain the related CSS code.
To declare a file as a partial file, we need to start the filename with the `underscore` symbol and add it in another file using the `@import` syntax without mentioning the underscore and file extension.
For example, we can create `_buttons.scss`, `_base.scss`, `_variables.scss`, and include all of them in the main SCSS file.
To import `_buttons.scss` from the buttons folder, we use `@import 'buttons/buttons';`.
To import `_base.scss`, we use `@import 'base';`.
It’s a general practice to create a single SCSS file to import all other partial files.
```
@import 'variables';
@import 'base';
@import 'buttons';
```
The order of import matters here. If `_buttons.scss` is using some variables declared in `_variables.scss`, then it needs to be imported before `_buttons.scss`, as shown in `main.scss` above.
The difference between Sass’ `@import` and a normal `css import` statement is that Sass’ `@import` will not make extra HTTP requests for each imported SCSS file. Instead, it will add the contents of partial files into a single file.
## Operators and functions
Sass provides support for mathematical operators like `+`, `-`, `*`, `/`, and `%`, which we can use in our SCSS code. It also provides a `calc` function that we can use to calculate any value.
```
button {
width: calc(200px / 2)
}
```
This will make the button width 100px.
There is also a widely-used `lighten` function provided by Sass which allows us to make any color light by a certain percentage. For example, when we mouse hover over any button or link.
Sass also has a `darken` function to make the color dark instead of light.
%[https://codepen.io/myogeshchavan97/pen/bGdmJgd]
Functions make Sass more powerful. If we want to build a menu, we can easily build using the Sass variables and functions.
%[https://codepen.io/myogeshchavan97/pen/RwPeOZm]
So, if in the future we need to add any other menu, we just need to increment the `$tabs-count` value and each menu’s width will be adjusted automatically.
## Setting Up Sass for Local Development
Create a new folder with the name `sass_intro` and execute the following commands in sequence:
```
1. npm init -y
2. npm install node-sass@4.13.1 live-server@1.2.1
```
The first command will create a `package.json` file where `node-sass` and `live-server` dependencies will be added.
Once installed, create an `index.html` and CSS folder with `main.scss` inside it. Your folder structure will look like this now:
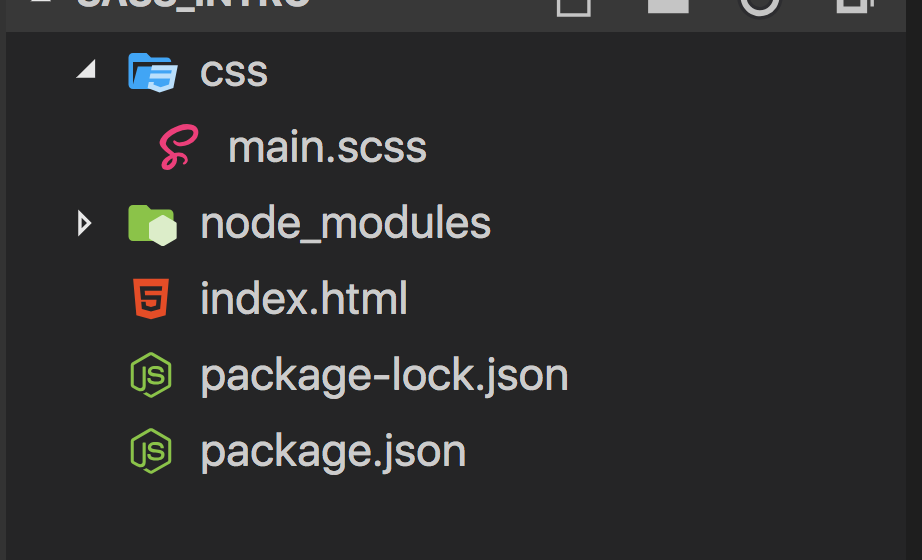 Add new scripts in the `scripts` section of the `package.json`.
```
"scripts": {
"compile": "node-sass css/main.scss css/main.css --watch",
"start": "live-server"
}
```
The command will use the `css/main.scss` file and will convert it to `main.css` and will save it to the `css` folder.
Now, your `package.json` file will look like this:
Add new scripts in the `scripts` section of the `package.json`.
```
"scripts": {
"compile": "node-sass css/main.scss css/main.css --watch",
"start": "live-server"
}
```
The command will use the `css/main.scss` file and will convert it to `main.css` and will save it to the `css` folder.
Now, your `package.json` file will look like this:
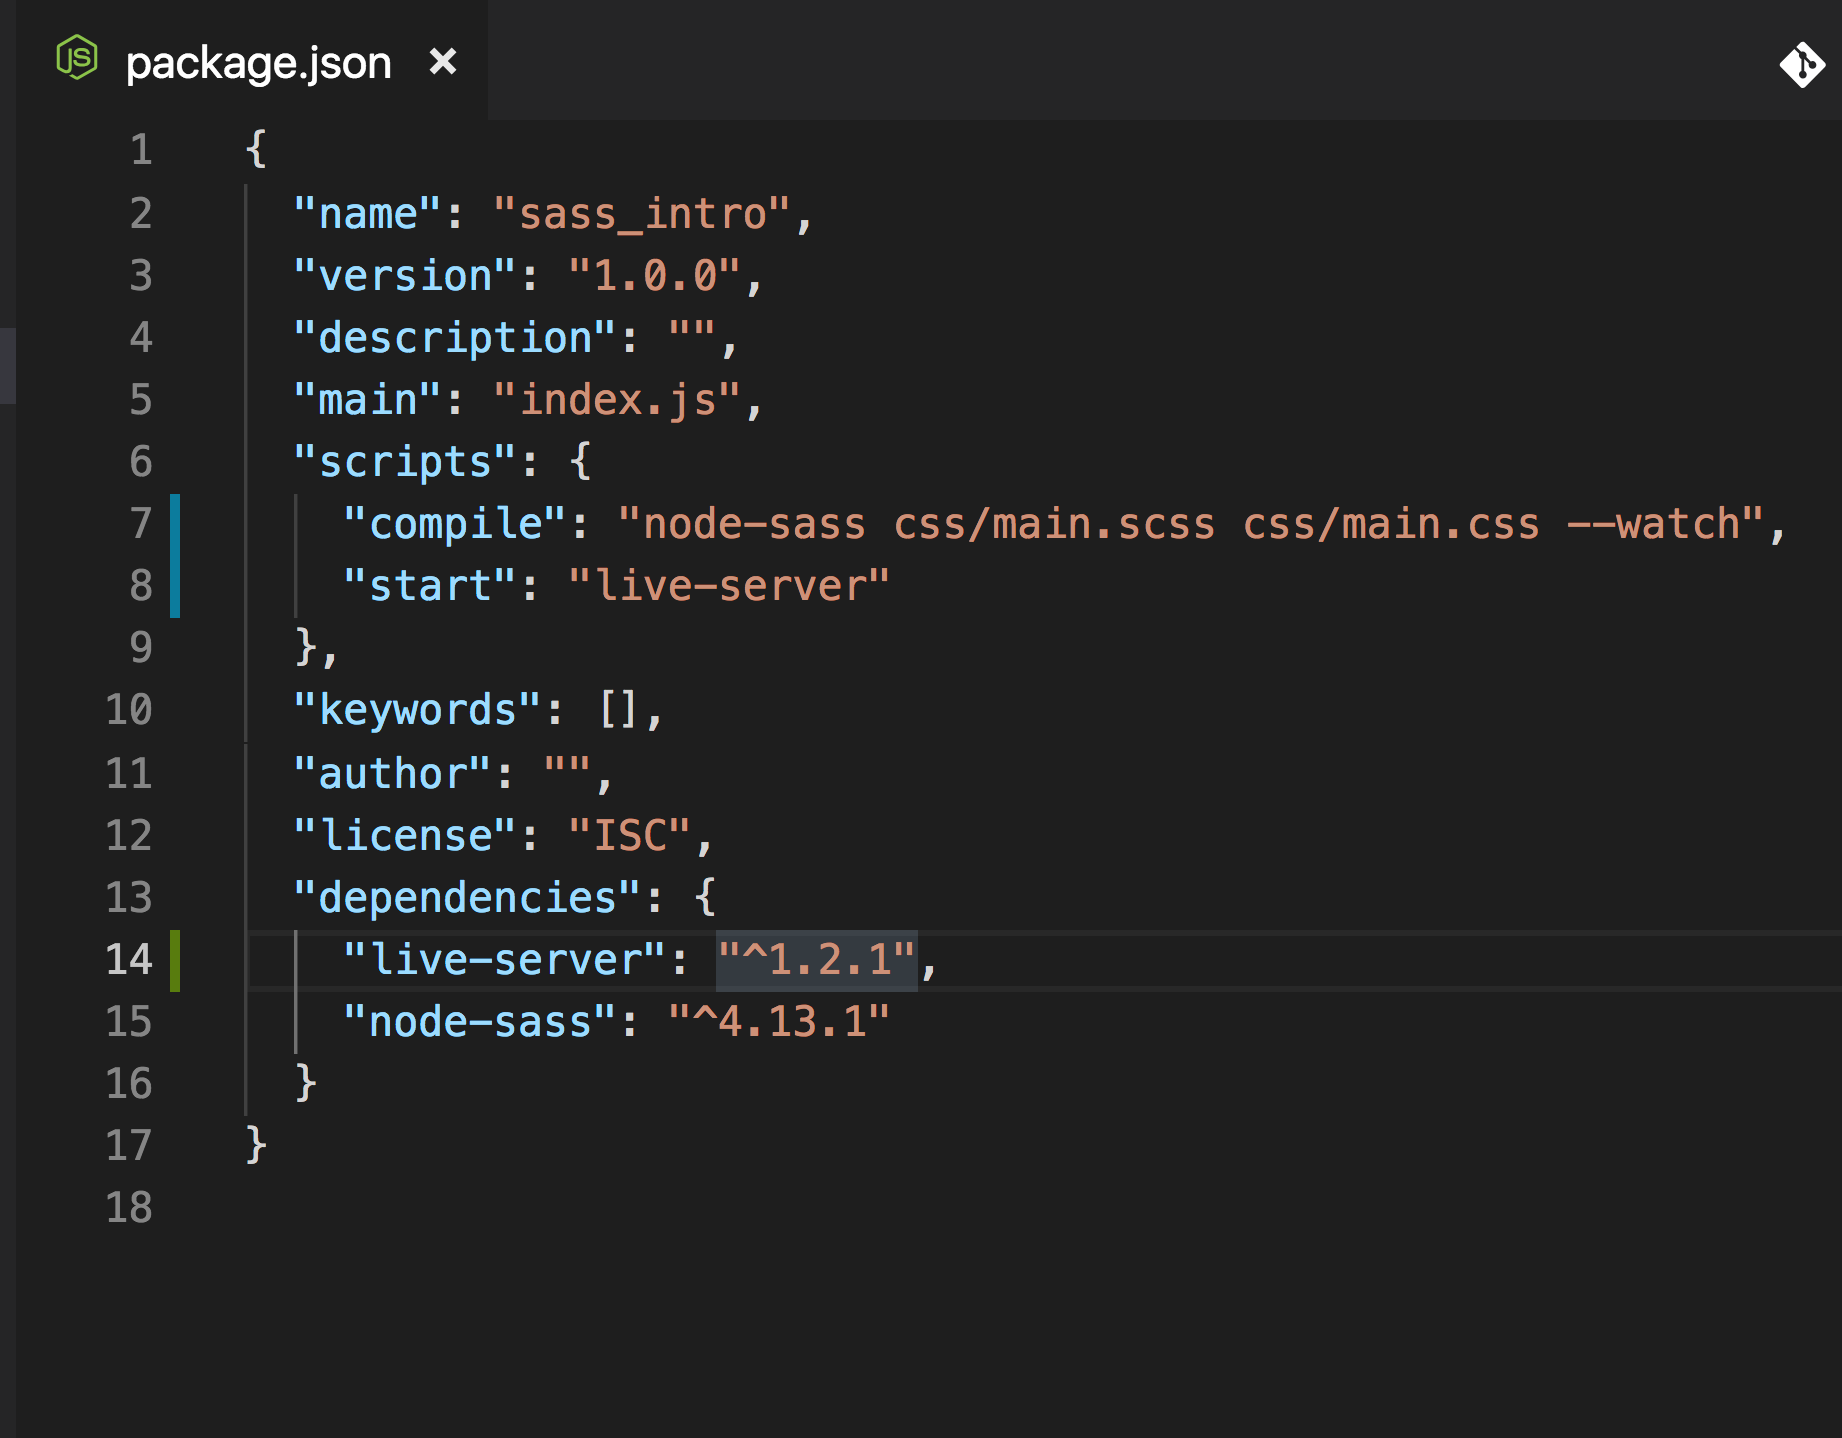 Open the `index.html` file and add the following content:
%[https://gist.github.com/myogeshchavan97/e4e4024a8fd3c6d3013f660c315e23eb]
Here we have included the `css/main.css` file in the `head` tag. This file will be created once we run the `compile` script created from the `package.json`.
Inside the CSS folder, create `_base.scss`, `_variables.scss`, `_buttons.scss`, and `_content.scss` files.
Open `_base.scss` and add the following CSS:
%[https://gist.github.com/BetterProgramming/efd452b766aae8b9e9e9ca9497b1b3b1]
Open `_buttons.scss` and add the following CSS:
%[https://gist.github.com/BetterProgramming/af989b7e9da07f95fa42048925a07eb1]
Open `_content.scss` and add the following CSS:
%[https://gist.github.com/BetterProgramming/6df7c1e60df3d268b8e27a583a3a8880]
Open `_variables.scss` and add the following content:
```
$main-background-color: #f0c77a;
$content-background-color: #777;
```
Open `main.scss` and add the following content:
```
@import 'variables';
@import 'base';
@import 'buttons';
@import 'content';
```
Now run the `compile` and `start` commands from the terminal or command prompt.
```
npm run compile
npm run start
```
The `compile` command will create a new `main.css` file inside the `css` folder and will keep watching for your changes in the `.scss` file to convert it to a CSS file.
The `start` command will load your `index.html` to the browser and will automatically refresh the page if anything is changed in the HTML or CSS files.
**You can check out the GitHub source code for the same in [this repository](https://github.com/myogeshchavan97/sass_intro).**
That’s it for today. I hope you learned something new.
I hope you've been enjoying my articles and tutorials I've been writing. If you found them useful, consider buying me a coffee! I would really appreciate it.
[
Open the `index.html` file and add the following content:
%[https://gist.github.com/myogeshchavan97/e4e4024a8fd3c6d3013f660c315e23eb]
Here we have included the `css/main.css` file in the `head` tag. This file will be created once we run the `compile` script created from the `package.json`.
Inside the CSS folder, create `_base.scss`, `_variables.scss`, `_buttons.scss`, and `_content.scss` files.
Open `_base.scss` and add the following CSS:
%[https://gist.github.com/BetterProgramming/efd452b766aae8b9e9e9ca9497b1b3b1]
Open `_buttons.scss` and add the following CSS:
%[https://gist.github.com/BetterProgramming/af989b7e9da07f95fa42048925a07eb1]
Open `_content.scss` and add the following CSS:
%[https://gist.github.com/BetterProgramming/6df7c1e60df3d268b8e27a583a3a8880]
Open `_variables.scss` and add the following content:
```
$main-background-color: #f0c77a;
$content-background-color: #777;
```
Open `main.scss` and add the following content:
```
@import 'variables';
@import 'base';
@import 'buttons';
@import 'content';
```
Now run the `compile` and `start` commands from the terminal or command prompt.
```
npm run compile
npm run start
```
The `compile` command will create a new `main.css` file inside the `css` folder and will keep watching for your changes in the `.scss` file to convert it to a CSS file.
The `start` command will load your `index.html` to the browser and will automatically refresh the page if anything is changed in the HTML or CSS files.
**You can check out the GitHub source code for the same in [this repository](https://github.com/myogeshchavan97/sass_intro).**
That’s it for today. I hope you learned something new.
I hope you've been enjoying my articles and tutorials I've been writing. If you found them useful, consider buying me a coffee! I would really appreciate it.
[ ](https://www.buymeacoffee.com/myogeshchavan97)
**Don’t forget to subscribe to get my weekly newsletter with amazing tips, tricks, and articles directly in your inbox [here](https://yogeshchavan.dev/).**
](https://www.buymeacoffee.com/myogeshchavan97)
**Don’t forget to subscribe to get my weekly newsletter with amazing tips, tricks, and articles directly in your inbox [here](https://yogeshchavan.dev/).**