# How to Build a Clone of GitHub's File Search Functionality
In this article, we will build a project that mimics the lesser-known but awesome file search functionality provided by GitHub.
To see how it works, go to any GitHub repository and press the letter `t` on your keyboard which will land you in search view. Then you can simultaneously search and scroll through the list as shown in the below gif.
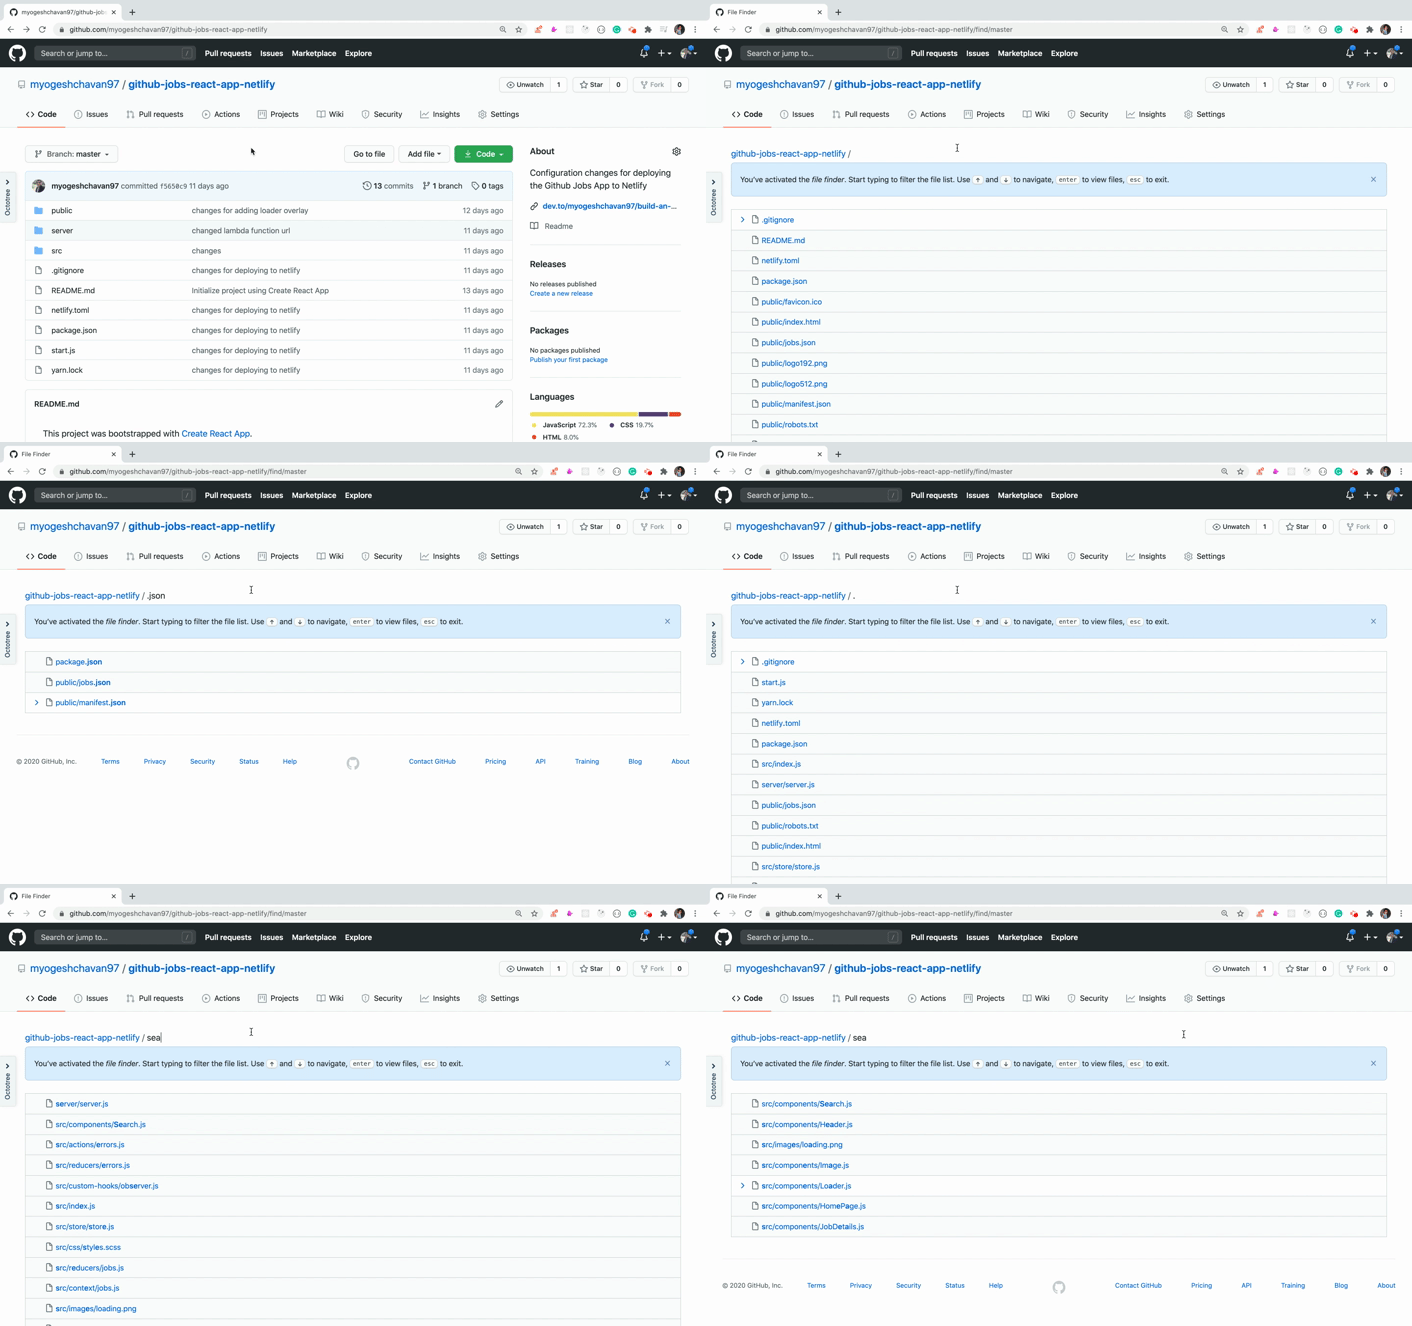
By building this app, you will learn the following:
* How to create a UI similar to a GitHub repository
* How to work with keyboard events in React
* How to work with navigation using the arrow keys on your keyboard
* How to highlight matching text while searching
* How to add icons in React
* How to render HTML content in a JSX expression
and much more.
**You can see the live demo of the final application [here](https://github-file-search-react.netlify.app/).**
> Want to learn Redux in detail and build a complete food ordering app? check out my [Mastering Redux](https://master-redux.yogeshchavan.dev/) course. Following is the preview of the app, we'll be building in the course. It's a great project you can add to your portfolio/resume.
Note that, in this app, I have used INR as the currency for displaying the prices but you can easily change it to USD or AUD or any other currency with a single configuration change in the app.
%[https://www.youtube.com/watch?v=izSw74H08Bc]
### Let’s get started
Create a new project using `create-react-app`:
```js
create-react-app github-file-search-react
```
Once the project is created, delete all files from the `src` folder and create `index.js`, `App.js` and `styles.scss` files inside the `src` folder. Also, create `components` and `utils` folders inside the `src` folder.
Install the necessary dependencies:
```js
yarn add moment@2.27.0 node-sass@4.14.1 prop-types@15.7.2 react-icons@3.10.0
```
Open `styles.scss` and add the contents from [here](https://github.com/myogeshchavan97/github-file-search-react/blob/master/src/styles.scss) inside it.
Create a new file `Header.js` inside the `components` folder with the following content:
```js
import React from 'react';
const Header = () =>
GitHub File Search
;
export default Header;
```
Create a new file `api.js` inside the `utils` folder and add the content from [here](https://github.com/myogeshchavan97/github-file-search-react/blob/master/src/utils/api.js) inside it.
In this file, we have created static data to be displayed on the UI to keep the application simple and easy to understand.
Create a new file `ListItem.js` inside the `components` folder with the following content:
```js
import React from 'react';
import moment from 'moment';
import { AiFillFolder, AiOutlineFile } from 'react-icons/ai';
const ListItem = ({ type, name, comment, modified_time }) => {
return (
{type === 'folder' ? (
) : (
)}
{name}
{comment}
{moment(modified_time).fromNow()}
);
};
export default ListItem;
```
In this file, we are taking the data of each file we want to display and we're displaying the folder/file icon, the name of the file, the comment(s), and the last time the file was modified.
For displaying the icons, we'll use the `react-icons` npm library. It has a really nice website that lets you easily search and use the icons you need. Check it out [here](https://react-icons.github.io/react-icons/).
The icons component accepts the `color` and `size` props to customize the icon which we have used in the above code.
Create a new file called `FilesList.js` inside the `components` folder with the following content:
```js
import React from 'react';
import ListItem from './ListItem';
const FilesList = ({ files }) => {
return (
);
};
export default FilesList;
```
In this file, we read the static data from the `api.js` file and then display each element of the `files` array by using the array map method.
Now open the `src/App.js` file and add the following code inside it:
```js
import React from 'react';
import Header from './components/Header';
import FilesList from './components/FilesList';
import files from './utils/api';
export default class App extends React.Component {
state = {
filesList: files
};
render() {
const { counter, filesList } = this.state;
return (
);
}
}
```
In this file, we have added a state to store the static files data which we can modify whenever we need to do so. Then we have passed it to the `FilesList` component to display on the UI.
Now, open the `index.js` file and add the following code inside it:
```js
import React from 'react';
import ReactDOM from 'react-dom';
import App from './App';
import './styles.scss';
ReactDOM.render(, document.getElementById('root'));
```
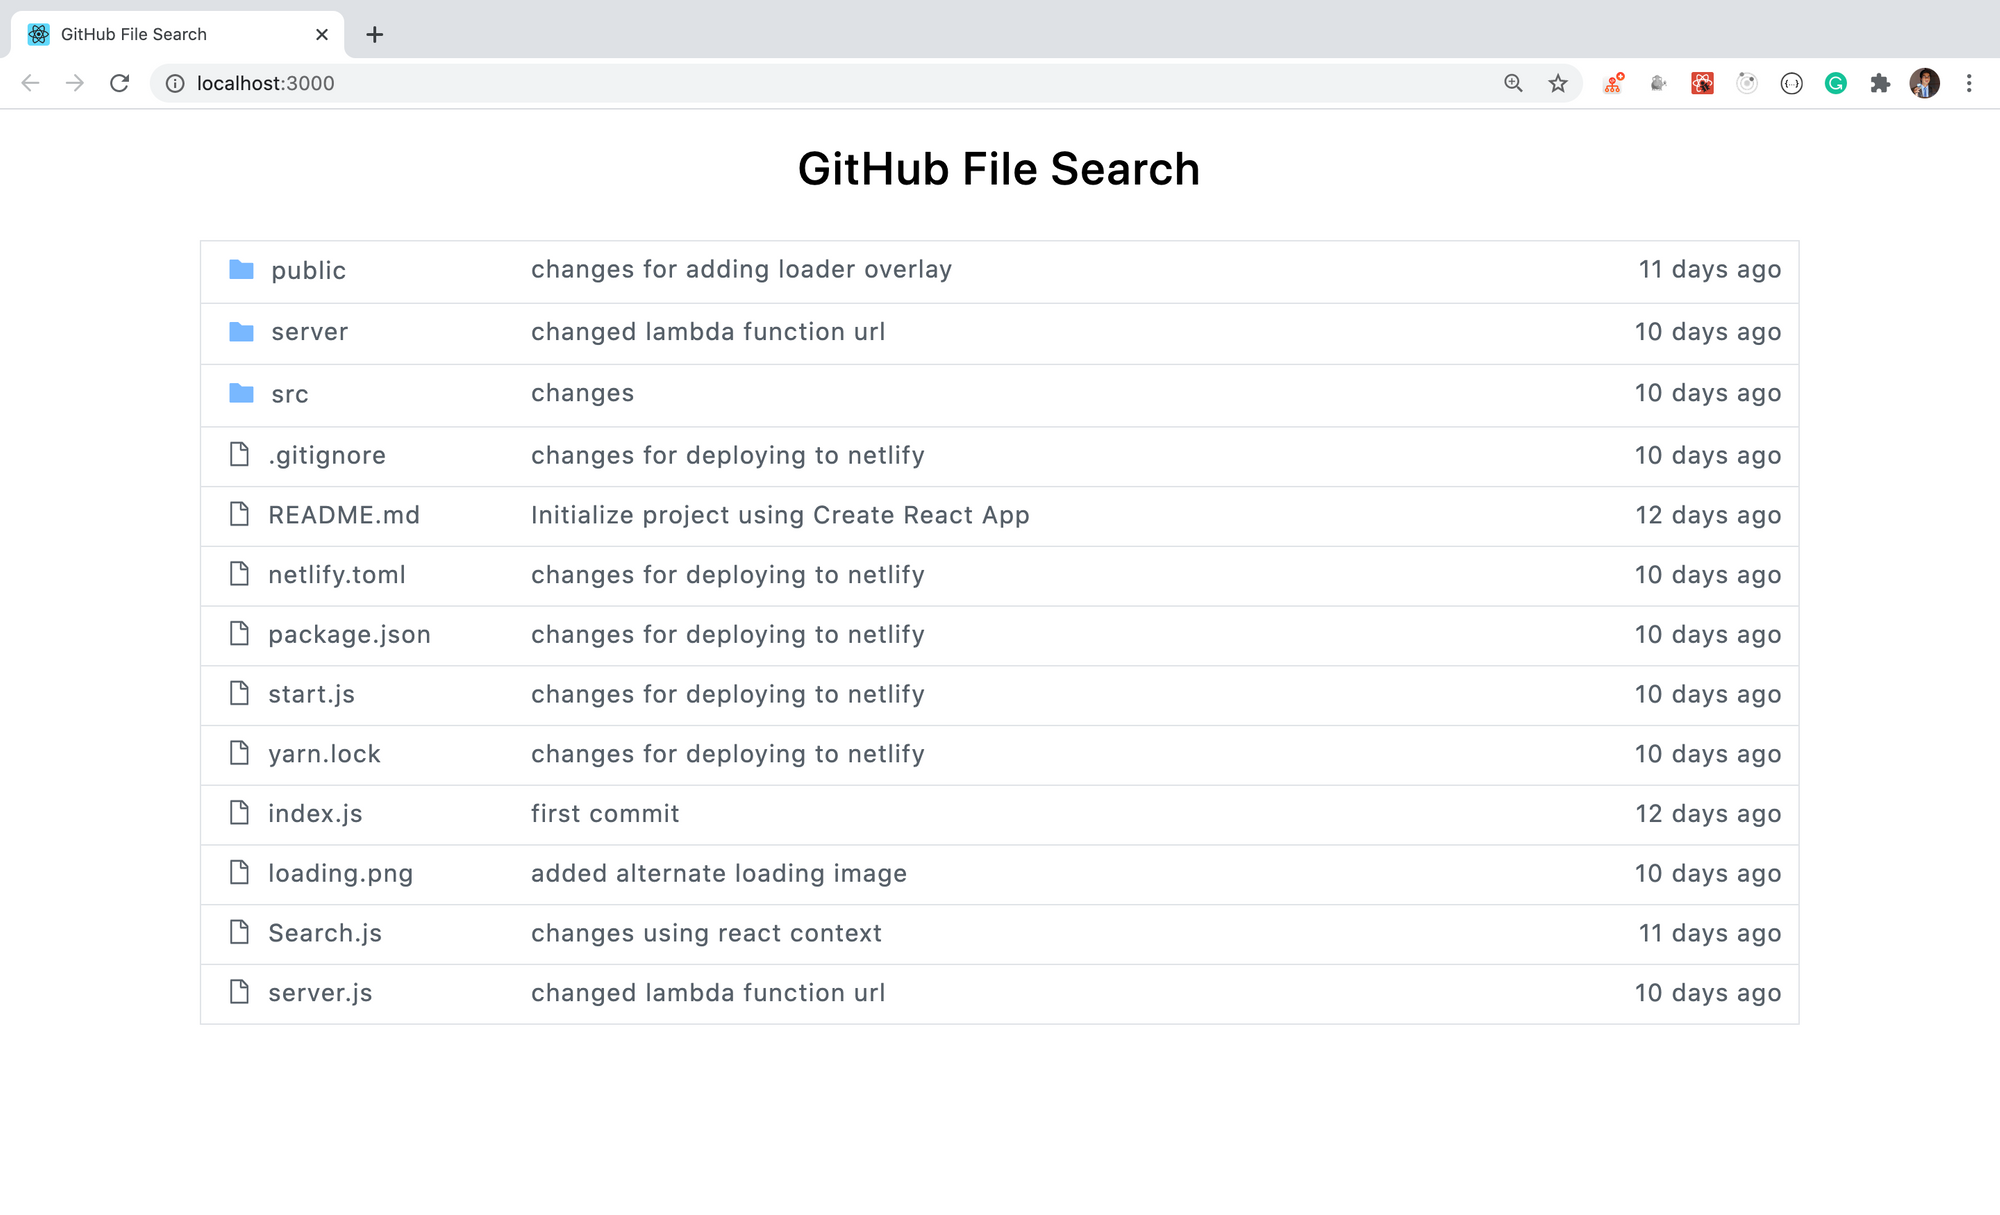
Now, start your application by running the `yarn start` command from the terminal or command prompt and you will see the following initial screen:
You can find the code up to this point in [this branch](https://github.com/myogeshchavan97/github-file-search-react/tree/initial_code).
## Add basic search functionality
Now, let's add the functionality which changes the UI and allows us to search through files when we press the letter `t` on our keyboard.
Inside the `utils` folder create a new file called `keyCodes.js` with the following content:
```js
export const ESCAPE_CODE = 27;
export const HOTKEY_CODE = 84; // key code of letter t
export const UP_ARROW_CODE = 38;
export const DOWN_ARROW_CODE = 40;
```
Create a new file called `SearchView.js` inside the `components` folder with the following content:
```jsx
import React, { useState, useEffect, useRef } from 'react';
const SearchView = ({ onSearch }) => {
const [input, setInput] = useState('');
const inputRef = useRef();
useEffect(() => {
inputRef.current.focus();
}, []);
const onInputChange = (event) => {
const input = event.target.value;
setInput(input);
onSearch(input);
};
return (
My Repository /
);
};
export default SearchView;
```
We are using React Hooks here for our state and lifecycle methods. If you are new to React Hooks check out [this article](https://levelup.gitconnected.com/an-introduction-to-react-hooks-50281fd961fe?source=friends_link&sk=89baff89ec8bc637e7c13b7554904e54) for an introduction.
In this file, we have first declared a state to store the user typed input. Then we added a `ref` using the `useRef` Hook so we can focus on the input field when the component is mounted.
```js
const inputRef = useRef();
useEffect(() => {
inputRef.current.focus();
}, []);
...
```
In this code, by passing the empty array `[]` as the second argument to the `useEffect` hook, the code inside the `useEffect` hook will only be executed once when the component is mounted. This acts as the `componentDidMount` lifecycle method in class components.
Then we assigned the ref to the input field as `ref={inputRef}`. On change of the input field inside the `onInputChange` handler, we are calling the `onSearch` method passed as a prop to the component from the `App.js` file.
Now, open `App.js` and replace its contents with the following code:
```js
import React from 'react';
import Header from './components/Header';
import FilesList from './components/FilesList';
import SearchView from './components/SearchView';
import { ESCAPE_CODE, HOTKEY_CODE } from './utils/keyCodes';
import files from './utils/api';
export default class App extends React.Component {
state = {
isSearchView: false,
filesList: files
};
componentDidMount() {
window.addEventListener('keydown', this.handleEvent);
}
componentWillUnmount() {
window.removeEventListener('keydown', this.handleEvent);
}
handleEvent = (event) => {
const keyCode = event.keyCode || event.which;
switch (keyCode) {
case HOTKEY_CODE:
this.setState((prevState) => ({
isSearchView: true,
filesList: prevState.filesList.filter((file) => file.type === 'file')
}));
break;
case ESCAPE_CODE:
this.setState({ isSearchView: false, filesList: files });
break;
default:
break;
}
};
handleSearch = (searchTerm) => {
let list;
if (searchTerm) {
list = files.filter(
(file) =>
file.name.toLowerCase().indexOf(searchTerm.toLowerCase()) > -1 &&
file.type === 'file'
);
} else {
list = files.filter((file) => file.type === 'file');
}
this.setState({
filesList: list
});
};
render() {
const { isSearchView, filesList } = this.state;
return (
{isSearchView ? (
) : (
)}
);
}
}
```
Now, restart the app by running the `yarn start` command again and check its functionality.
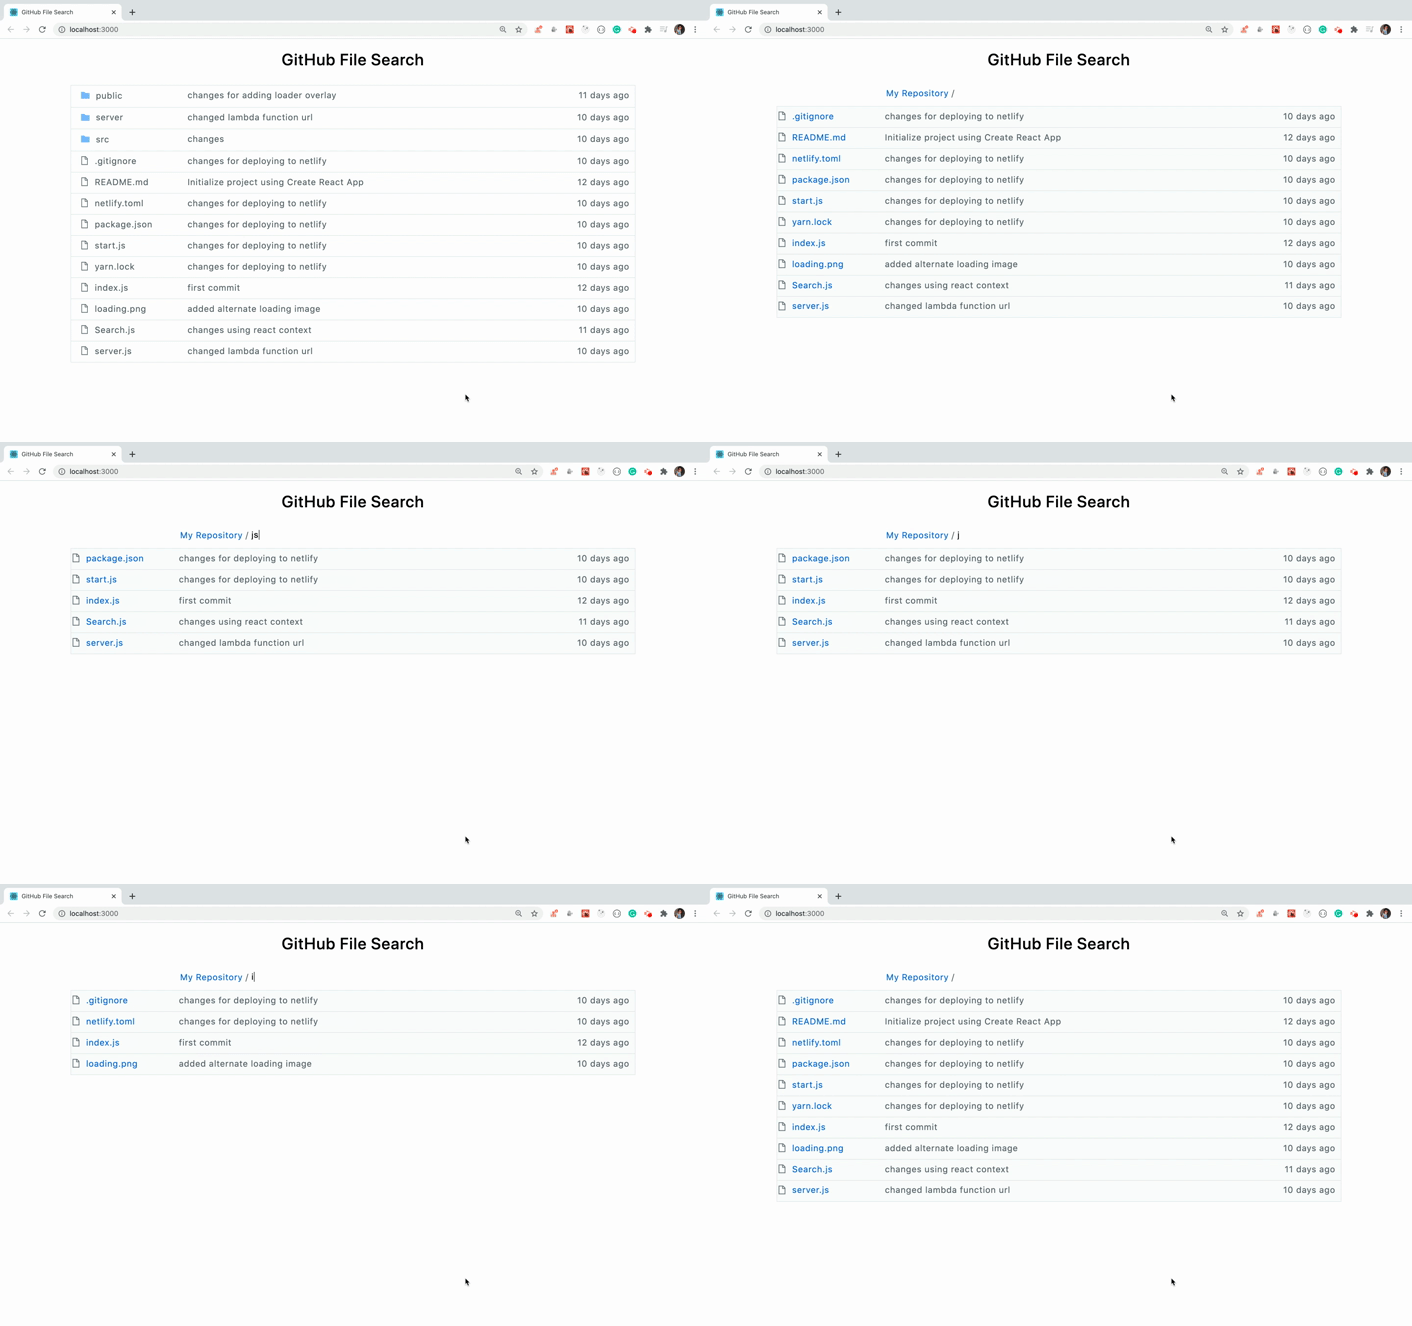
As you can see, initially all folders and files are displayed. Then when we press the letter `t` on the keyboard, the view changes to allow us to search through the displayed files.
Now, let's understand the code from the `App.js` file.
In this file, we have first declared `isSearchView` as a state variable. Then inside the `componentDidMount` and `componentWillUnmount` lifecycle methods, we are adding and removing the `keydown` event handler, respectively.
Then inside the `handleEvent` function, we are checking which key is pressed by the user.
* If the user presses the t key, then we set the `isSearchView` state to true and update the `filesList` state array to include only files and exclude the folders.
* If the user presses the escape key then we set the `isSearchView` state to false and update the `filesList` state array to include all the files and folders.
The reason we declare `HOTKEY_CODE` and `ESCAPE_CODE` in separate files (`keyCodes.js` instead of directly using the keycode like 84) is that later, if we want to change the hotkey from `t` to `s`, then we just need to change the keycode in that file. It will reflect the change in all files where it's used without needing to change it in every file.
Now, let's understand the `handleSearch` function. In this function, we check if the user has entered something in the input search box and then filter out the matching file name(s) which include that search term. Then we update the state with the filtered result(s).
Then inside the render method, based on the `isSearchView` value, we display either the file list view or search view to the user.
You can find code up to this point in [this branch](https://github.com/myogeshchavan97/github-file-search-react/tree/switching_view).
## Add functionality to navigate between files
Now, let's add the functionality to display an arrow in front of the currently selected file while navigating the list of files.
Create a new file called `InfoMessage.js` inside the `components` folder with the following content:
```js
import React from 'react';
const InfoMessage = () => {
return (
You've activated the file finder. Start typing to filter the file
list. Use ↑ and{' '}
↓ to navigate,{' '}
esc to exit.
);
};
export default InfoMessage;
```
Now, open the `App.js` file and import the `InfoMessage` component to use it:
```js
import InfoMessage from './components/InfoMessage';
```
Add a new state variable called `counter` with the initial value of `0`. This is to keep track of the index of the arrow.
Inside the `handleEvent` handler, get the `filesList` and `counter` values from state:
```js
const { filesList, counter } = this.state;
```
Add two new switch cases:
```js
case UP_ARROW_CODE:
if (counter > 0) {
this.setState({ counter: counter - 1 });
}
break;
case DOWN_ARROW_CODE:
if (counter < filesList.length - 1) {
this.setState({ counter: counter + 1 });
}
break;
```
Here, we decrement the counter state value when we press the up arrow on the keyboard and increment when we press the down arrow.
Also, import the up and down array constants at the top of the file:
```js
import {
ESCAPE_CODE,
HOTKEY_CODE,
UP_ARROW_CODE,
DOWN_ARROW_CODE
} from './utils/keyCodes';
```
Inside the `handleSearch` function, reset the `counter` state to `0` at the end of the function so the arrow will always display for the first file from the list while filtering the files list.
```js
this.setState({
filesList: list,
counter: 0
});
```
Change the render method to display the `InfoMessage` component and pass `counter` and `isSearchView` as props to the `FilesList` component:
```js
render() {
const { isSearchView, counter, filesList } = this.state;
return (
{isSearchView ? (
) : (
)}
);
}
```
Now, open the `FilesList.js` file and accept the `isSearchView` and `counter` props and pass them to the `ListItem` component.
Your `FilesList.js` file will look like this now:
```js
import React from 'react';
import ListItem from './ListItem';
const FilesList = ({ files, isSearchView, counter }) => {
return (
);
};
export default ListItem;
```
In this file, we first accept the `isSearchView` and `counter` prop. Then we check if the index of the currently displayed file from the list matches with the counter value.
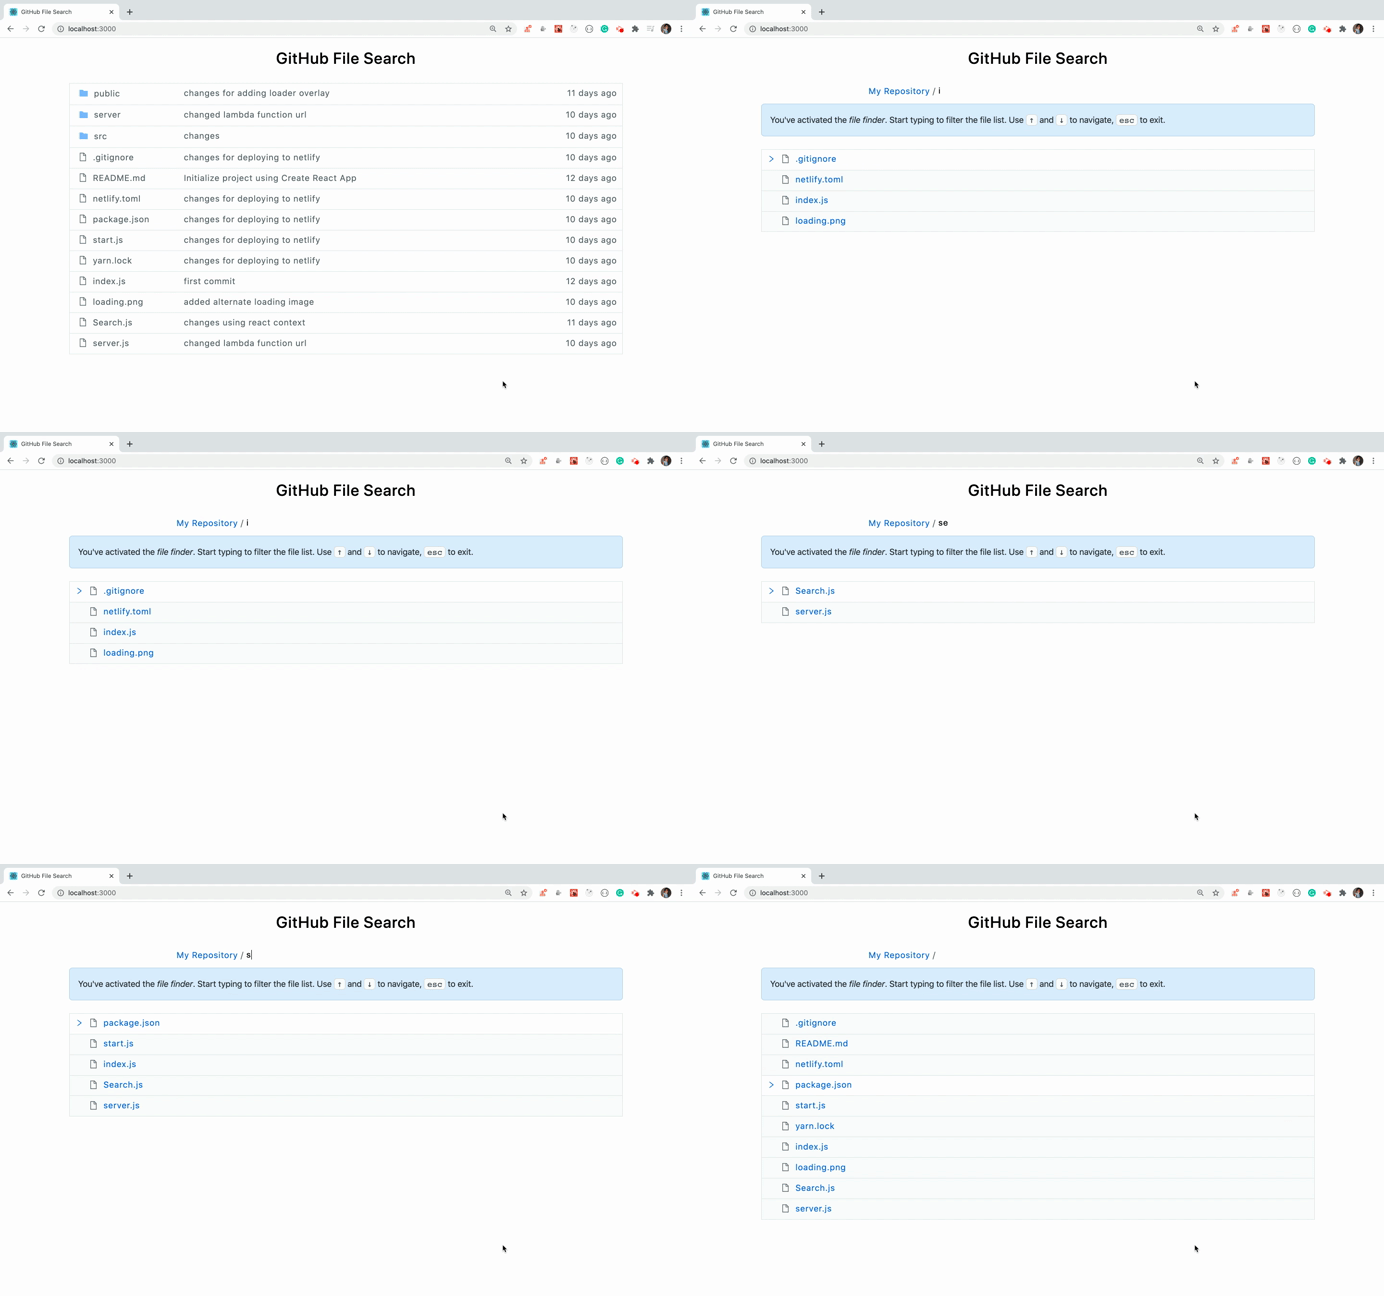
Based on that, we display the arrow in front only for that file. Then when we use the down or up arrow to navigate through the list, we increment or decrement the counter value respectively in the `App.js` file.
Based on the `isSearchView` value we display or hide the comment and time column in the search view on the UI.
Now, restart the app by running the `yarn start` command again and check its functionality:
You can find the code up to this point in [this branch](https://github.com/myogeshchavan97/github-file-search-react/tree/navigation_functionality).
## Add functionality to highlight matching text
Now, let's add the functionality to highlight the matching text from the filename when we filter the file.
Open `App.js` and change the `handleSearch` function to the following code:
```js
handleSearch = (searchTerm) => {
let list;
if (searchTerm) {
const pattern = new RegExp(searchTerm, 'gi');
list = files
.filter(
(file) =>
file.name.toLowerCase().indexOf(searchTerm.toLowerCase()) > -1 &&
file.type === 'file'
)
.map((file) => {
return {
...file,
name: file.name.replace(pattern, (match) => {
return `${match}`;
})
};
});
} else {
list = files.filter((file) => file.type === 'file');
}
this.setState({
filesList: list,
counter: 0
});
};
```
In this code, first, we use the RegExp constructor to create a dynamic regular expression for global and case insensitive search:
```js
const pattern = new RegExp(searchTerm, 'gi');
```
Then we filter out the files which match that search criteria:
```js
files.filter(
(file) =>
file.name.toLowerCase().indexOf(searchTerm.toLowerCase()) > -1 &&
file.type === 'file'
);
```
Then we call the array map method on the result we got from the above filter functionality.
In the map method, we use the string replace method.
The replace method accepts two parameters:
* pattern to search for
* function to execute for each matched pattern
We use the `replace` method to find all the matches for the `pattern` and replace it with the string ${match}`. Here match will contain the matched text from the file name.
If you check the JSON structure from the `utils/api.js` file, the structure of each file looks like this:
```js
{
id: 12,
type: 'file',
name: 'Search.js',
comment: 'changes using react context',
modified_time: '2020-06-30T07:55:33Z'
}
```
As we want to replace the text from the name field only, we spread out the file object properties and only change the name, keeping other values as they are.
```js
{
...file,
name: file.name.replace(pattern, (match) => {
return `${match}`;
})
}
```
Now, restart the app by running the `yarn start` command again and check its functionality.
You will see that the HTML is displayed as it is on the UI when you search:
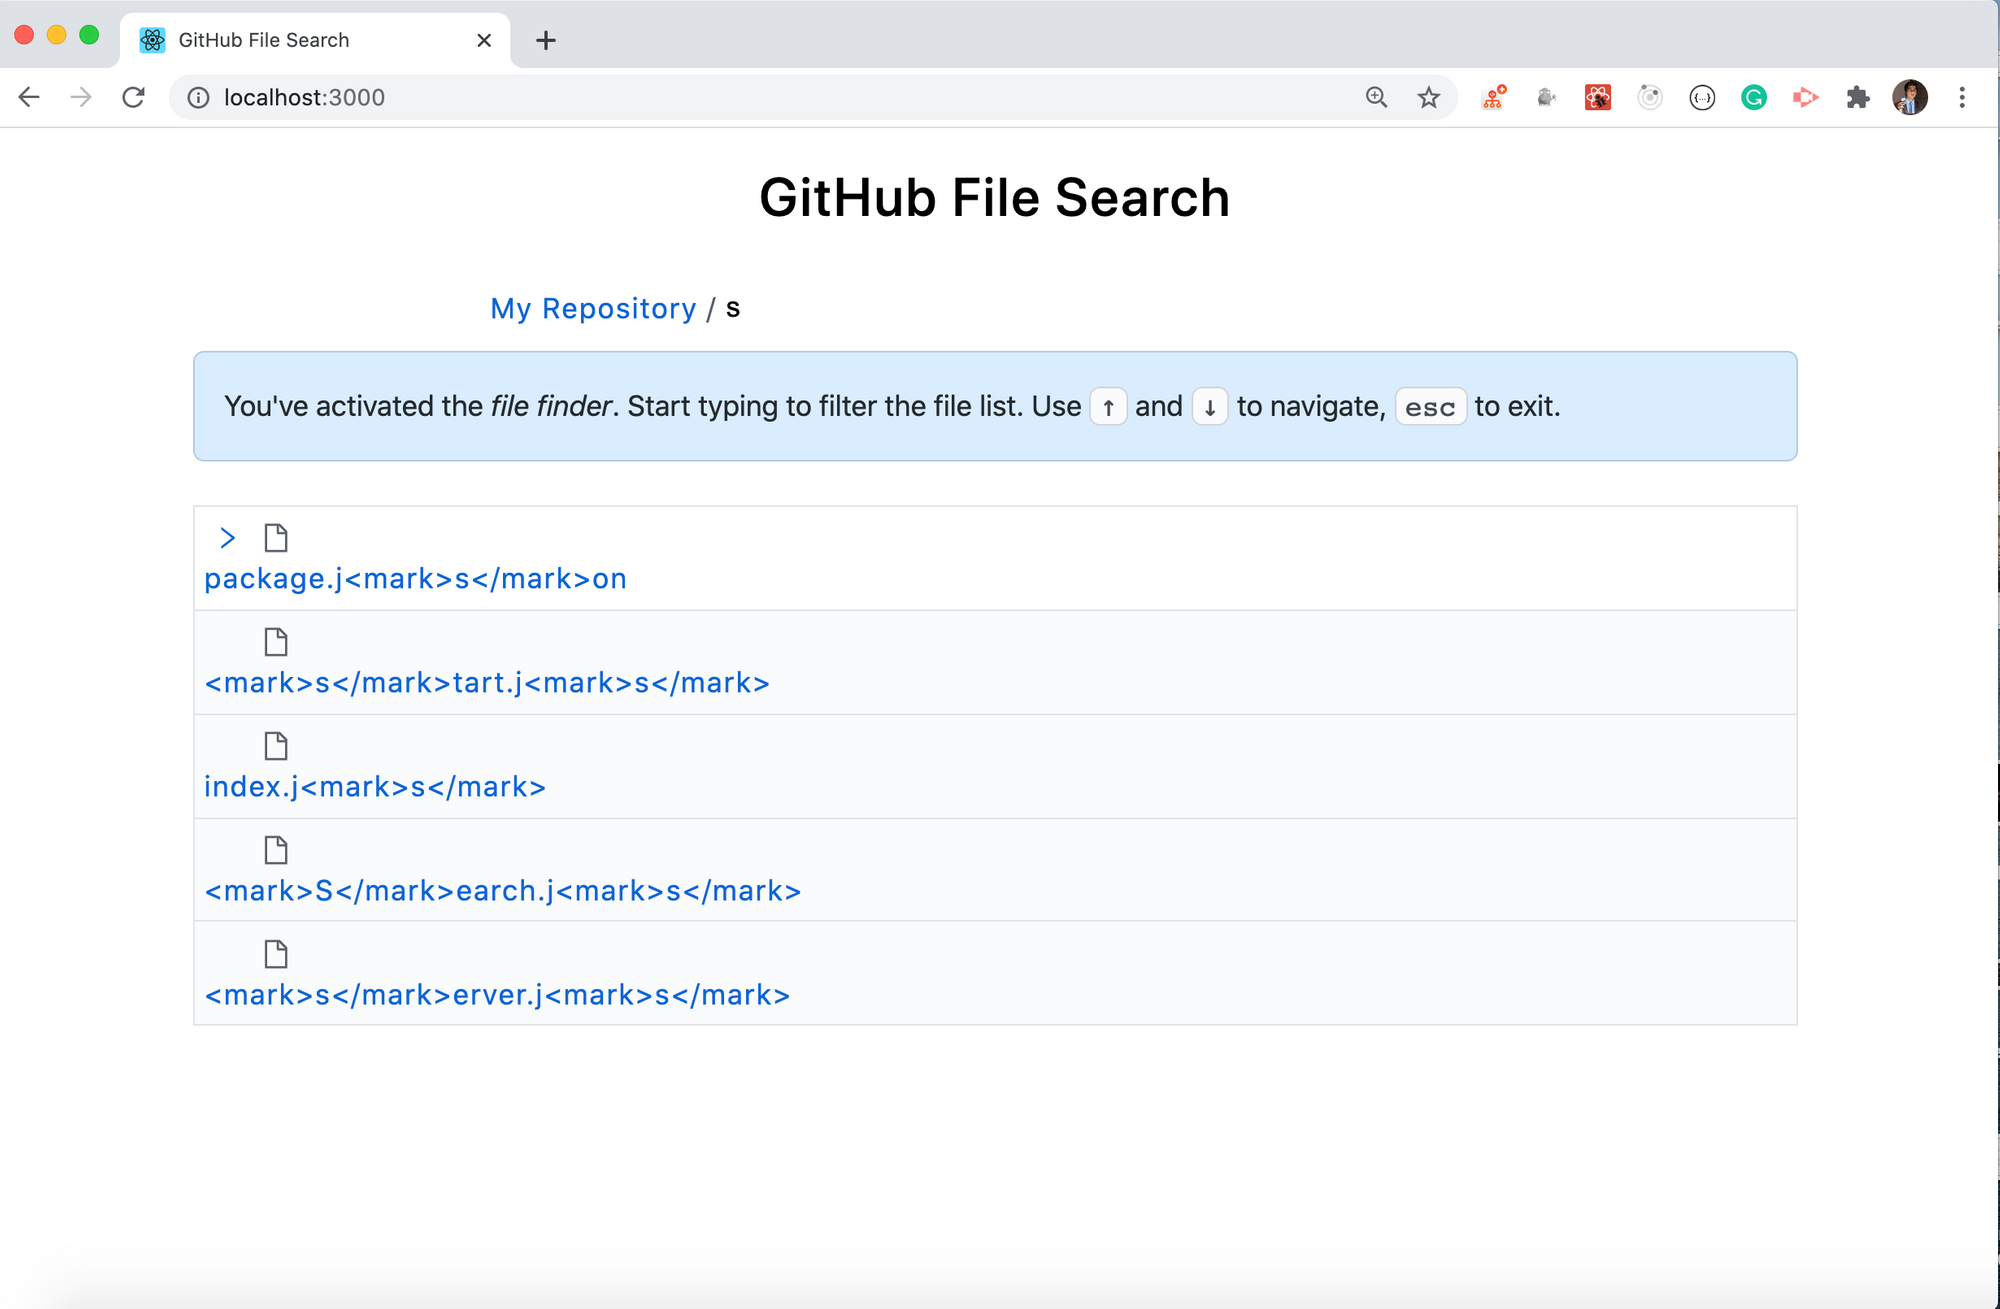
This is because we are displaying the file name in the `ListItem.js` file in the following way:
```js
{name}
```
And to prevent Cross-site scripting (XSS) attacks, React escapes all the content displayed using the JSX Expression (which is in curly brackets).
So if we want to actually display the correct HTML, we need to use a special prop known as `dangerouslySetInnerHTML`. It passes the `__html` name with the HTML to display as the value like this:
```js
```
Now, restart the app by running the `yarn start` command again and check its functionality:
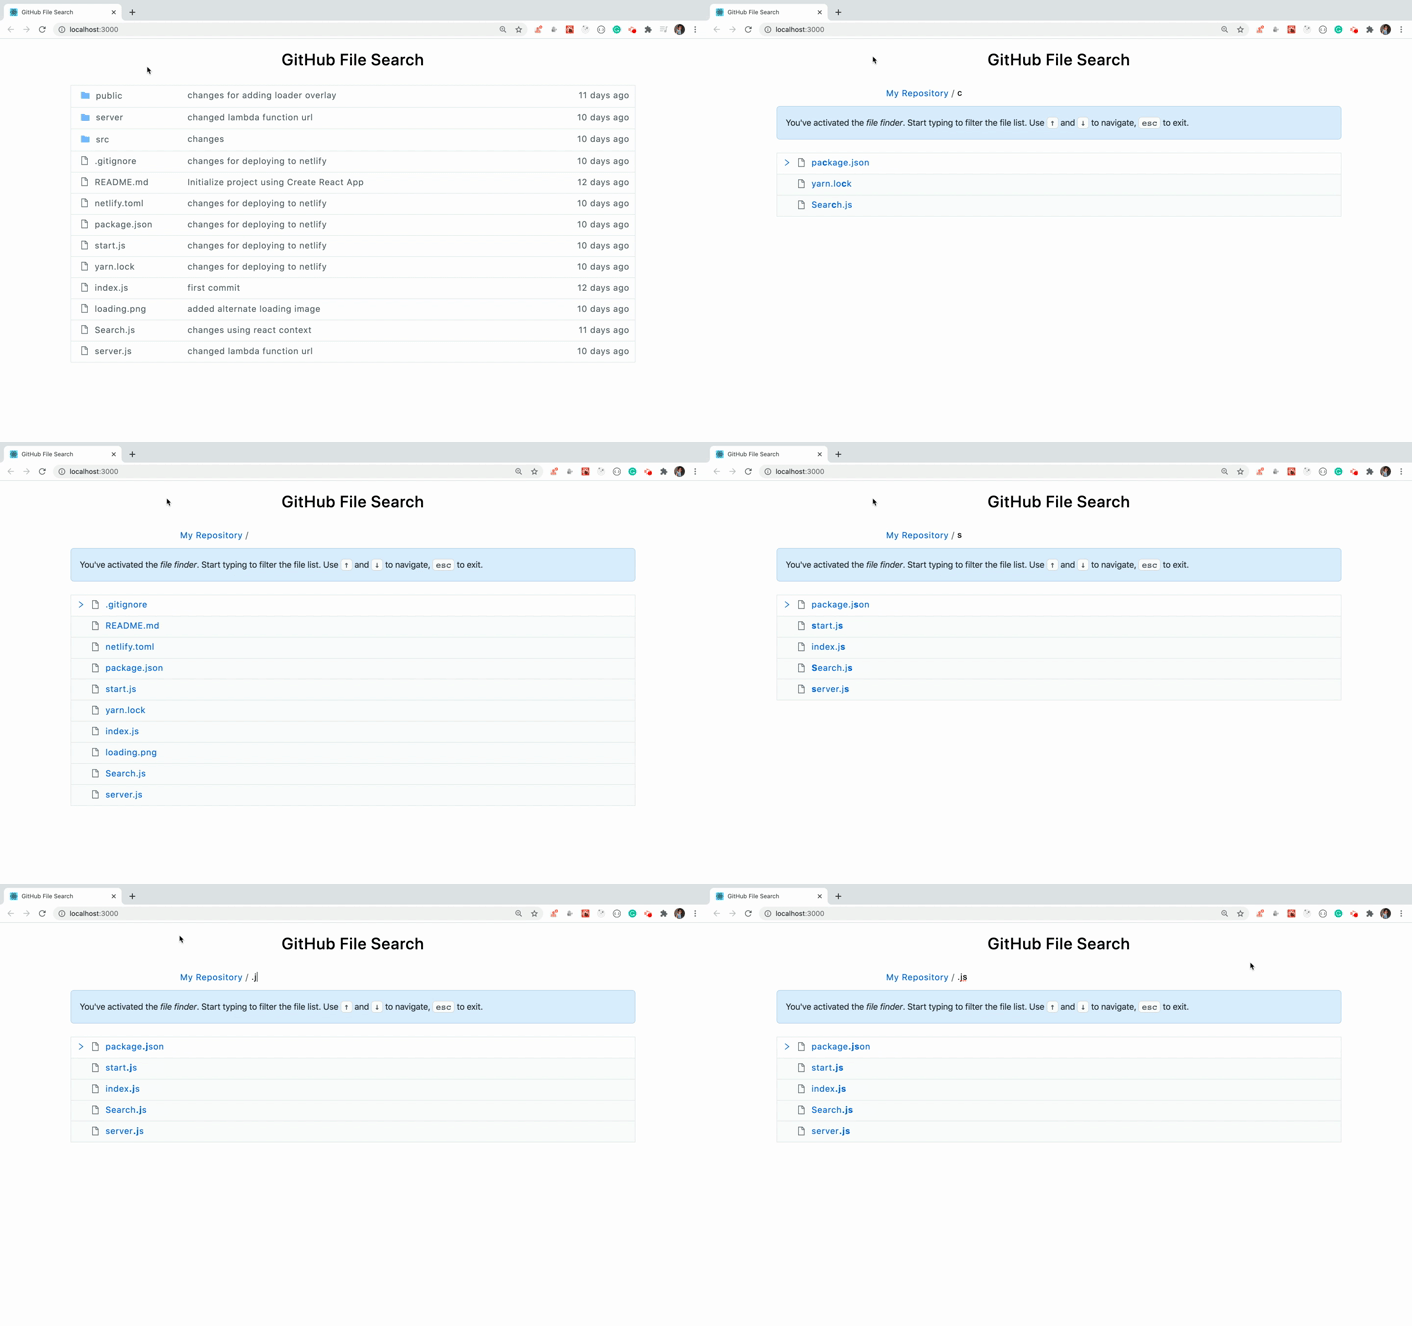
As you can see, the search term is correctly getting highlighted in the name of the file.
### Thanks for reading!
You can find the code up to this point in [this branch](https://github.com/myogeshchavan97/github-file-search-react/tree/text_highlighting).
* Complete GitHub Source Code: [here](https://github.com/myogeshchavan97/github-file-search-react)
* Live Demo: [here](https://github-file-search-react.netlify.app/)
Check out my recently published [Mastering Redux](https://master-redux.yogeshchavan.dev/) course.
In this course, you will learn:
* Basic and advanced Redux
* How to manage the complex state of array and objects
* How to use multiple reducers to manage complex redux state
* How to debug Redux application
* How to use Redux in React using react-redux library to make your app reactive.
* How to use redux-thunk library to handle async API calls and much more
and then finally we'll build a complete [food ordering app](https://www.youtube.com/watch?v=izSw74H08Bc) from scratch with stripe integration for accepting payments and deploy it to the production.
[](https://bit.ly/3w0DGum)
**Want to stay up to date with regular content regarding JavaScript, React, Node.js? [Follow me on LinkedIn](https://www.linkedin.com/in/yogesh-chavan97/).**
[](https://www.buymeacoffee.com/myogeshchavan97)
 ](https://bit.ly/3w0DGum)
**Want to stay up to date with regular content regarding JavaScript, React, Node.js? [Follow me on LinkedIn](https://www.linkedin.com/in/yogesh-chavan97/).**
[
](https://bit.ly/3w0DGum)
**Want to stay up to date with regular content regarding JavaScript, React, Node.js? [Follow me on LinkedIn](https://www.linkedin.com/in/yogesh-chavan97/).**
[ ](https://www.buymeacoffee.com/myogeshchavan97)