# How to Setup React Project From Scratch Using Webpack And Babel
React is the most loved and popular javascript library in the world for creating front end applications.
React is famous because of the following reasons.
* React’s simplicity in terms of syntax makes it a lot easier to learn for a developer who has a good working knowledge of HTML. This is one of the main factors that bring React points ahead in the React vs Angular vs Vue comparison.
* React comes with high flexibility and responsiveness.
* React uses Virtual DOM which allows making the DOM changes quickly and makes the application faster.
* React is a 100% open source library, which gets a number of everyday improvements and updates because of the contributions made by developers around the world.
The easy way of creating a react application is using a create-react-app tool created by the Facebook team. This is good to start working on React but it hides a lot of details regarding:
1. What happens under the hood
2. What configuration is needed to work with the latest features
3. How the conversion from ES6 to ES5 happens
To get an understanding of all of these, in this article we will set up webpack + Babel from scratch to work with React.
So without wasting much time, lets start with the configuration.
* Create a new folder with the name `react_starter` ( You can name anything you wish).
* Create a `package.json` file inside it by running the following command in terminal:
```js
npm init -y
```
* Install babel and the plugins required for using babel by running the following command:
```js
npm install @babel/core@7.7.4 @babel/preset-env@7.7.4 @babel/preset-react@7.7.4
```
Let’s understand what these packages do.
1. `@babel/core` — It provides basic core babel configuration
2. `@babel/preset-env` — It allows to work with the latest ES6/ES7/ES8 features
3. `@babel/preset-react` — It allows to work with react syntax which is JSX
* Create a new folder with the name `public` and create a new file `index.html` inside it with the following content:
%[https://gist.github.com/myogeshchavan97/ad8a36cbe94eec6559a8fa3af6b9c96e]
* Create a new folder `src` and a new file with the name `app.js` inside it
* Create a new file with the name `webpack.config.js` inside the `react_starter` directory and add the following content inside it:
%[https://gist.github.com/myogeshchavan97/8689b0622f5d08a07f1b383f259aec5a]
Here, we are telling webpack, what is the entry point of the application and to put the generated output file `bundle.js` inside the `public` directory.
This is how your folder structure will look like now:
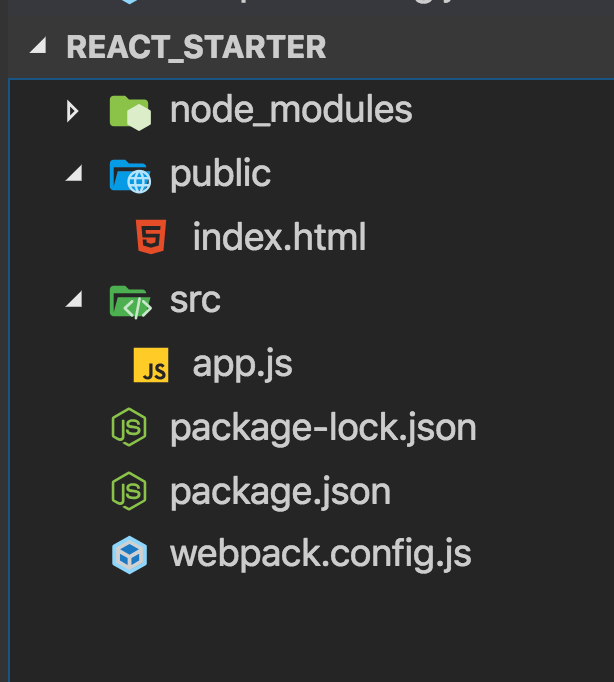
* Now install the `webpack`, `webpack-cli` and `webpack-dev-server` (which is used to serve the `public` directory and reload the changes in the browser when we make any change in the code)
Execute the following command to install it:
```js
npm install webpack@4.41.2 webpack-cli@3.3.10 webpack-dev-server@3.9.0
```
* Now to inform `webpack-dev-server` to load files from the `public` directory, add the following code in `webpack.config.js`:
```js
devServer: {
contentBase: path.join(__dirname, 'public')
}
```
Now your `webpack.config.js` file will look like this:
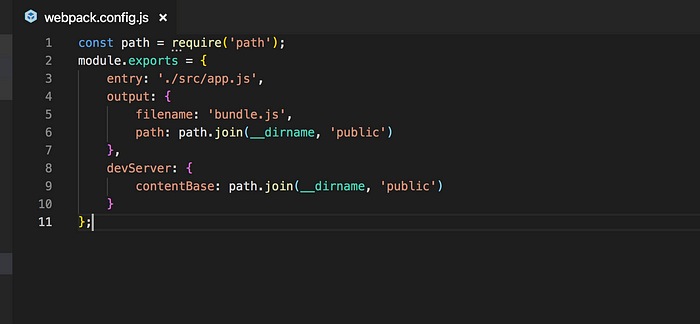
* Now to install `react`, `react-dom` and `babel-loader`, run the following command in terminal:
```js
npm install react@16.12.0 react-dom@16.12.0 babel-loader@8.0.6
```
* Now we will set up the `babel-loader` which will convert your ES6 and React code to ES5.
Add the following code in `webpack.config.js` after the output property:
```js
module: {
rules: [{
loader: 'babel-loader',
test: /\.js$/,
exclude: /node_modules/
}]
}
```
Here we are telling `babel-loader` to look for only `.js` files to convert to ES5 code but exclude the `.js` files from the `node_modules` directory.
Now your `webpack.config.js` file will look like this:
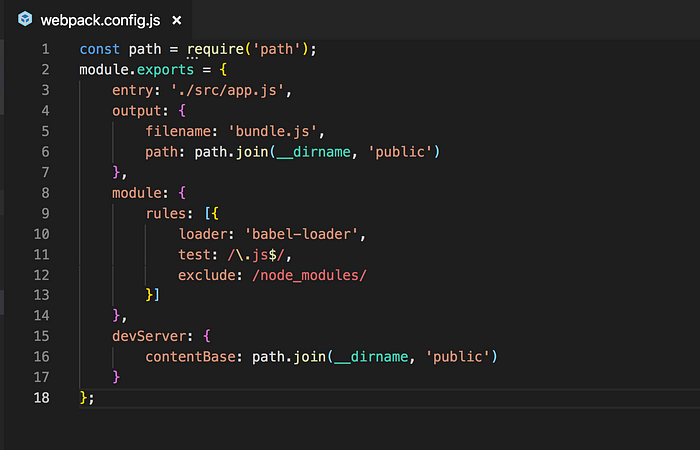
* Now create a new file with the name `.babelrc` (Note the file name starts with a dot) and add the following content inside it:
%[https://gist.github.com/myogeshchavan97/2bce1ab3f4e49b747d0885a733426c9c]
This file will tell the `babel-loader` to use `env` and `react` presets (which are just plugins) for converting ES6 to ES5 code.
Now, let’s write some React code to check the application.
Add the following content in `app.js` file which is inside the `src` directory:
%[https://gist.github.com/myogeshchavan97/fd0fcd23d4407c539e96dbf8d3e34c10]
Now to run the application, we need to make two changes:
a) Include the `bundle.js` file in `index.html` which will be generated by the webpack.
Add the following line in `index.html` after the div tag:
```js
```
So the final `index.html` will look like this:
%[https://gist.github.com/myogeshchavan97/a7a92bed3f1d9a06e916ed1abef928a7]
b) Add the following two scripts to `package.json` ( Replace the old `scripts` entry)
```js
"scripts": {
"build": "webpack",
"start": "webpack-dev-server --watch"
}
```
So the `package.json` will look like this now:
%[https://gist.github.com/myogeshchavan97/ae975ff7feedb53234c540cc71905e29]
Now to inform the webpack, that it should run in development mode (default is production mode) to speed up the build process, add the following line in `webpack.config.js` file:
```js
mode: 'development'
```
Now, your final `webpack.config.js` file will look like this:
%[https://gist.github.com/myogeshchavan97/d0a99bfef16ac3072104237ee3e55aed]
To run the application, execute the following command from the terminal
```js
npm start
```
Now navigate to [http://localhost:8080/](http://localhost:8080/) and you will see your contents from `app.js` as shown below:
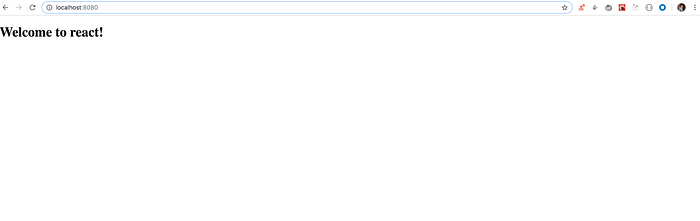
Congratulations! You have done it.
Now, try making any change in `app.js` like changing "Welcome to REACT!" to "Welcome to REACT!!" and save it, you will see that `webpack-dev-server` will automatically restart your application and you will see the changes reflected in the browser.
**Note:** `webpack-dev-server` will serve the `bundle.js` directly and will not create a local file inside the public folder to speed up the page loading.
You can manually create the `bundle.js` if required by executing the following command:
```js
npm run build
```
Note that, we have already added the `build` script previously in `package.json`.
**You can find the complete source code for this application in [this repository](https://github.com/myogeshchavan97/react_starter).**
### Thanks for reading!
Want to learn all ES6+ features in detail including let and const, promises, various promise methods, array and object destructuring, arrow functions, async/await, import and export and a whole lot more from scratch?
Check out my [Mastering Modern JavaScript](https://modernjavascript.yogeshchavan.dev/) book. This book covers all the pre-requisites for learning React and helps you to become better at JavaScript and React.
**Check out free preview contents of the book [here](https://www.freecodecamp.org/news/learn-modern-javascript/).**
Also, you can check out my **free** [Introduction to React Router](https://yogeshchavan.podia.com/react-router-introduction) course to learn React Router from scratch.
Want to stay up to date with regular content regarding JavaScript, React, Node.js? [Follow me on LinkedIn](https://www.linkedin.com/in/yogesh-chavan97/).
[ ](https://bit.ly/3w0DGum)
[
](https://bit.ly/3w0DGum)
[ ](https://www.buymeacoffee.com/myogeshchavan97)