


In this article, we will explore why refactoring from class components to React Hooks is not straightforward in certain scenarios and how to convert it efficiently.
If you’re new to React Hooks, check out my previous article here for the introduction to Hooks.
Want to learn Redux in detail and build a complete food ordering app? check out my Mastering Redux course. Following is the preview of the app, we'll be building in the course. It's a great project you can add to your portfolio/resume.
Enroll for the course at just $12 instead of $19 until 26th May as a part of pre-launch offer.
Note that, in this app, I have used INR as the currency for displaying the prices but you can easily change it to USD or AUD or any other currency with a single configuration change in the app.
Let’s get started
Take a look at the below Code Sandbox demo which uses class components.
The App.js code looks like this:
import React from "react";
import Counter from "./Counter";

export default class App extends React.Component {
  state = {
    counter: 10
  };

  handleOnChange = event => {
    this.setState({
      counter: event.target.value
    });
  };

  render() {
    const { counter } = this.state;
    return (
      <div>
        <span>Start counting from</span>
        <select
          className="dropdown"
          value={counter}
          onChange={this.handleOnChange}
        >
          <option value="5">5</option>
          <option value="10">10</option>
          <option value="15">15</option>
          <option value="20">20</option>
        </select>
        <Counter counter={counter} />
      </div>
    );
  }
}
Here, we have a countdown timer that counts down from the specified value. Also, we have a dropdown that allows us to restart the timer with different values.
In the Counter.js component file, we have added a startTimer function which we are calling when the component is mounted and also when the dropdown value changes.
startTimer = () => {
  this.interval = setInterval(() => {
    if (this.state.counter > 0) {
      this.setState(prevState => {
        return { counter: prevState.counter - 1 };
      });
    } else {
      clearInterval(this.interval);
    }
  }, 1000);
};
Let’s convert the code from the Counter.js file to use React Hooks.
Inside the Counter component, declare the state using the useState hook which takes the value from counter prop.
const [counter, setCounter] = useState(props.counter);
And add the useEffect hook to start the timer when the counter value changes.
useEffect(() => {
  const interval = setInterval(() => {
    if (counter > 0) {
      setCounter(prev => prev - 1);
    } else {
      clearInterval(interval);
    }
  }, 1000);
}, [counter]);
Here's an updated Code Sandbox Demo.
As you can see, the counter starts but it does not stop when it reaches zero value. Also, it does not count down correctly.
This is because the setInterval function inside the useEffect will be called on every 1000 milliseconds(1 second) so we need to clear the previous interval before it starts counting down again on the next interval.
useEffect(() => {
  const interval = setInterval(() => {
    if (counter > 0) {
      setCounter(prev => prev - 1);
    } else {
      clearInterval(interval);
    }
  }, 1000);

  return () => clearInterval(interval);
}, [counter]);
As you might be aware that, when we return a function from the useEffect hook, it will be executed when the component is mounted and also before running that effect again so the below code inside the useEffect will clear the interval before the useEffect is called again.
return () => clearInterval(interval);
Here's an updated Code Sandbox Demo.
As you can see the counter correctly counts down and it also stops when it reaches zero.
Now let's add the code to restart the timer when we change the dropdown value.
To do that, we will separate out the setInterval functionality into a function so we can call that on component load and also when the dropdown value changes.
const startTimer = () => {
  const interval = setInterval(() => {
    if (counter > 0) {
      setCounter(prev => prev - 1);
    } else {
      clearInterval(interval);
    }
  }, 1000);

  return () => clearInterval(interval);
};

useEffect(() => {
  startTimer();
}, [startTimer]);
Here's an updated Code Sandbox Demo.
As you can see in the above demo, after moving the code into a function, it does not work as expected, and we are getting a warning in the console.
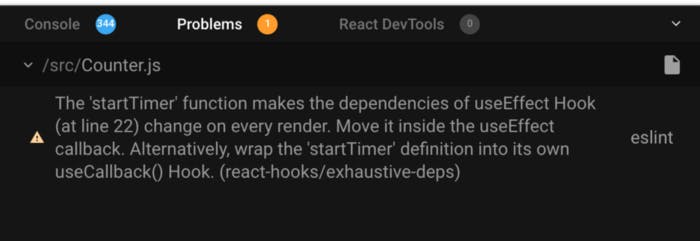
As the warning says, the startTimer function is getting executed continuously, so we need to wrap the startTimer function inside the useCallback hook.
The useCallback hook returns a memoized version of a function that will be executed only once. It also accepts the dependencies as a second parameter which works the same as the useEffect hook.
const startTimer = useCallback(() => {
  const interval = setInterval(() => {
    if (counter > 0) {
      setCounter(prev => prev - 1);
    } else {
      clearInterval(interval);
    }
  }, 1000);

  return () => clearInterval(interval);
}, [counter]);

useEffect(() => {
  startTimer();
}, [startTimer]);
Here's an updated Code Sandbox Demo.
As you can see we've wrapped the startTimer function inside the useCallback hook as suggested by the warning but the counter is still not stopping when it reaches value zero.
This is because we have specified the counter as a dependency for useCallback, so the setInterval function is getting created every time the counter changes. Also, the counter is not restarted when a dropdown value changes.
So the issue is with the counter variable as after it changes, the useCallback hook is getting called again.
So to fix that, we need a way to avoid the use of an external variable (counter in our case) inside the useEffect or useCallback hook. By avoiding the use of external variables we can minimize the number of dependencies and the effect will not run multiple times.
One way to do this is to use the updater function syntax for setting the state.
const startTimer = () => {
  setInterval(() => {
   console.log("inside startTimer");
   setCounter(prev => {
      return prev > 0 ? prev - 1 : prev;
    });
  }, 1000);
};

useEffect(() => {
  setCounter(props.counter);
  startTimer();
}, [props.counter]);
Here's a Code Sandbox Demo.
Here, inside the setCounter function, we're checking the previous value of the counter and based on that we're decrementing it by one if it's greater than zero.
As you can see, the counter is correctly getting decremented and also getting restarted when the dropdown value is changed.
Here, we are using the updater function syntax to get the previous state of the counter value and also moved the if condition inside the setCounter function so we will always get the updated value while returning a new state.
One thing you will notice is that the setInterval function is still getting called even when the counter reaches zero as can be seen in the console, so we need to clear the interval.
To do this, we need to use the useRef hook so we can access the interval timer value outside the startTimer function.
const counterRef = useRef();
useEffect(() => {
  if (counter === 0) {
    clearInterval(counterRef.current);
  }
}, [counter]);

useEffect(() => {
  clearInterval(counterRef.current);
  setCounter(props.counter);
  startTimer();
}, [props.counter]);

const startTimer = () => {
  counterRef.current = setInterval(() => {
   console.log("inside interval");
    setCounter(prev => {
      return prev > 0 ? prev - 1 : prev;
    });
  }, 1000);
};
Here's a Code Sandbox Demo.
Here, we've saved the value returned by setInterval function inside the startTimer function in the counterRef.current.
So using ref, in this case, will retain its value even after multiple re-renders of the component.
And that ref value we're using inside the first and second useEffect hook to clear the interval.
clearInterval(counterRef.current);
So now the code is working correctly and the same as our class component demo.
Thanks for reading!
Check out my recently published Mastering Redux course.
In this course, you will learn:
- Basic and advanced Redux
- How to manage the complex state of array and objects
- How to use multiple reducers to manage complex redux state
- How to debug Redux application
- How to use Redux in React using react-redux library to make your app reactive.
- How to use redux-thunk library to handle async API calls and much more
and then finally we'll build a complete food ordering app from scratch with stripe integration for accepting payments and deploy it to the production.

Want to stay up to date with regular content regarding JavaScript, React, Node.js? Follow me on LinkedIn.
